Installing the App Component
Roles Required: Admin, Splunk_System_Role, ess_admin.
You can install and configure the App and Add-On in any order. It is important to note that you will receive errors while configuring either until both App and Add-On configuration has been completed.
The installation location for the ThreatQuotient App component depends on the type of environment you are using. See the Deployment Methods chapter for further details.
- Log into your Splunk instance.
- Click on the Down arrow on the Apps menu located in the main navigation bar.
- Select the Find More Apps option.
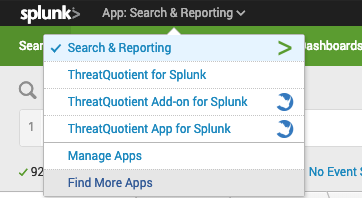
- Search for “ThreatQuotient” in the search bar.
- Select the ThreatQuotient App for Splunk option and follow the instructions to install the app.
Configuring the App Component
Roles Required: Admin, Splunk_System_Role, ess_admin.
The following instructions detail the configuration tabs that must be completed in order to finish configuring the app.
Account Tab
The Verify SSL Certificate checkbox option was removed to meet Splunk Cloud Validation requirements with version 2.6.0. See the Disabling Verify SSL Certification topic for details on disabling the Verify SSL Certificate option.
- Click on Info dropdown and select Edit App Configuration.
- Click on the Account tab.
- Enter the following parameters:
Parameter Description Authorization Type Select your authentication method. Options include: - Basic Authentication
- OAuth
Server URL Enter your ThreatQ server URL without the scheme. Username Enter your ThreatQ username. This parameter is only accessible if you have selected the
Basic Authenticationoption for the Authorization Type parameter.Password Enter your ThreatQ password. This parameter is only accessible if you have selected the
Basic Authenticationoption for the Authorization Type parameter.Client ID Enter your ThreatQ user Client ID. Client Secret Enter your ThreatQ Client Secret. See the OAuth Credentials topic for steps on generating a ThreatQ Client Secret. This parameter is only accessible if you have selected the
OAuthoption for the Authorization Type parameter.Splunk Web URL Enter the Splunk URL that will be provided in the Matched Indicators Events description in ThreatQ. The hypertext for the link will read as Splunk URL. Add Splunk Port to URL Enable this parameter to include the Splunk instance’s port number in the generated URL used in ThreatQ events.
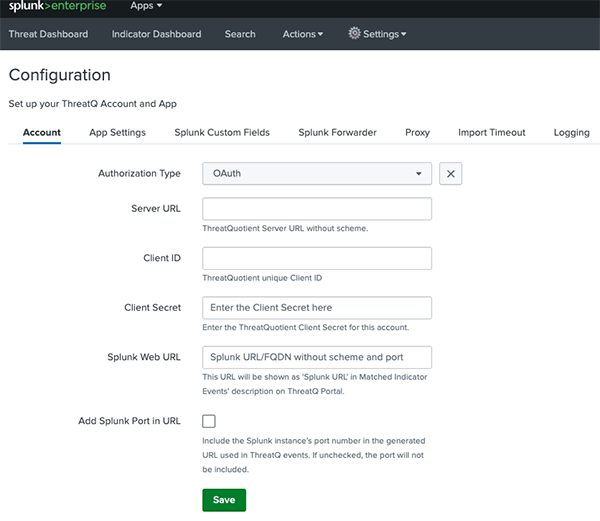
- Click on Save.
App Settings
The App Settings tab allows you to select datamodels, search matching algorithm, macro configurations.
- Click on Info dropdown and select Edit App Configuration.
- Click on the App Settings tab.
- Enter the following parameters:
Parameter Description Hostname Configuration The Hostname will be used as a Source Name when Splunk updates attributes on the ThreatQ platform. Macro Configuration ThreatQ indicators will be matched against the events from the selected indexes. Sighting Event Configuration option for event creation in ThreatQ for sighted indicators. Enable Splunk ES savedsearches Enable this option to upload ThreatQ indicators in Splunk ES Threat Intelligence Lookup. This option can be used with either Raw Search or Datamodel Search.
Search Matching Algorithm You can select from the following: - Raw Search
- Datamodel Search
- Datamodel tstats Search
At the initial setup, you do not have to select any of the modes listed above. This disables the matching algorithm completely and gives you the opportunity to determine the right scale of data your installation can handle. See the Scaling the App chapter for more details.Attempting to search too much data may result in some saved searches being skipped based on your Splunk deployment type and hardware specification.
Select Datamodels Select the datamodels to be used. Send Raw Event to ThreatQ Enable this option to send the latest raw event for the matched indicator to the ThreatQ platform. - Click on Save.
Disable Verify SSL Certification for the App
One important change that was made with the release of 2.6.0 versions of the App and Add-On was the removal of the Verify SSL Certification configuration fields in the UI. This change was made to meet Splunk Cloud Validation requirements. The steps below detail how to manually disable Verify SSL Certification, if needed.
- Open the following file:
$SPLUNK_HOME/etc/apps/ThreatQAppforSplunk/bin/threatq_const.py - Update the
VERIFY_SSLline to False.
Splunk Custom Fields
The Splunk Custom fields tab provides you with a way to configure app to export custom attributes and fields to ThreatQ.
- Click on the Splunk Custom Fields tab to set proxy settings if required.
The following parameters are available:Parameter Description ThreatQ Custom Attributes Include custom attributes that will be exported from ThreatQ using a comma-separated list. Values entered here will be treated as case-sensitive. This configuration option requires that you create a custom export. This can be achieved by making a copy of the default Splunk export and adding the required fields. Contact ThreatQ Support for further guidance on this process.
ThreatQ Custom Fields Include custom fields that will be exported from ThreatQ using a comma-separated list. Values entered here will be treated as case-sensitive except for the ID field. The ID field should be lower-case only. This configuration option requires that you create a custom export. This can be achieved by making a copy of the default Splunk export and adding the required fields. Contact ThreatQ Support for further guidance on this process.
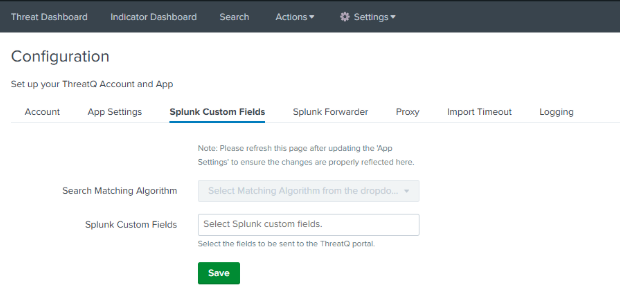
- Click on Save.
Splunk Forwarder
The Splunk Forwarder tab allows you to enter the details of the Forwarder instance if the Add-On is configured on the forwarder machine. This is required if you plan to use the Pull Indicators button on the Indicator and Threat dashboards from the App itself instead of navigating to the Forwarder machine.
Example:

- Click on the Splunk Forwarder tab.
The following parameters are available:Parameter Description Splunk Forwarder URL Use the checkbox to enable or disable the proxy. Splunk Forwarder Mgmt Port Select the type of proxy. Options include: - http
- socks4
- socks5
Splunk Forwarder Username Enter the proxy server URL. Splunk Forwarder Password Enter the proxy server port. Enable Proxy Enter the proxy server username. 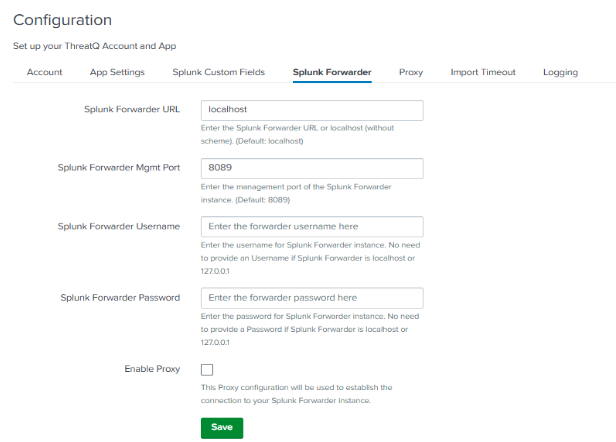
- Click on Save.
Proxy
The Proxy tab provides you with a way to configure proxy settings, if required, for the app.
- Click on the Proxy tab to set proxy settings if required.
The following parameters are available:Parameter Description Enable Use the checkbox to enable or disable the proxy. Proxy Type Select the type of proxy. Options include: - http
- socks4
- socks5
Host Enter the proxy server URL. Port Enter the proxy server port. Username Enter the proxy server username. Password Enter the password associated with the username above. Remote DNS Resolution Use this check box to enable remote DNS resolution. 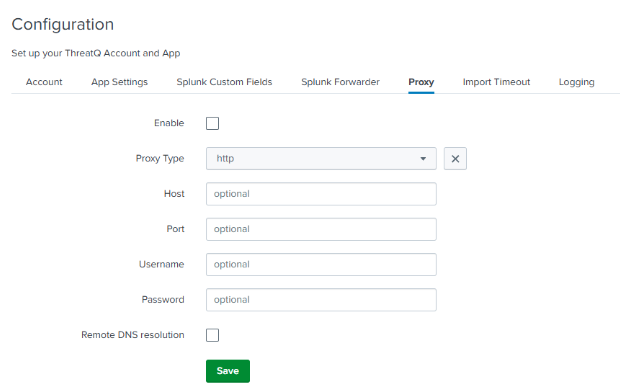
- Click on Save.
Import Timeout
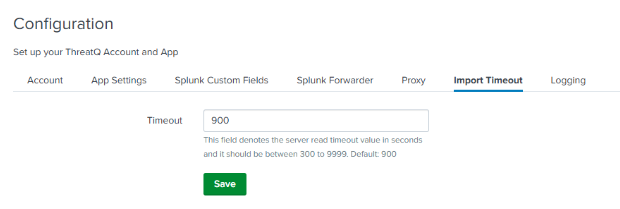
The Import Timeout tab provides you with a way to set the server read timeout setting in seconds.
- Click on the Import Timeout tab.
- Enter a value, in seconds, in the Timeout field provided.
The default value is 900 seconds. The minimum value allowed is 300 seconds. The max value allowed is 9999.
- Click on Save.
Logging
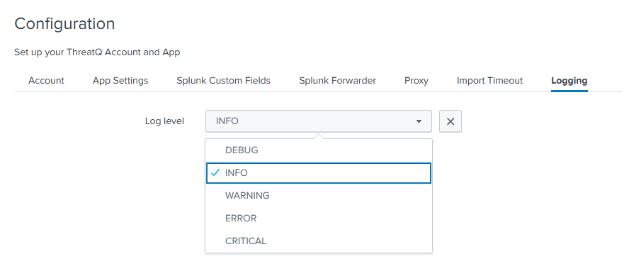
The Logging tab allows you to select the
- Click on the Logging tab.
- Use the Log Level dropdown to select the log level. Options include:
- Debug
- Info
- Warning
- Error
- Critical
- Click on Save.