About SAML Authentication
Default ThreatQ Role: Administrative or Maintenance
Custom Role - Action Permissions: Administrative Functions - Edit User Management
If SSL Client Certificate Authentication is enabled, the SAML tab displays a warning message indicating that SSL Client Certificate Authentication/CAC must be disabled before you can enable SAML.
Security Assertion Markup Language (SAML) is a single sign-on (SSO) standard that allows you to log into your ThreatQ instance using a credentials service outside of the platform.
Email addresses and passwords are authenticated outside of ThreatQ and user roles are determined using the permissions mappings located on the ThreatQ SAML configuration page.
Upon enabling SAML, users will see a SSO login option on the ThreatQ login page - see the About Accessing the Platform topic.
Users cannot use SSO to log into a ThreatQ Local Maintenance account.
AGDS Users -If you are using LDAP or SAML authentication on your Source ThreatQ instance, and require users transferred via import to have authentication capabilities on your Target ThreatQ instance, then you must enable the same authentication method on your Target ThreatQ instance prior to performing import.
SAML Support for Custom Roles
If SAML is enabled and you create a new custom role, ThreatQ sends the following notification to the Notifications menu:
- Additional SAML configurations are available due to the creation of a new role. Please map the <role name> role to a user group on the SAML settings page to complete setup.
Configuring SAML
ThreatQuotient strongly recommends that you perform a full backup before changing your authentication method.
SAML users are required to add their email address to their user profiles in order to use the SSO. As part of the integration process, the ThreatQ platform expects that the user's email address has already been added to their IdP. See the Setting Up LDAP Users/Groups for SAML topic for more details.

LDAP must be disabled before enabling SAML. The ThreatQ platform will alert you if LDAP is enabled when you try to enable SAML and will instruct you to disable LDAP.
- From the main menu, select Settings
 > User Management.
 - From the User Management page, click the SAML tab.
The SAML configuration page opens.
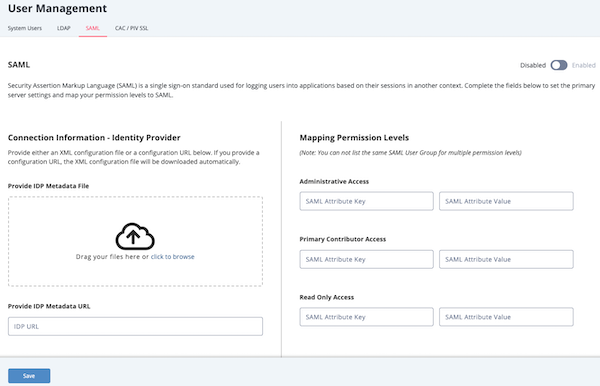
- Complete the Identity Provider (IdP) section by either:
- Uploading your IdP metadata file by dragging and dropping the file onto the field or using the browse button to locate the file saved on your local machine.
- Entering your IdP metadata file’s URL in the Provide IdP Metadata URL field.

Whichever method you choose to use will result in the auto-completion of the other field. Example: Uploading a metadata file will result in the IdP Metadata URL being populated with data parsed from the file.
- The Connection Information - Service Provider Information section gives you two options for providing your ThreatQ platform metadata to you network administrator:
- Service Provider Connection URL - Copy the URL listed in the Service Provider Connection URL field.
- Service Provider Metadata File - After you save your SAML configuration, you can download a copy of the Service Provider Metadata file from the Connection Information - Service Provider Information section as shown in the Example: After Saving Configuration image below.
Example: Before Saving Configuration

Example: After Saving Configuration

- Check the User Server Certificate and Key option under the Platform Server Certificate Information section if your environment requires a certificate. You can upload the Certificate and .key file by either:
- Drag and drop the file into the field.
- Select browse to locate the file on your local machine.
Your Network Administrator will need the certificate and key later when applying the ThreatQ platforms connection information supplied in step 4.
- Complete the Mapping Permissions Levels section by providing a SAML Attribute Key and SAML Attribute Value for each ThreatQ or custom user role. See the Setting Up LDAP Users/Groups for SAML topic for information on how to setup LDAP users and groups for SAML integration.

Mapping Notes:
- SAML cannot be used for Maintenance Accounts.
- Local Maintenance Accounts cannot be mapped when enabling SAML.
- If converting from LDAP authentication, LDAP groups that were mapped to the ThreatQ Maintenance role will have to be mapped to another user role.
- You cannot use the same SAML Key and Values for multiple roles.
- You do not have to map all ThreatQ roles but at least one role has to be mapped to use SAML. Example: Administrator and Primary Contributor will be mapped but the Read Only Access role will be blank.
- You must map every custom role before you can enable SAML.
- SAML accounts imported with the same user name and email as a local account will be converted.
- SAML cannot be used for Maintenance Accounts.
- Click on Save located at the bottom of the page.
- Confirm that your network administrator has completed Adding ThreatQ as a Service Provider before proceeding with the final steps listed below.
- Click on Test Authentication to confirm that the ThreatQ platform and your IdP can connect.
- Click on the Enable toggle switch located at the top-right of the page to enable SAML.