Adding ThreatQ as a Service Provider
ThreatQ supports SAML configurations for all identity providers that are compliant with the Security Assertion Markup Language v2.
The sections listed in this topic serve as identity provider examples and include the required steps to add ThreatQ as a service provider for your IdP. Contact ThreatQ Support if your identity provider is not listed and you require assistance with configuration.
ADFS 2016
The steps below detail how to add ThreatQ as a service provider in ADFS 2016 .
From your server manager:
- Select AD FS under the Dashboard heading.
- Click on the Tools option and select AD FS Management.
- Navigate to the Relying Party Trusts folder In the left-hand directory.
- Click on the Relying Party Trusts > Add Relying Party Trust under the Actions heading.
- Leave the Claims Aware option selected and click on Start.
The Select Data Source section loads.
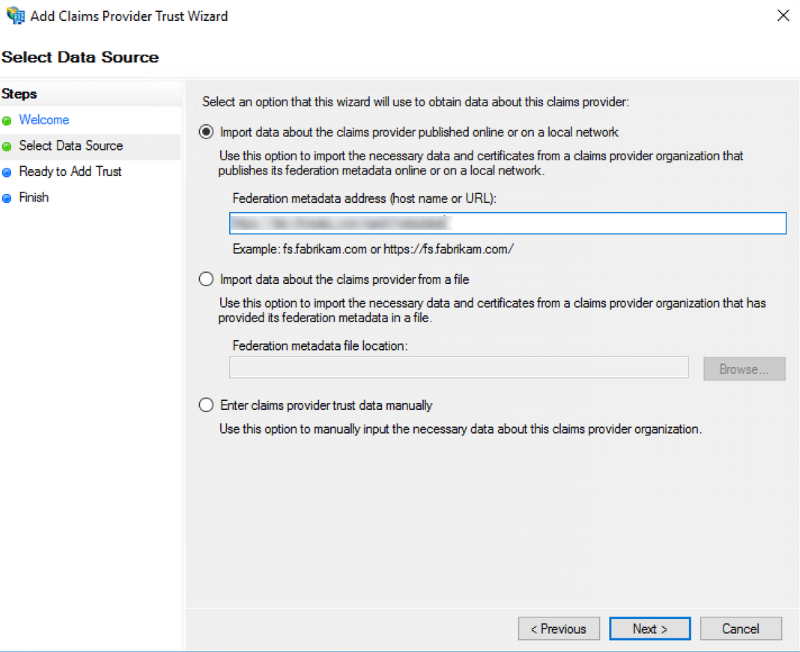
- Confirm that the first radio option, Import data about the claims provider published online..., is selected.
- Paste the Platform Connection URL located on the ThreatQ SAML page, step 4 on the Configuring SAML topic, into the Federation Metadata Address field in the following format:
https://<your IdP hostname>/FederationMetadata/2007-06/FederationMetadata.xml - Click Next.
A popup warning will appear stating that some metadata cotent was skipped.

- Click Ok to proceed.
- Continue through the next few sections by clicking Next until you reach the Ready to Add Trust page.
- Review the information listed in the multiple tabs provided. Confirm that the proper certificates are listed under the Certificate and Signature tabs and upload any that are missing.
- Click Next.
The ThreatQ Relaying Party Trust has now been added. The next step to create 4 new Claims Rules for the new service provider.
Contact your Network Administrator to receive the appropriate group mapping.
- Click on Add Rule.
- Select the Send LDAP Attribute as Claims claim rule template and click Next.
- Enter a name for the rule. Example: email and UID.
- Select the Active Directory as the Attribute Store.
Active Directory must already be installed and enabled in order to complete this step
- Add the following rows in the LDAP Mapping Attributes table:
LDAP Attribute Outgoing Claim Type Notes E-Mail-Addresses email Email-Addresses uid Email-Addresses is the recommended value.
However, you can use SAM-Account-Name as an alternative. - Click on OK to create the rule.
- Click on Add Rule.
- Select the Send LDAP Attribute as Claims claim rule template and click Next.
- Enter a name for the rule. Example: Email.
- Select the Active Directory as the Attribute Store.
- Add the following row in the LDAP Mapping Attributes table:
LDAP Attribute Outgoing Claim Type E-Mail-Addresses E-Mail Address - Click on OK to create the rule.
- Click on Add Rule.
- Select the Send LDAP Attribute as Claims claim rule template and click Next.
- Enter a name for the rule. Example: Groups.
- Select the Active Directory as the Attribute Store.
- Add the following row in the LDAP Mapping Attributes table:
LDAP Attribute Outgoing Claim Type Token-Groups - Unqualified Names SSO - Click on OK to create the rule.
- Click on Add Rule.
- Select the Transform an Incoming Claim claim rule template and click Next.
- Enter a name for the rule. Example: Named ID Transform.
- Complete the following fields:
Field Selection Incoming Claim Type E-Mail Address Outgoing Claim Type Name ID Outgoing Name ID Format Email - Select the Pass through all claim value radio option.
- Click on OK to create the rule.
- Click OK to close the Issuance Transform Rules dialog box.
Azure AD
ThreatQ supports SP-Initiated SSO in Azure AD. The steps below detail how to add ThreatQ as a service provider in Azure AD. This process is required in order to complete the SAML setup.
Setting Up the SAML App
- Log into the Azure portal with administrator permissions.
- Go to Azure Active Directory > Enterprise applications
- Click on +New Application then Create your own application.
- Choose Integrate any other application you don't find in the gallery (Non-gallery).
- Enter an application name such as ThreatQ then click Add.
- Select Set up single sign on then choose SAML.
- Select Edit on Basic SAML Configuration.
- Enter the Entity ID and Reply URL(Assertion Consumer Service URL) as follows:

Field Value Description ACS / Single Sign on URL https://threatq.example.com/api/saml/acs Assertion Consumer Service (ACS) is the ThreatQ URL + appended the “/api/saml/acs” string. SP Entity ID https://threatq.example.com/api/saml/metadata This is the ThreatQ entity ID which is the ThreatQ URL + appended with the “/api/saml/metadata” string. - Under Attributes & Claims, set the Unique User identifier (Name ID) format to Email Address.
- In the Additional claims section add uid and set the value as
user.mail.Both the username and uid attributes are required and must be mapped to the user’s Email address.

-
You also need to add an attribute you want to map to the roles in ThreatQ. In this example we added a Claim and created a Groups attribute and mapped it to all user.groups assigned to the application. The group id the user belongs to is then included in the SAML assertion upon login.

When adding a group claim it is recommended to customize name as this is what is required to be entered on the ThreatQ side as the SAML Attribute Key. This should not contain a namespace otherwise the full claim name will need to be entered - see http://schemas.xmlsoap.org/ws/2005/05/identity/claims/givenname for more information. See the example below:

In the example above, Groups would be entered as the Attribute Key in ThreatQ. The Attribute Value would be one of the Group IDs (Group Object ID) assigned to the application in Step 9.
- On the Assignments tab, verify that each of the users or groups that should have access have been assigned to the application.
- Under SAML Signing Certificate, click the Download link for the Certificate (Base64) and the Metadata file. These files are required in steps 4 and 5 in the Configuring SAML topic.

- After you complete the Configuring SAML process, add the SAML Attribute Key and SAML Attribute Value for each ThreatQ user role to the Mapping Permissions section.
In the example below, we mapped an Azure AD Group to the Administrative Access using the group’s Object ID as the SAML attribute value.

When you test the application from the Azure Portal, you will receive the following error message:
SAML authenticated but missing Client ID parameter. This happens because we do not yet support IdP-initiated SSO. You must validate the authentication from the ThreatQ application. - In the Azure Portal, you can navigate to the User Sign-Ins under the user to view the login attempts.
If your authentication is successful but you receive aSAML authenticated but missing group requirements messagethis indicates that the required attributes mapped to the TQ roles are not configured correctly.

Google G Suite
The steps below detail how to add ThreatQ as a service provider in Google's G Suite. This process is required in order to complete the SAML setup.
Setting Up the SAML App
- Log into your Google Administrative Console.
- Navigate to Apps > SAML Apps.
- Click on the + icon located at the bottom-right on the page.
- Select the Setup my own custom app option.

The Google IdP information page loads.

- Click on Next.
- Complete the Basic Information for Your Custom App fields:
>Field Description Example Application Name The name of the application. ThreatQ Description What function the app will serve. SSO for ThreatQ Platform

- Click on Next.
- Complete the Service Provider Details fields:
Field Description Example ACS URL Assertion Consumer Service is your ThreatQ URL + appended the “/api/saml/acs” string. https://threatq.example.com/api/saml/acs Entity ID The Entity ID is your ThreatQ URL + appended with the “/api/saml/metadata” string. https://threatq.example.com/api/saml/metadata Name ID Format Set this field to Email. N/A

- Click on Next.
The Attribute Mapping page loads.

- Click on Add New Mapping.
The email and uid attributes must be mapped to the Primary Email field.
- Create the email mapping:
Attribute Type Google Data Field email Basic Information Primary Email - Click on Add New Mapping.
- Create the uid mapping:
Attribute Type Google Data Field uid Basic Information Primary Email - Click on Add New Mapping:
- Create the SSOGroup mapping for ThreatQ roles:
Attribute Type Google Data Field SSOGroup Employee Details < specific to your company > Any attribute can be used for this mapping other than Employee ID. See the Creating custom attributes using the user schema Google support article for instructions on creating custom attributes to use for role mapping.
- Your setup should now resemble the following screenshot:

- Click on Finish.
- Locate your new app under Apps > SAML Apps, click on the vertical ellipsis, and select On for Everyone.
- Click on the app to open its settings details.
- Click on Service Provider Details.
The Service Provider Details page opens.

- Click on Manage Certificates.
- Download the certificate and the IdP Metadata files that are required in steps 4 and 5 in the Configuring SAML section in the About SAML Authentication topic.
Okta
The steps below detail how to add ThreatQ as a service provider in Okta. This process is required in order to complete the SAML setup.
- Log into the Okta web application.
- Click on the Admin button located to the top-right of the screen.
The Dashboard page loads. - Click on the Applications tab.
The Application page loads. - Click on Add Application.
- The Add Applications page loads.
- Click on Create New App.
The Create New Application dialog box opens. - Select Web from the Platform dropdown.
- Select SAML 2.0 for the Sign on method.
- Click on the Create button.
The Create SAML Integration page opens with the General Settings tab selected. - Enter a name for the app in the App Name field.
- Click on Next.
The Configure SAML section loads. - Complete the following fields:

Field Entry/Selection Notes Single sign on URL https://< Host-name >.com/api/saml/acs The Assertion Consumer Service (ACS) is your ThreatQ URL + appended the “/api/saml/acs” string. Audience URI
(SP Entity ID)https://< Host-name >/api/saml/metadata The Audience URI is your ThreatQ URL + appended with the “/api/saml/metadata” string. Name ID format EmailAddress Application username Email ThreatQ requires that this field be set to Email. - Scroll down to the Attribute Statements section and add the following attribute:

Name Name Format Value uid Unspecified user.email - Add the required attributes to the Group Attribute Statements that will be used to map Okta groups to ThreatQ user roles. In the example image below, an attribute called SSORole was created and is mapped to all Okta group names that starts with TQ.

See Okta's Custom Expression help article for additional information on assigning an attribute.
- Click on Preview the SAML Assertion to confirm that the settings are correct.
- Click on Next.
The Feedback section loads.
- Select I'm a software vendor. I'd like to integrate my app with Okta and then click on Finish.
The Application details page loads.
- Click on the Assignments tab.
- Click on the Assign dropdown and select Assign to Groups.
- Assign the app to groups that will be used to map ThreatQ roles.
- Click on Save and Go Back.
- Click on Done.
- Click on the Sign On tab.
- In the Sign On Methods section, right-click and download the Identity Provider metadata file.
- Click on the View Setup Instructions button.
You will be able to review URL information such as the Identity Provider Single Sign-On URL, Identity Provider Issuer, and the X.509 Certificate.
- Click on Download Certificate. The certificate and Identity Provider metadata file downloaded in step 23 are required in steps 4 and 5 in the Configuring SAML section of the About SAML Authentication topic.