Indicator Statuses Management
Default ThreatQ Role: Administrative, Maintenance, or Primary Contributor
Custom Role - Action Permissions: Objects & Context - Manage Object Statuses
The Indicator Statuses page allows you to view, duplicate, add, edit, and delete available system-wide indicator statuses. You cannot edit or delete indicator statuses provided by ThreatQ (Active, Expired, Indirect, Review, Whitelisted), but you can add, edit, and delete your custom statuses.
Indicator Status Assignment
Multiple factors affect the indicators created from the relations on an individual object in a request. When using API/Indicators/Consume, each individual object in the request JSON is an indicator, and each indicator can have additional indicator relations stored under an indicators field in that object. As a result, the status of an indicator depends on the configuration of the request JSON.
Indirect Indicator Status
When you set up a default status of Indirect, the system assigns this status to indicators in the following scenarios:
- A status or status_id field is not provided for the parent object.
- A status or status ID is not provided for the additional indicator relations of the object.
- The JSON request body includes duplicate indicators and one of the duplicates has a default status ID. If none of the duplicates has a default status ID, the system uses the status ID of the last duplicate.
Currently, the Indirect Indicator status only applies to IOCs related to a main indicator.
Protected Indicator Statuses
When doing insertions, ThreatQ determines if the indicator already exists and the Indicator status is a protected status, If so, the system retains the status.
Viewing Indicator Statuses
-
Navigate to Settings
 > Object Management.
The Object Management page opens to the Indicator Statuses tab.
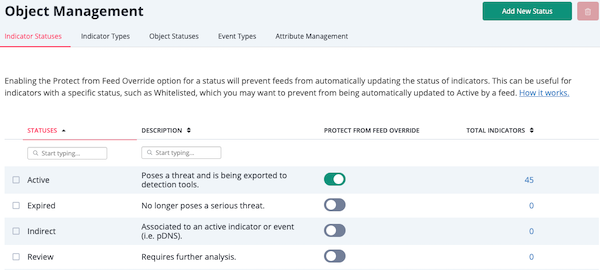
Statuses found within ThreatQ are listed by status, number, and description within the Indicator Statuses table.
- Optionally, to sort the table by a column, click the column header. To reverse the column sorting order, click the header a second time.
Indicator Statuses Table Functions:
| Function | Description |
|---|---|
| Status Filter | Enter a keyword in the text field to filter the table by status name. You can click on the Statuses header to sort the table by alphabetical order. |
| Description Filter | Enter a keyword in the text field to filter the table by status description. You can click on the Description header to sort the table by alphabetical order. |
| Protect from Feed Override | Clicking on the toggle switch in this column will enable/disable the Protect from Feed Override option for that status. See the Suppressing Indicator Status Updates section below for more details on this feature. |
| Total Indicators | The number of indicators currently using the status. Clicking on the value will open the Threat Library filtered to that status. Clicking on the Total Indicators heading will sort the table in ascending/descending order. |
Suppressing Indicator Status Updates
Enabling the Protect from Override option for a status, prevents feeds from automatically updating indicators with this status to another. Any status with a green toggle switch is currently protected from status updates. Those with grey toggle switches are not.
Use Case: You have a well-vetted set of whitelisted indicators that you do not want to update without internal review and discussion. To protect these indicators from automatic status updates from feeds, toggle the Protect from Feed Override switch for the Whitelisted status to green (active). After you make this change, ThreatQ retains the status of Whitelisted for any indicator to which it is assigned and suppresses any updated status information received from a feed.
- Navigate to Settings > Object Management.
The Object Management page opens to the Indicator Statuses tab.
- In the Protect From Feed Override column, click the toggle switch corresponding to the status to change it from grey (status updates allowed) to green (status updates suppressed).
Adding an Indicator Status
- Navigate to Settings > Object Management.
The Object Management page opens to the Indicator Statuses tab.
- Click Add New Status.
The Add a Status dialog box opens.

- Enter a Status Name.
- Optionally, enter a Status Description.
- Click Add Status.
Editing an Indicator Status
You cannot edit an indicator status provided by ThreatQ.
- Navigate to Settings > Object Management.
The Object Management page opens to the Indicator Statuses tab.
- Determine the indicator you want to edit and click Edit in the far right column.
The Edit Status dialog box opens.

- Optionally, enter a new Status Name.
- Optionally, enter a new Status Description.
- Click Save Changes.
Deleting an Indicator Status
You cannot delete indicator statuses provided by ThreatQ. Custom statuses can only be deleted if there are no indicators using that status.
- Navigate to Settings > Object Management.
The Object Management page opens to the Indicator Statuses tab.
- Determine the indicator you want to delete and select the corresponding checkbox in the first column.
- Click the Delete icon in the upper right hand corner.
A confirmation dialog box appears.

- Click Delete Statuses.