Managing Exports
Default ThreatQ Role: Administrative or Maintenance
Custom Role - Action Permissions Role: Administrative Functions - Edit Exports
You should NOT attempt to export all of your threat intelligence data with a single export. Attempting to do so will cause system degradation and the export will not complete.
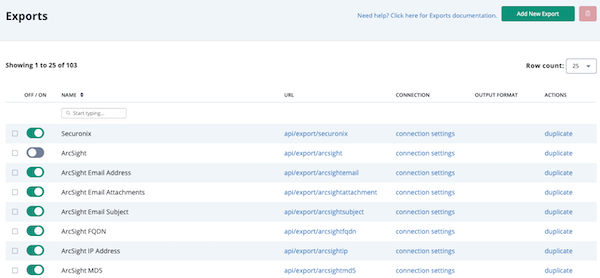
The Exports page lists all existing exports in ascending, alphabetical order by export name. You can easily identify active exports by the green toggle in the Off/On column. In addition, all seeded exports have a blank Output Format field and all exports created in your instance, have an output format link.
To customized the Export page display, you can change the number of rows displayed from the default of 25 to 10, 50, or 100. You can change the sort order to descending alphabetical by clicking the Name column.
Tips and Tricks
- Use the seeded exports or output format template examples provided by ThreatQuotient as building blocks for new exports.
- Give each new export a descriptive name.
- In some instances, you may need to stop the export log process. ThreatQ provides a CLI configuration command that allows you to disable export logging.
Accessing the Exports List
- Select the Settings
 icon >Exports.
The Exports page lists all exports in alphabetical order. Active exports display a green toggle in the Off/On column.
Viewing an Export
- From the Exports page, click the export's URL.
A new tab opens in your browser and displays the data returned from the export. By default, this tab displays up to ten objects. To increase the number of objects included in your export, you can update the limit value in the export's URL.Original URL - Default 10 Objects:
https://te-28440.threatq.com/api/export/b98c62268ac80754e3e0e774afafc639/?limit=10&token=49vx259akYhOgvaJ2Fa8
New URL - 300 Objects:
https://te-28440.threatq.com/api/export/b98c62268ac80754e3e0e774afafc639/?limit=300&token=49vx259akYhOgvaJ2Fa8The load time may be lengthy depending on the amount of data returned.
Enabling/Disabling Exports
- From the Exports page, locate the export you want to enable/disable.
- Click the toggle in the On/Off column to enable/disable the export.
Adding an Export
- From the Exports page, click the Add New Export button.
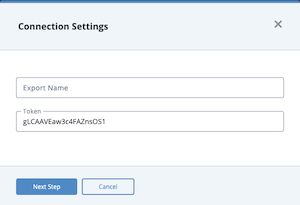
The Connection Settings window opens.

- Enter the export name.
- Verify or edit the token.
- Click the Next Step button.
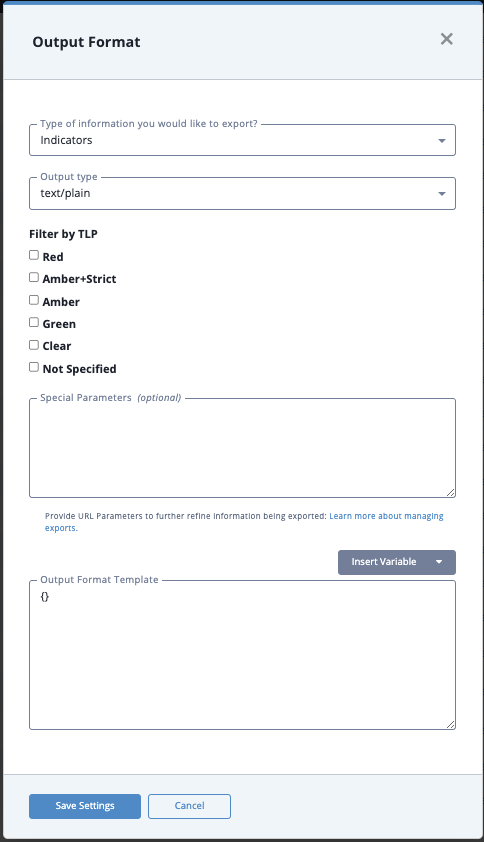
The Output Format dialog box opens.

- Populate the following fields:
Field Value Which type of information
would you like to export?This field defaults to a value of Indicators. Click the field to select from a list of object types. Output Type Select a format for the export such as text/plain or text/json. This sets the content type of the export response to a specific value (e.g. text/plain, text/json). Output Type does not have an impact on how the data is formatted but it does affect the content type within the header of the exported document.
For example, if you select Output Type of text/json, when viewing the source of the export, the header will contain a Content Type = text/json attribute.
See http://www.w3.org/Protocols/rfc1341/4_Content-Type.html for more information.Filter by TLP (Optional) By default, all the TLP filter options are checked so that your export includes all objects regardless of their source, attribute source, or description source TLP labels. To exclude objects with a particular TLP label, you can uncheck the box to the left of the label name. For example, to omit objects with sources assigned a Red TLP label, uncheck the Red box. The Filter by TLP field options will only appear if administrators have enabled Traffic Light Protocol (TLP) viewing. See the Traffic Light Protocol (TLP) topic for more information.
Special Parameters (Optional) See the Output Format Options topic for more information. Output Format Template (Optional) See the Output Format Templates topic for more information. - Click Save Settings.
The export you just created appears at the bottom of the Exports table. By default, the new export is toggled to Off. - To begin exporting data, click the export's Off/On toggle to On.
Duplicating an Export
Duplicating an export creates a new version that you can edit.
- From the Exports page, locate the Export you want to duplicate.
- Click the duplicate option in the Actions column.
The duplicate appears at the bottom of the Exports table. By default, the copy you just created is toggled to Off.
Editing an Export's Connection Settings
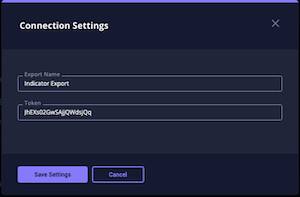
Connection settings are available for each of the exports. The Connection Settings window contains the name of the export as well as the token you need to connecting a device to ThreatQ.
While you cannot edit or delete any of the exports originally supplied by ThreatQ, you can edit exports you have added to ThreatQ or copies of the original exports.
- From the Exports page, locate the export you want to edit.
- Click connection settings in the Connection column.
The Connection Settings window opens.
- Enter your changes.
- Click the Save Settings button.
Editing an Export's Output Format
While you cannot edit or delete any of the exports originally supplied by ThreatQ, you can edit exports you have added to ThreatQ as well as copies of the original exports.
- From the Exports page, locate the export you want to edit.
- Click output format in the Output Format column.
- From the Output Format window, enter your changes.
-
Click the Save Settings button.
Deleting an Export
While you cannot delete any of the exports included with your ThreatQ installation, you can delete any exports you have added or copies of the default exports.
- From the Exports page, locate the export(s) you wish to delete.
- For each export you want to delete, check the box next to the export's off/on toggle.
- Click the delete icon next to the Add New Export button.