Data Retention Policy
Default ThreatQ Role: Administrative, Maintenance, or Primary Contributor
Custom Role - Action Permissions: Data Controls - Edit Data Retention Policy
The ThreatQuotient team strongly recommends that you disable your DRP when making changes to an associated data collection and then reviewing the Calculate Impact option before re-enabling DRP to prevent the unintended deletion of system objects. See the Data Retention Policy Bug product alert for more details. It is also recommend that you perform a backup of your ThreatQ instance before implementing a Data Retention Policy.
Setting up a Data Retention Policy allows you to automatically delete system objects from the Threat Library using a data collection to specify the criteria for deletion.
Similar to the bulk delete process, the Data Retention Policy does not support the deletion of tasks or files.
When ThreatQ applies the Data Retention Policy, it runs a bulk delete job to delete all objects included in the data collection. For example, you can create a data collection that captures all Indicators with an expiration date older than fifteen days ago. When you add this data collection to your Data Retention Policy, a Retention Policy job runs each day that deletes indicators with expiration dates prior to fifteen days ago.
After you enable your data retention policy, ThreatQ provides updates on the associated object deletions through system notifications and the Job Management page.
Tips and Tricks
- If you assign an unshared data collection to the data retention policy, all users are automatically granted view-only permissions for the data collection.
- If you disable the data retention policy, the Policy Activity & Performance graph continues to track created objects.
Accessing the Data Retention Policy Page
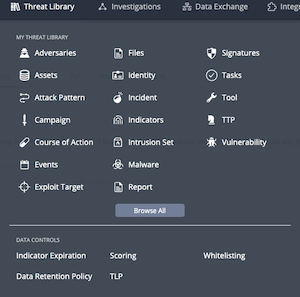
From the navigation menu, click on Threat Library and select Data Retention Policy under the Data Controls heading.

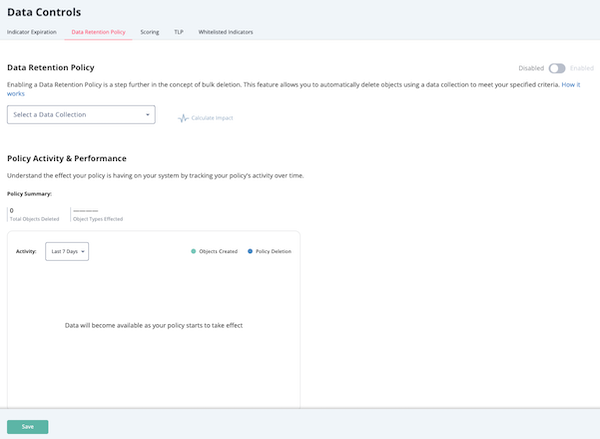
The Data Controls page is displayed with the Data Retention Policy tab selected.

Creating a Data Collection for the Data Retention Policy
Before you create a Data Retention Policy, you must create/select the data collection that used to identify the system objects to be deleted during the Policy's scheduled run. We recommend you apply the following guidelines in creating a Data Collection for use by your Data Retention Policy:
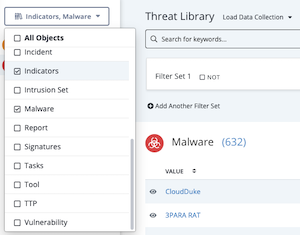
- To restrict your Data Retention Policy to specific object types, use the object type filter on the left side of the main Threat Library page to specify the object types for your data collection.

- Since your Data Retention Policy cannot delete tasks or files, your data collection should not include these system objects.
- If you assign an unshared data collection to the data retention policy, all users are automatically granted view-only permissions for the data collection.
See the Managing Search Results topic for step-by-step instructions on creating a data collection.
Creating a Data Retention Policy
- Create a data collection that includes the system objects you want to delete.
- In the Data Retention Policy tab, click the Select a Data Collection field to locate and select the data collection you created in step 1.
The drop-down list for this field displays all the data collections that are shared with you as well as the ones you own.
- Click the Calculate Impact option to view how many objects will be removed during the initial application of the data retention policy.
- To save the data collection you selected without enabling the data retention policy, click the Save button.
If the data collection is in use in another area such as a dashboard, the Are You Sure? window prompts you to click the Save button to confirm your action.
To enable the data retention policy with the data collection you selected, move the Disabled/Enabled toggle to Enabled. - After you enable the data retention policy:
- The system creates and begins processing the first job to apply the data retention policy you configured.
- You receive a notification center message reminding you that you can monitor the progress of the job from the Job Management page where it is listed with a Job Type of Retention Policy.
To view the notification center message, you must refresh your browser.
- After the initial job is complete, the system creates and runs a job for the data retention policy each day at 12 AM UTC. After the daily job run, the Policy & Activity Performance graph reflects the objects deleted by the data retention policy.
Reviewing Data Retention Policy Performance
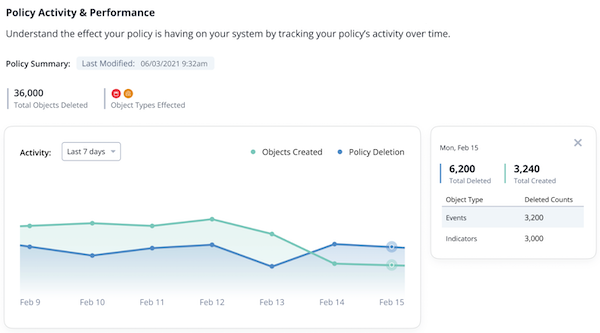
The Policy Activity & Impact section of the Data Retention Policy page displays a line chart that represents objects deleted by the data retention policy and objects created. By default, the Policy Activity & Performance section displays the last 7 days of activity. You can change the date range displayed by clicking the Activity field and selecting Monthly or Yearly. You can click a point on the graph to view object details for a specific day such as the total objects deleted, total objects created, and deletion counts by object type.
Chart Updates
The object data displayed in the Policy Activity & Impact chart during the day is cached data reflecting the most recent objects created and policy deletion update processes:
- Objects Created - Updates at 8 AM UTC and reflects the objects created from 12 AM UTC of the prior day until 12 AM UTC of the current day.
- Policy Deletion - Updates after each 12 AM UTC processing of the Data Retention Policy and reflects the policy deletions since the last 12 AM UTC process.
When you update your data retention policy, the line chart does not reflect your updates until the next objects created and policy deletion processes complete.
