Installing an Air Gapped ThreatQ Instance
ThreatQuotient supports the deployment of ThreatQ version 6 on an air gapped device. An air gapped device can be defined as a device situated in a location with no or limited public network access.
The standard steps for installing ThreatQ require network access to the ThreatQ repositories to download and install the platform. In an air gapped instance, where the device cannot make that connection, you must download required files from a network-connected device and then transfer those files to the targeted air gapped device. The process is the same when it comes to upgrading an air gapped device.
This document will provide you with the requirements, recommended settings, and the steps for installing a new instance of ThreatQ version 6 on a device in an air gapped environment.
ThreatQuotient recommends you install the most recent version of ThreatQ 6x for your upgrade.
Operating System and Kubernetes Distribution Maintenance
After upgrading to ThreatQ 6x, customers are responsible for maintaining their RHEL or Ubuntu operating system as well as the RKE2 Kubernetes distribution.
ThreatQ currently supports RHEL 8.10, 9.4, or 9.6, Ubuntu 22.04 LTS, and the latest, stable RKE2 version. Before updating to a different version, please contact ThreatQuotient Support to confirm compatibility.
Supported Hardening Standards by Operating System
ThreatQ v6 supports the following hardening standards for RHEL 8.10, RHEL 9.4, RHEL 9.6, and Ubuntu 22.04 LTS:
| RHEL 8.10 |
RHEL 9.4 |
RHEL 9.6 |
Ubuntu 22.04 LTS |
|
|---|---|---|---|---|
| CIS Level 1 | X | ✔ | X | X |
| CIS Level 2 | X | ✔ | X | X |
| STIG | ✔ | ✔ | ✔ | X |
See the ThreatQ v6 RHEL v9 Hardening guide for more information on implementing CIS Level 1, CIS Level 2, and STIG hardening standards in a RHEL 9.4 or 9.6 environment.
Security Technical Implementation Guide (STIG) Installs
This installation guide includes STIG Install Notes to assist customers performing a STIG install of ThreatQ 6x on RHEL 8.10 , 9.4, or 9.6 instances.
Prerequisites
Review the following requirements before attempting to install the ThreatQ platform on your air gapped device.
System Requirements
Before you begin a ThreatQ install, you must disable any security endpoint tools running on your VM as this may cause the installation to fail.
For the best performance, your system should meet the following requirements. Failing to meet the minimum system requirements can cause serious platform degradation and loss of functionality.
- Ubuntu 22.04 LTS or Red Hat Enterprise Linux (RHEL) 8.10, 9.4, or 9.6 instance that meets ThreatQ System Requirements and is configured to use UTC as the time zone standard.
- The latest stable RKE2 version. See the steps below for information on installing and configuring RKE2.
- The following packages must be installed on your system:
bash-completion curl gnupg python3 tmux wget zstd
In addition, software-properties-common is required for Ubuntu. The container-selinux and iptables packages are required for RHEL. - Your ThreatQ license key.
- Your ThreatQ YUM credentials.
- A static IP address assigned to the new Ubuntu or RHEL instance.
- Firewall access to the following ports:
ThreatQ Appliance PortsSource Destination Port Port Use All of the workstations that will be used by security analysts ThreatQ 443 Open for ThreatQ UI (HTTPS / TLS) Workstations that will access remotely ThreatQ ThreatQ 22 Secure shell access. Open for shell access by administrators All of the workstations that will be used by security analysts ThreatQ 80 Redirects to 443 to ensure TLS is used TAXII Clients ThreatQ 5910 Used by the embedded TAXII server Other TQX subscribers ThreatQ Publisher 8883 Used by ThreatQ Exchange (TQX) Broker (opendxl-broker). The port is used for TQX communication. This is the subscriber's incoming connection port
ThreatQ v6 BYOD Partitioning Overview
For BYOD 6x installations, we require the following partition scheme to obtain the best ThreatQ experience.
Specific Sizes Overview
Use the following in the event that your organization requires specific sizes:
| File System | Size | Notes |
|---|---|---|
| / | 50GB | N/A |
| /var | 120GB/200GB | 200GB is the recommended size if there are no other partitions under /var. 120GB is the recommended size if there are separate log and tmp partitions under /var. Images are stored in /var in addition to the locations listed below. See the breakdown of the individual locations within /var in the Specific Size Breakdown table below. |
| /opt | >=600GB | The majority of resources should be dedicated to this location. MYSQL and SOLR utilize this mount point. A minimum of 600GB to several TBs is required for optimal performance. |
Specific Size Breakdown
The following is a more detailed break down of specific sizes (listed on the overview table above):
| File System | Size | Notes |
|---|---|---|
| /boot | 1GB | N/A |
| /home | 20GB | N/A |
| /tmp | 20GB | N/A |
| /var/tmp | 5GB |
|
| /var/log | 50GB | All container logs are written to this location. You can increase the size if needed.
|
| /var/log/audit | 20GB |
|
| / | >=680GB | All remaining resources should be dedicated to this location. |
Dedicated Mount /opt
Use the following sizing, in addition to the Specific Size Breakdown table, if you are required to create a dedicated mount for /opt.
| File System | Size | Notes |
|---|---|---|
| / | 250GB | N/A |
| /opt | >=600GB | The majority of resources should be dedicated to this location. A minimum of 600GB to several TBs is required for optimal performance. |
Before You Begin
Before setting up your new environment, installing ThreatQ 6x, and migrating your ThreatQ 5x data, we recommend the following preparation:
- Create a non-root user for the new ThreatQ 6x environment.
- Determine if you want to use the default IP range for K8s on the new 6x instance or a custom IP range.
- Make sure your YUM credentials are easily accessible. If you do not have them, please reach out to ThreatQ Support.
The following install steps must be completed using a non-root user account.
Set up Your Ubuntu or RHEL Environment
- Provision a new amd64 Ubuntu 22.04 LTS or RHEL 8.10, 9.4, or 9.6 instance that meets ThreatQ system requirements.
Deployment Size Typical Usage Required Hardware Specifications Minimum Instance Size for AWS Deployment <2M Indicators Development or PoC (small) - 4-8 Core CPUs
- 64GB RAM
- 800GB of provisioned storage
r6i.2xlarge 2 - 10M Indicators Medium Production - 8-16 Core CPUs
- 128GB RAM
- 800GB of provisioned storage
r6i.4xlarge >10M Indicators Large Production - 16-32 Core CPUs
- 256GB RAM
- 2TB of provisioned storage
r6i.8xlarge - Run the following command to set the maximum number of inotify instances for the installing user to 300.
If the inotify instance maximum is already configured for your system, this command will overwrite any existing value with a value of 300.
sudo sed -i '/^fs\.inotify\.max_user_instances/d' /etc/sysctl.conf && printf "fs.inotify.max_user_instances = 300\n" | sudo tee -a /etc/sysctl.conf >/dev/null && sudo sysctl -p
Pin Your RHEL 9 Version
The following steps allow you to pin your current RHEL 9 release so that you cannot inadvertently upgrade your RHEL 9 environment to an unsupported release. See the Red Hat Enterprise Linux 9 Support section for more information on currently supported RHEL 9 versions.
Run the following commands as root or prefix them with sudo.
- Set release to minor version:
- subscription-manager release --set=<release number>
- Clean repositories:
- yum clean all
- Check which release is set locally:
- subscription-manager release --show
Pin Your Ubuntu 22.04 Version
ThreatQ recommends you update the release-upgrades file to disable manual Ubuntu upgrades so that you cannot inadvertently upgrade your Ubuntu 22.04 environment to an unsupported release.
- Use a text editor, such as vi, to access
/etc/update-manager/release-upgrades. - Change the
Prompt=setting toPrompt=never. - Save your changes and exit the file.
Configure Internal Networking
With the default configuration, changing the hostname or external IP address of a Kubernetes system can cause unrecoverable errors that require a complete reinstall to resolve. All these commands must be run with root permissions.
- Create a virtual network interface using an IP address that does not exist on a local subnet.
For Ubuntu:sudo tee /etc/netplan/99-k8s-dummy.yaml <<EOF > /dev/null
network:
version: 2
bridges:
dummy0:
interfaces: []
addresses: [ "<dummy IP>/32" ]
EOF
sudo chmod 0600 /etc/netplan/*.yaml
sudo netplan applyYou may receive a warning message. You can ignore this message and proceed to the next step.
For RHEL:sudo nmcli connection add type dummy ifname dummy0 ipv4.method manual ipv4.addresses <dummy IP>/32 ipv6.method disabled - Add an entry to the /etc/hosts file mapping the IP address of the dummy network interface to a simple hostname like “node”.
Example:echo '<dummy IP> node' | sudo tee -a /etc/hosts
Prepare the RKE2 Configuration File
- Add a configuration file for RKE2 before installing it so it takes effect when building the initial configuration. This will force the system to use the dummy IP address and hostname for the Kubernetes node, leaving you free to change your system's external IP address and hostname.
sudo mkdir -p /etc/rancher/rke2Example:
sudo tee /etc/rancher/rke2/config.yaml <<EOF > /dev/null
node-name: node
node-ip: <dummy IP>
node-external-ip: <dummy IP>
EOFsudo mkdir -p /etc/rancher/rke2
sudo tee /etc/rancher/rke2/config.yaml <<EOF > /dev/null
node-name: node
node-ip: 192.168.199.1
node-external-ip: 192.168.199.1
EOFFurther steps require additional changes to the configuration file, so be careful not to overwrite the file if it already exists.
- For RHEL only, enable SElinux in the rke2 config file:
echo "selinux: true" | sudo tee -a /etc/rancher/rke2/config.yaml > /dev/null
- You must configure RKE2 to disable the default ingress module before installing in an air gapped environment. Failure to do so will result in the ThreatQ installation hanging later.
sudo tee -a /etc/rancher/rke2/config.yaml <<EOF> /dev/null
disable:
- rke2-ingress-nginx
EOF
Change the Kubernetes Subnet (Optional)
By default, RKE2 uses the 10.42.0.0/15 subnet for container and service networking. If that subnet is used for your local network, you may want to configure RKE2 to use a different subnet.
See the RKE2 server configuration options for cluster-cidr, service-cidr, and cluster-dns.ptional.
Set Up kubectl
- Run the following command to add RKE2 and associated utilities:
sudo tee /etc/profile.d/rke2.sh <<EOF > /dev/null
export PATH="\$PATH:/var/lib/rancher/rke2/bin"
EOF
source /etc/profile.d/rke2.shDuring the installation of RKE2, restart the host system right after you enable the rke2-server.service and before you start it.
- Install RKE2 as a Server Node on a systemd-based system using the steps in the RKE2 Air-Gap Install guide.
If you are using RKE2 on a RHEL system with SElinux enabled you MUST install the rke2-selinux package prior to starting the rke2-server service. This is done automatically if RKE2 is installed via RPM but NOT if it is installed via tarball.
Verify Your RKE2 Installation
The following steps must be completed using a non-root user account.
- After the RKE2 installation is complete, copy the RKE2 kubeconfig file to your home directory and set the appropriate permissions. This enhances security by restricting access to the kubeconfig file.
Example:mkdir -p ~/.kube
sudo cp /etc/rancher/rke2/rke2.yaml ~/.kube/config
sudo chmod 600 ~/.kube/config
sudo chown "$(id -un)":"$(id -ng)" ~/.kube/config - Run the following command to check the status of your pods:
kubectl get pods -AExample - Successful Output:

Air Gapped Installation
The following steps will walk you through how to download all necessary files and install ThreatQ on an air gapped device.
- Use the following link format to download the appropriate ThreatQ install tarball:
You will be prompted to enter your YUM credentials.
STIG Install Note:
Download ThreatQ from another system. FIPS will not allow you to download ThreatQ. After you download ThreatQ from another system, copy it to the /root/ directory.https://install-v6.threatq.com/<version>-platform.tar.gzYou can also download the tarball using a curl command:curl https://<YUM_USER>:<YUM_PASSWORD>@install-v6.threatq.com/<version>-platform.tar.gz -O - Download the tqadmin file.
STIG Install Note:
Ubuntu:
Download TQAdmin from another system. FIPS will not allow you to download TQAdmin. After you download TQAdmin from another system, copy it to the /root/ directory.curl -fO -u <YUM_USER> https://install-v6.threatq.com/tqadmin.debRHEL:curl -fO -u <YUM_USER> https://install-v6.threatq.com/tqadmin.rpm - Open the CLI of the device you will install ThreatQ on and copy the install tarball and tqadmin package to /root using the SCP client of your choice.
- Return to the CLI of the device and confirm that the install tarball and tqadmin package are present.
- Install TQAdmin:
STIG and RHEL 8.10 Install Note:
Ubuntu:
For STIG installs and for non-STIG RHEL 8.10 installs, append--nodigestto the end of the TQAdmin install command.sudo dpkg -i tqadmin.debRHEL:sudo rpm -Uvh tqadmin.rpm - For RHEL installs, run the following command to install iptables:
RHEL:sudo dnf install iptables-nft - Run the following command to provision your deployment:
sudo /usr/local/bin/tqadmin configure
Prompt Description Do you want to enable OpenDXL (TQX)? (yes/no) Enter yes to enable ThreatQ Data Exchange's OpenDXL functionality. Enter no to disable this functionality. Do you want to enable the embedded TAXII server? (yes/no) Enter yes to enable ThreatQ Data Exchange's TAXII server functionality. Enter no to disable this functionality. Do you want to use your own SSL certificate? (yes/no) Enter yes to configure a custom SSL certification (not self-signed). Enter the file path for your certificate Enter the path for your SSL certificate.
example: /etc/threatq-certs/mycert.pemEnter the file path for your private key Enter the path for the SSL certificate's private key.
example: /etc/threatq-certs/mykey.pemDo you want to enable CAC/mTLS? (yes/no) Enter yes to configure SSL Client Certificate Authentication. Enter the file path for your certificate Enter the path for your CA Certificate.
example: /etc/threatq-certs/mycert.pemEnter the FQDN of the server Enter the FQDN of the server.
example: myserver.threatq.comEnable syslog audit log output? Enter yes to access the following configuration prompts: - Enter the hostname or IP address of the syslog server to send audit log messages:
- Enter the port number on the syslog server for audit log messages (default 514):
- Enable TLS with a client certificate for the syslog server? - If you enter yes for this prompt, TQAdmin displays the following three prompts.
- Enter the full path to the client certificate file:
- Enter the full path to the client private key file:
- Enter the path to the trusted root CA certificate for the syslog server (leave empty to disable certificate validation):
STIG Install Notes:
Running thetqadmin platform installcommand may take longer than fifteen minutes and as such may trigger the timeout interval required by STIG. To prevent process interruption, a user will need to press the spacebar prior to each timeout. If this is not an option, you can use the following command to increase the timeout interval:
RHEL 9.6:sudo sed -i 's/=600/=60000/g' /etc/systemd/logind.conf
RHEL 9.4:sudo sed -i 's/=600/=60000/g' /etc/profile.d/tmout.sh
RHEL 8.10:
sudo sed -i 's/600/60000/g' /etc/ssh/sshd_config; sudo systemctl restart sshd.service
After you run this command, you must log out and log back in. After you complete the install process, run the following command to reinstate the timeout interval:
RHEL 9.6:sudo sed -i 's/=60000/=600/g' /etc/systemd/logind.conf
RHEL 9.4:sudo sed -i 's/=60000/=600/g' /etc/profile.d/tmout.sh
RHEL 8.10:
sudo sed -i 's/60000/600/g' /etc/ssh/sshd_config; sudo systemctl restart sshd.service - Run the following command to Install ThreatQ. You will be prompted for the location of the platform bundle if it is not in /root.
sudo /usr/local/bin/tqadmin platform install -v <ThreatQ version> -z
STIG Install Note:
If you disabled the fifteen minute timeout, after the TQAdmin install completes, run the following command to reinstate the timeout interval:
RHEL 9.6:sudo sed -i 's/=60000/=600/g' /etc/systemd/logind.conf
RHEL 9.4:sudo sed -i 's/=60000/=600/g' /etc/profile.d/tmout.sh
RHEL 8.10:
sudo sed -i 's/60000/600/g' /etc/ssh/sshd_config; sudo systemctl restart sshd.service - Run the following command to generate the initial password for the ThreatQ Admin user (username = admin):
sudo /usr/local/bin/tqadmin password
- To verify your ThreatQ installation, check the status of the pods and services in your Kubernetes cluster.
kubectl get pods -A
kubectl get svc -A - List the ThreatQ pods:
kubectl get pods -n threatq
Access Your New ThreatQ 6x Instance
- Connect to the ThreatQ web interface, using the IP/hostname given during the installation.
- Add the license key provided by ThreatQ Support.
- Use the username admin and the password you generated.
- Accept the EULA.
- Opt in or out of sending analytics.
The following steps are for installing ThreatQ v5 in an air gapped environment.
Introduction
ThreatQuotient supports the deployment of ThreatQ version 5 on an air gapped device. An air gapped device can be defined as a device situated in a location with no or limited public network access.
The standard steps for installing ThreatQ require network access to the ThreatQ repositories to download and install the platform. In an air gapped instance, where the device cannot make that connection, you must download required files from a network-connected device and then transfer those files to the targeted air gapped device. The process is the same when it comes to upgrading an air gapped device.
This document will provide you with the requirements, recommended settings, and the steps for installing a new instance of ThreatQ version 5 on a device in an air gapped environment.
Throughout this guide, you will see commands with $ and # characters. $ identifies commands that can be run as any user while # identifies commands that must be run as root.
Warnings
ThreatQuotient supports bring your own device (BYOD) air gapped installations of ThreatQ.
Review the following warnings to ensure the success of your installation and to optimize your use of the application:
- After you install ThreatQ, it must be treated as an appliance. As such, you should not enable custom repos, install custom packages, or manually upgrade packages to unsupported versions since these changes may have a negative impact on performance.
- Using repositories other than ThreatQ's to install or upgrade your instance is not supported and may result in package conflicts during the install/upgrade process. ThreatQuotient recommends that you disable all repositories other than ThreatQ.
- For the ThreatQ platform to function optimally, EFI should be disabled because it is not supported.
Prerequisites
Review the following requirements before attempting to install the ThreatQ platform on your air gapped device.
Recommended Settings per Deployment Size
Your system must meet the following requirements:
| Deployment Size | Typical Usage | Recommended Settings |
|---|---|---|
| < 2M indicators | Development or PoC (Small) |
|
| 2 - 10M indicators | Medium Production |
|
| > 10M indicators | Large Production |
|
Minimum Screen Resolution
For ThreatQ to display properly, set your screen resolution to at least 1024 x 768 pixels.
System Requirements
For the best performance, your system should meet the following requirements. Failing to meet the minimum system requirements can cause serious platform degradation and loss of functionality.
Before you begin, confirm that you have the following:
- A functional CentOS/RHEL 7.2 or later minimal install (7.2 to 7.9 minimal)
- ThreatQ version 5 tarball package - steps to download this package are included in the Installation chapter.
- ThreatQuotient 5 install script (
tqadmin) - steps to download this package are included in the Installation chapter. - Customer configuration (RPM username and password)
- System time standard set to UTC.
Amazon Web Services (AWS) Guidelines
If you are using AWS for your installation, we recommend using an r5 instance family of at least a size matching the Recommended Settings per Deployment Size .
Partitioning
The following is recommend for your partitioning scheme to attain the best ThreatQ experience:
| Filesystem | Size | Used | Available | Use % | Mounted on |
|---|---|---|---|---|---|
| /dev/mapper/Vol Group00-LogVol00 |
1.9T | 66G | 1.8T | 4% | / |
| devtmpfs | 63G | 0 | 63G | 0% | /dev |
| tmpfs | 63G | 0 | 63G | 0% | /dev/shm |
| tmpfs | 63G | 17M | 63G | 1% | /run |
| tmpfs | 63G | 0 | 63G | 0% | /sys/fs/cgroup |
| /dev/sda1 | 244M | 164M | 80M | 68% | /boot |
| tmpfs | 13G | 0 | 13G | 0% | /run/user/1002 |
Pre-installation
Before running the installation script, double-check the following system Timezone and SELinux configuration settings:
Timezone
The system time standard must be set to UTC.
If not, change where the /etc/localtime symlink points.
# ln -s /usr/share/zoneinfo/UTC /etc/localtime
SELinux
SELinux must be enabled. You can check this with the sestatus command.
SELinux status: |
enabled |
SELinuxfs mount: |
/sys/fs/selinux |
SELinux root directory: |
/etc/selinux |
Loaded policy name: |
targeted |
Current mode: |
permissive |
Mode from config file: |
disabled |
Policy MLS status: |
enabled |
Policy deny_unknown status: |
allowed |
Max kernel policy version: |
28 |
If SELinux is not enabled, enable it by editing the config file in the SELinux root directory as output by sestatus.
You are not required to change the SELINUX=line in the configuration file to SELINUX=permissive. However, the install process changes this value to permissive and resets it to the original value during the first boot process.
After this configuration change, you must reboot the system.
Root Password Requirements
You need to load your configuration into the environment prior to installing ThreatQ.
# export CUSTOMER_PASSWORD='your password'
Air Gapped Installation
The following steps will walk you through how to download all necessary files and install ThreatQ on an air gapped device.
- Log into https://install.threatq.com/ using your YUM credentials.
- Locate and download the appropriate ThreatQ install tarball.
File Name Format:
<version>-platform.tar.gz
Example:
5.6.1-platform.tar.gz
You can also download the tarball using a curl command:curl https://<YUM_USER>:<YUM_PASSWORD>@install.threatq.com/<version>-platform.tar.gz -o <version>-platform.tar.gz - Open the CLI of the device you will install ThreatQ on and copy the install tarball to
/root/using the SCP client of your choice. - Return to the CLI of the device and confirm that the install tarball is present.
- Use the following curl command to download dependencies for the TQAdmin yum package:
# curl https://vault.centos.org/7.9.2009/os/x86_64/Packages/bash-completion-2.1-8.el7.noarch.rpm -o bash-completion-2.1-8.el7.noarch.rpm
- Log into https://download.threatq.com/ using your YUM credentials.
- Download the
tqadmin.rpmfile.You can also download the rpm using a curl command:
curl https://download.threatq.com/tqadmin.rpm -o tqadmin.rpm - Open the CLI of the device you will install ThreatQ on and copy the
tqadmin.rpmfile to/root/using the SCP client of your choice. - Run the following command to install TQAdmin on the air gapped device:
yum localinstall <path to tqadmin rpm>
- Log into the air gapped device as a root user.
- Run the following command to install ThreatQ on the air gapped device:
tqadmin platform install -v <release number> -zExample:
tqadmin platform install -v 5.6.1 -z
The install process will look for the install tarball in the
/root/location. If the file is not in that location, you are prompted to enter the absolute path of the tarball. - Navigate to your instance in a web browser after the install process has completed.
The Welcome ThreatQ page will load.
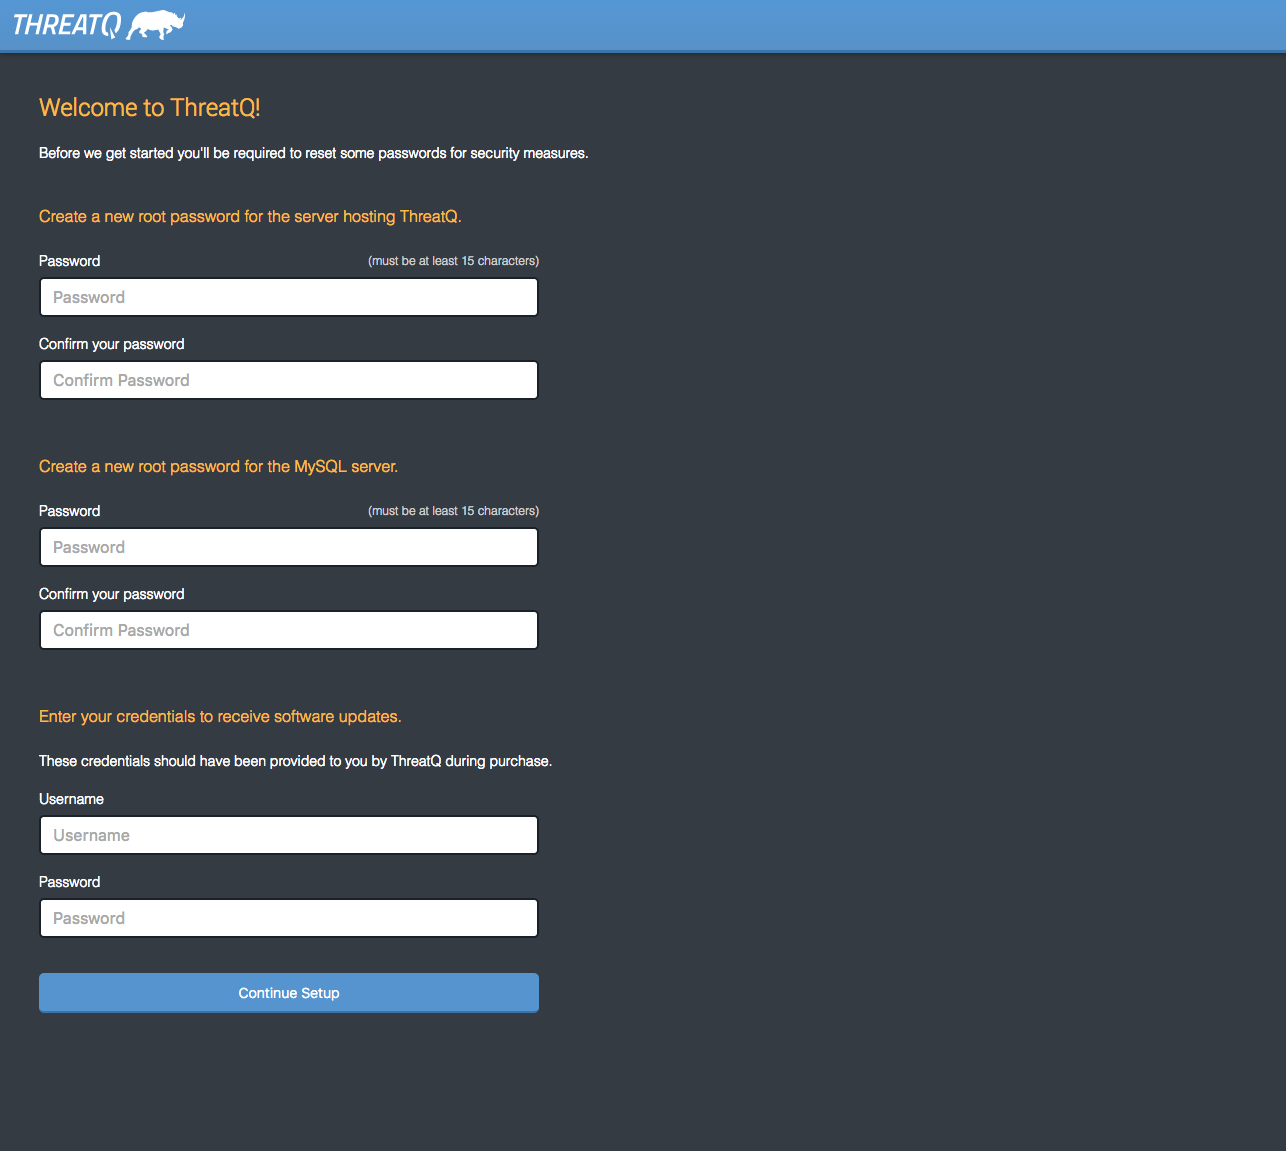
- Create a new Password for the server hosting ThreatQ.
- Create a new Password for the MySQL server.
- Enter your YUM credentials (username and password).
- Click on Continue Setup.
The Initial Admin User page will load.
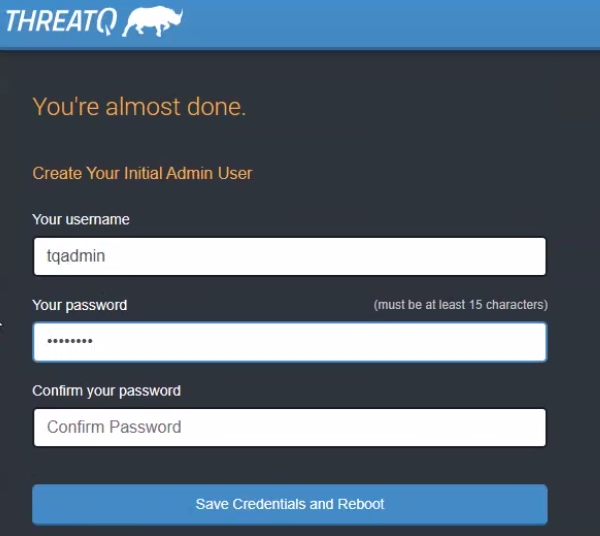
- Create your initial Admin account for the ThreatQ platform by providing a email address and password. This account will serve as your Maintenance account.
- Click on Save Credentials and Reboot ThreatQ.
The server will reboot. It may take up to 10 minutes for the server to complete this process.
- Refresh the page or navigate back to the ThreatQ instance after the reboot process has completed. You will be prompted for a license key.
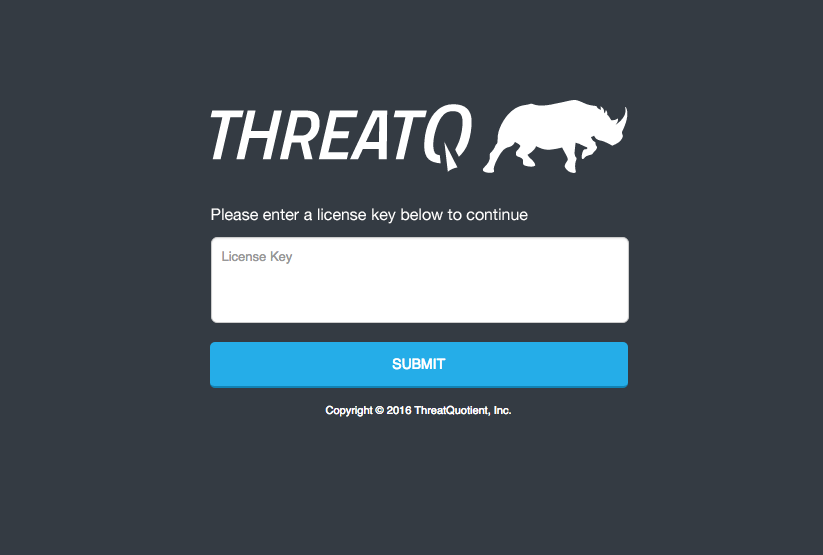
- Enter your License Key and click on Submit.
Your license key is included in your Welcome Letter from ThreatQ Support.
- Log in with the credentials you created in step 16.
- Accept the End User License Agreement (EULA).
- Opt in/out for Product Analytics and then click the Submit button.
Configuring Network Connectivity
Configuring network connectivity for your ThreatQ environment may include some or all of the following processes:
- Converting to a Static IP Address
- Setting the Network Timing Protocol (NTP)
- Setting Up Your Proxy Server
The following steps must be performed as the root user or via sudo.
Converting to a Static IP Address
- Run the network configuration utility from the command line:
# nmtui-edit - Select the appropriate network interface in the left column.
- Press Tab to move the cursor to the Edit option and press Enter.

- Press Tab to move the cursor to <Show> for the protocol (IPv4 or IPv6) that you wish to configure:

- Enter the desired network configuration information.
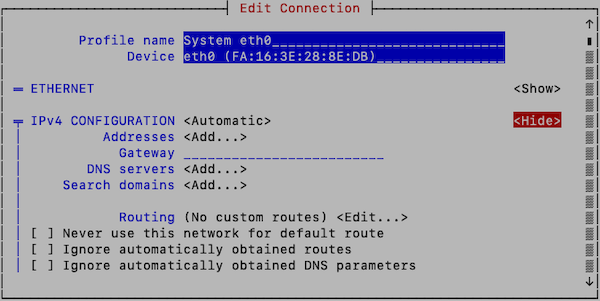
- Tab to <OK> and press Enter.
This returns you to the main page. - Tab to <Quit> to close the tool.
- Enter the following command to restart networking:
# systemctl restart network
Networking configuration should now be complete. You can verify network configuration by running the
ip addrcommand.
Configuring chrony as a Network Timing Protocol (NTP) Client
In Linux systems, the chronyd daemon provided by the chrony package is the default NTP client. By default, chronyd uses an NTP.org pool as the time source. You can update the server or pool option in the /etc/chrony.conf file to specify a single NTP (server) or pool of NTP servers (pool) as the time source.
- Enter the following command to access the NTP configuration file:
vi /etc/chrony.conf
- To specify a single NTP sever as your time source, add the following lines to the chrony configuration file, replacing <ntp server> with your preferred NTP server.
server <NTP server> iburstTo specify a pool of NTP servers as your time source, add the following lines to the chrony configuration file, replacing <ntp server pool> with your preferred NTP server pool.pool <NTP server pool> iburst
- Save your changes.
- For your changes to take affect you must reboot or use the following command to restart chronyd:
systemctl restart chronyd
Setting Up Your Proxy Server
-
SSH into your ThreatQ instance.
-
Open the environment file using the vi command:
vi /etc/environment -
Press the i character to enter insert mode. Enter your following entry into the file while replacing the placeholders with your information. These settings are case-sensitive so you must include both the lowercase, ex: http, and uppercase, ex: HTTP, versions.
You can add exceptions to the no_proxy strings to prevent specific entries that should not be forwarded to the proxy. The minimal value for no_proxy should be the loopback IP address and "localhost" plus the TQ entry for itself "threatq". Do not use CIDR notation or wildcards with no_proxy entries as they are not accepted formats. In that situation, list the IP addresses.
If Proxy Server Requires a Password
http_proxy=http://<username>:<password>@<Proxy IP>:<Proxy Port>
HTTP_PROXY=http://<username>:<password>@<Proxy IP>:<Proxy Port>
https_proxy=http://<username>:<password>@<Proxy IP>:<Proxy Port>
HTTPS_PROXY=http://<username>:<password>@<Proxy IP>:<Proxy Port>
no_proxy=localhost,127.0.0.1,threatq,<ThreatQ IP>, <ThreatQ Hostname>
NO_PROXY=localhost,127.0.0.1,threatq,<ThreatQ IP>, <ThreatQ Hostname>If Proxy Server Does Not Require a Password
http_proxy=http://<Proxy IP>:<Proxy Port>
HTTP_PROXY=http://<Proxy IP>:<Proxy Port>
https_proxy=http://<Proxy IP>:<Proxy Port>
HTTPS_PROXY=http://<Proxy IP>:<Proxy Port>
no_proxy=localhost,127.0.0.1,threatq,<ThreatQ IP>, <ThreatQ Hostname>
NO_PROXY=localhost,127.0.0.1,threatq,<ThreatQ IP>, <ThreatQ Hostname> -
Press the ESC key and enter the following command to close the editor:
:wq <Enter Key>The next several steps will show you how to ensure that custom connector CRON jobs are able to use the proxy settings. This is achieved by sourcing the environment script so that it is available to all child sessions and applications.
-
Open the proxy.sh file using the vi command:
vi /etc/profile.d/proxy.sh -
Press the i key to enter Insert mode and enter the following lines:
set -a
source /etc/environment
set +a
This will ensure the automatic export of any variables created.
-
Press the ESC key and enter the following command to close the editor:
:wq <Enter Key> -
Log out of your session and then log back in.
-
Run the following command to confirm your settings:
printenv | grep -i proxy -
Remove any other proxy-related files from the
/etc/profile.ddirectory.
Upgrading
Perform the following steps to upgrade an air gapped ThreatQ instance.
- Log into https://install.threatq.com/ using your YUM credentials.
- Locate and download the appropriate air gap upgrade file.
File Name Format:
<version>-platform.tar.gz
Example:
5.6.1-platform.tar.gzYou can also download the upgrade tarball using a curl command:
curl https:// : @install.threatq.com/ <version>-platform.tar.gz -o <version>-platform.tar.gz - Open the CLI of the device to upgrade and copy the upgrade file to
/root/using the SCP client of your choice. - Return to the CLI of the device and confirm that the upgrade file is present.
- Log into the air gapped box as a root user.
- Run the following command to upgrade the air gapped box:
tqadmin platform upgrade -v <release number> -zExample:
tqadmin platform upgrade -v 5.6.1 -z
The upgrade process will look for the upgrade tarball in the
/root/location. If the file is not in that location, you are prompted to enter the absolute path of the tarball.
FIPS 140-2 Compliance
The Federal Information Processing Standard (FIPS) 140-2 Security Requirements for Cryptographic Modules was issued by the National Institute of Standards and Technology (NIST) in May, 2001, and is the Federal standard for proper cryptography for computer systems purchased by the government and was issued. The standard specifies the security requirements for cryptographic modules utilized within a security system that protects sensitive or valuable data.
Utilizing the FIPS 140-2 validated crypto module ensures that the crypto algorithms used are deemed appropriate and perform the encrypt/decrypt/hash functions in accordance to the NIST standard.The requirements can be found in the following documents:
- Security Requirements for Crytographic Modules
- Annex A: Approved Security Functions for FIPS PUB 140-2, Security Requirements for Cryptographic Modules
ThreatQ FIPS 140-2 Compliance
ThreatQuotient complies with FIPS 140-2, which defines the technical requirements to be used by Federal Agencies when these organizations specify cryptographic-based security systems for protection of sensitive or valuable data.
The compliance of ThreatQ with FIPS 140-2 is ensured by:
- Integrating validated and NIST-certified third party cryptographic module(s), and using the module(s) as the only provider(s) of cryptographic services;
- Using FIPS-approved cryptographic functions;
- Using FIPS-approved and NIST-validated technologies applicable for ThreatQ design, implementation and operation.
Modes of Operation
The ThreatQ platform operates in one of two modes, as determined by the OS configuration.
TLS
All the ThreatQ platform communications can be secured with FIPS-compliant Transport Layer Security TLS1.2 or higher, which relies on FIPS 140-2 approved hash algorithms and ciphers.
- TLS handshake, key negotiation and authentication provides data integrity and uses secure hash and FIPS 140-2 approved cryptography and digital signature.
- TLS encryption of data in transit provides confidentiality and makes use of FIPS 140-2 approved cryptography.
Enabling FIPS Mode
ThreatQ conforms with FIPS 140-2 Level 1 compliance by dynamically linking to the FIPS 140-2 approved OpenSSL cryptographic module provided by the Operating System, which is currently the Red Hat Enterprise Linux 7 OpenSSL Module.
The ThreatQ platform can be configured to operate in FIPS-Compliant Mode to ensure its functions and procedures that require cryptography (secure hash, encryption, digital signatures etc.), such as SSL/TLS connections, makes use of the crypto services provided by Red Hat Enterprise 7 OpenSSL Module v3.0, which is validated for FIPS 140-2.
The assurance that ThreatQ is using the right FIPS 140-2 encryption modules is managed at the operating system level by CentOS implementation.
ThreatQ checks the OS level flag setting /proc/sys/crypto/fips_enabled to kick off ThreatQ’s FIPS mode installation.
You can enable FIPS Mode in your ThreatQ environment manually or via script. Links to both methods can be found below.
| Method | Steps Reference |
|---|---|
| Manual Configuration | https://access.redhat.com/documentation/en-us/red_hat_enterprise_linux/7/html/security_guide/chap-federal_standards_and_regulations#sec-Enabling-FIPS-Mode |
| enableFIPS Script | https://access.redhat.com/discussions/3487481 |
Change Log
Version numbers assigned to the change log entries below indicate document versions and not ThreatQ platform versions.
- Version 1.04.
- Added instructions for adding dependencies for TQAdmin.
- Version 1.0.3
- Updated Time standard requirements.
- Version 1.0.2
- Updated the Proxy setup commands.
- Version 1.0.1
- Updated the Setting Up Your Proxy Server chapter.
- Updated the Setting the Network Timing Protocol (NTP) chapter.
- Version 1.0.0
- Initial Release