Building a Workflow
Default ThreatQ Role: Administrative or Maintenance
Custom Role - Action Permissions: See the TQO Requirements topic.
The workflow builder allows you to create your own workflows using data collections and installed TQO Actions, which are available on the ThreatQ Marketplace.
Transcript: TEXT
Footage from ThreatQ Version 5.25.0
Manually Triggered Workflows do not require a set data collection as the data is selected from the Threat Library. In the event that a workflow with a set data collection is selected as the Manually Triggered Workflow, the object or Threat Library selection will be used instead of the set data collection.
- Navigate to the ThreatQ Orchestrator page.
- Click the Add Workflow button.

The Add Workflow dialog window will open.
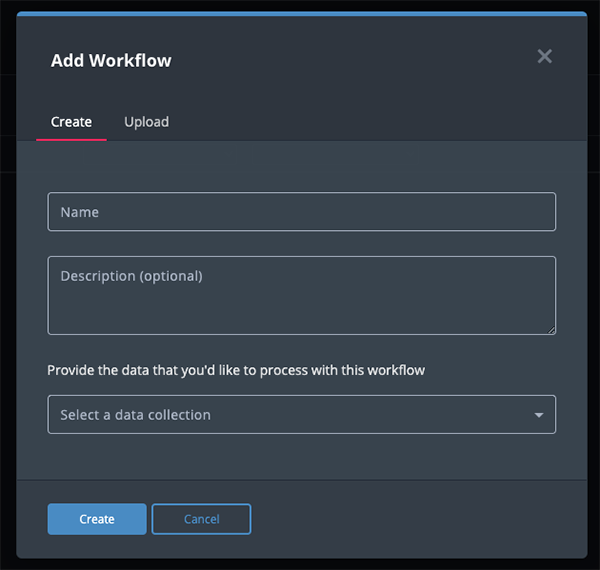
- Complete the following fields:
Field Description Name The name to give this workflow. Description Optional - A description of what this workflow does. Data Collection The data collection that will be used in the workflow. A data collection is required if you intend to run the workflow by schedule. Workflows built to be used as Manually Triggered Workflows do not require a set data collection.
- Click on Create.
The Workflow Builder will load.
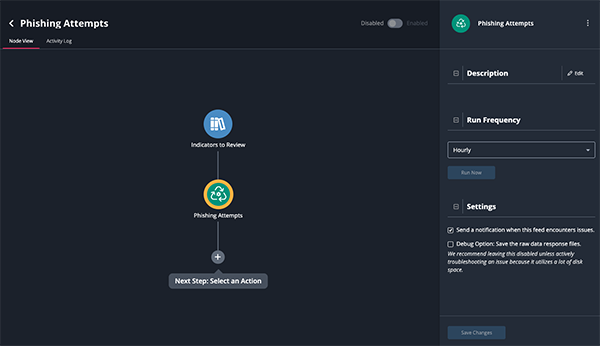
- Set how often the workflow will run using the dropdown provided under Run Schedule. You can select periodic or scheduled runs.
Periodic Run Options
Selection Description Hourly Run the workflow every hour. Every 6 Hours Run the workflow every six hours. Every 24 Hours Run the workflow every day. Every 2 Days Run the workflow every two days. Every 14 Days Run the workflow every two weeks. Every 30 Days Run the workflow every month. Schedule Run Options
Selection Description Daily Allows you to run the workflow at a specific time every day. Weekly Allows you to run the workflow at a specific time, on a specific day, every week. You can also select No Schedule. This will result in the workflow only running when you click on the Run Now button or initiate a Manually Triggered Workflow run from the Threat Library or an object's details page.
- The Allow data to be reprocessed flag allows you to control the application of the workflow to objects based on whether they were previously included in the data collection or added since the last workflow process:
Allow data to be reprocessed Setting Description Checked After you check the Allow data to be reprocessed, the After x days field allows you to specify how many days must elapse before an object is reprocessed. The field defaults to 30 days. The number of days before reprocessing must be zero or greater. If you enter a value of zero, TQO applies the workflow action to all applicable objects in the data collection during each workflow run.
- First Workflow Run - TQO applies the workflow action(s) to all applicable objects in the data collection.
- Subsequent Workflow Runs - First, TQO applies the workflow action(s) to all objects added to the data collection since the last run. Then, TQO reapplies the workflow action(s) to previously processed objects that meet or exceed the After x days requirement. For example, if the After x days field is set to 10, the workflow actions are applied to all objects processed by the workflow ten or more days prior to the current run.
Unchecked - First Workflow Run - TQO applies the workflow action(s) to all applicable objects in the data collection.
- Subsequent Workflow Runs - TQO applies the workflow action(s) to all objects added to the data collection since the last run.
- Review the workflow settings under the Settings option. Options include:
Setting Description Send a Notification Enabled by default. Workflow Health Notifications allow the ThreatQ application to send you, and other designated users, email and in-app notifications when a workflow encounters an issue. The in-app notifications appear in Notification Center for users with an administrator or maintenance account. These notifications include a link that redirects you to the Activity Log tab for the workflow. See the Workflow Notifications topic for more information. Debug Options Disabled by default. The Debug Option checkbox gives you the option to save raw data response files for troubleshooting purposes. Since this option uses a large amount of disk space, it defaults to unchecked. ThreatQuotient recommends temporarily enabling the option when you are troubleshooting a workflow issue. - Click on the + icon, located beneath the workflow node, to select an action.
- Select an installed action from the dropdown menu provided in the right pane.
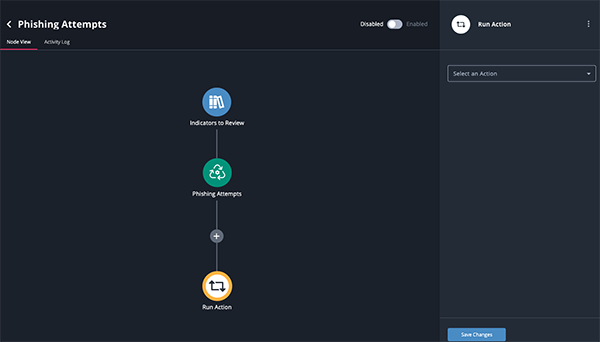
- The action node will appear in the builder view and the action's details will load in the right pane.
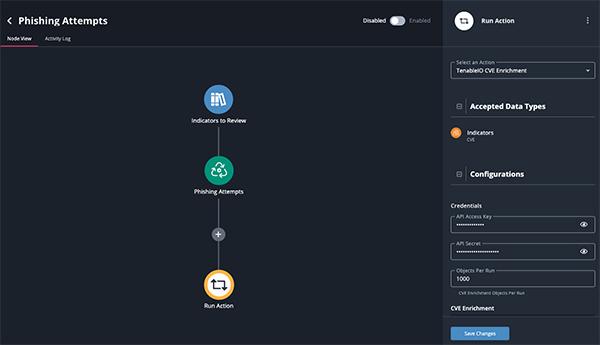
Actions will load with the default settings that have been saved in the action's configuration details, such as API Keys. This allows you to use an action in multiple workflows without having to enter credentials each time you add it. You can modify the action's configuration in the workflow itself in the right pane. Any configuration changes to an action made in the workflow itself will only apply to the action's instance in that particular workflow and will not change the default settings. Additionally, any modifications to the action's default configuration from the configuration details page will not affect actions already deployed in a workflow.
- Review the configuration options for the action, make any changes if needed, and click on Save Changes.
- Repeat steps 8-11 to add additional actions.
- Click on the Disable/Enable toggle switch to enable the workflow.
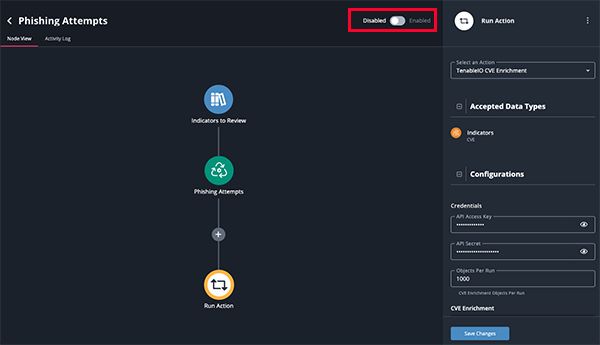
Upon enabling the workflow, it will initiate a run and then follow your set schedule. The workflow will not automatically initiate a run if you have No Schedule set as the frequency.
- Navigate to the ThreatQ Orchestrator page.
- Click on the Add Workflow button.

The Add Workflow dialog window will open.

- Complete the following fields:
Field Description Name The name to give this workflow. Description Optional - A description of what this workflow does. Data Collection The data collection that will be used in the workflow. A data collection is required if you intend to run the workflow by schedule. Workflows built to be used as Manually Triggered Workflows do not require a set data collection.
- Click on Create.
The Workflow Builder will load.
- Set how often the workflow will run using the dropdown provided under Run Schedule. You can select periodic or scheduled runs.
Periodic Run Options
Selection Description Hourly Run the workflow every hour. Every 6 Hours Run the workflow every six hours. Every 24 Hours Run the workflow every day. Every 2 Days Run the workflow every two days. Every 14 Days Run the workflow every two weeks. Every 30 Days Run the workflow every month. Schedule Run Options
Selection Description Daily Allows you to run the workflow at a specific time every day. Weekly Allows you to run the workflow at a specific time, on a specific day, every week. You can also select No Schedule. This will result in the workflow only running when you click on the Run Now button or initiate a Manually Trigger Workflow run from the Threat Library or an object's details page.
- Review the workflow settings under the Settings option. Options include:
Setting Description Send a Notification Enabled by default. Workflow Health Notifications allow the ThreatQ application to send you, and other designated users, email and in-app notifications when a workflow encounters an issue. The in-app notifications appear in Notification Center for users with an administrator or maintenance account. These notifications include a link that redirects you to the Activity Log tab for the workflow. See the Workflow Notifications topic for more information. Debug Options Disabled by default. The Debug Option checkbox gives you the option to save raw data response files for troubleshooting purposes. Since this option uses a large amount of disk space, it defaults to unchecked. ThreatQuotient recommends temporarily enabling the option when you are troubleshooting a workflow issue. - Click on the + icon, located beneath the workflow node, to select an action.
- Select an installed action from the dropdown menu provided in the right pane.

- The action node will appear in the builder view and the action's details will load in the right pane.

Actions will load with the default settings that have been saved in the action's details, such as API Keys, under the My Integrations page. This allows you to use an action in multiple workflows without having to enter credentials each time you add it. You can modify the action's configuration in the workflow itself in the right pane. Any configuration changes to an action made in the workflow itself will only apply to the action's instance in that particular workflow and will not change the default settings. Additionally, any modifications to the action's default configuration from the My Integrations page will not affect actions already deployed in a workflow.
- Review the configuration options for the action, make any changes if needed, and click on Save Changes.
- Repeat steps 7-10 to add additional actions.
- Click on the Disable/Enable toggle switch to enable the workflow.

Upon enabling the workflow, it will initiate a run and then follow your set schedule. The workflow will not automatically initiate a run if you have No Schedule set as the frequency.