Managing Workflows
The Orchestrator page provides you with a list of your existing workflows as well as key information on each such as:
- Name - The workflow name. This name is extracted from the workflow file itself if you imported it.
- Type - Identifies the workflow as an Advanced Workflow uploaded from a YAML file or a workflow created within TQ0's Workflow Builder.
- Health Issues - If this column is blank, the last workflow run did not encounter an issue. If this column displays Issue Encountered, the last workflow run encountered one of the following error statuses:
- Error Occurred
- Error during run
- Incomplete
- Failed to Complete
- Last Run - The date/time of the last workflow run.
- Last Modified - The date/time of the most recent changes to the workflow. For a newly imported workflow, this column lists the date/time you imported it.
- Created By - For workflows created in TQO, this column lists the login of the user who created the workflow. For advanced workflows this column is blank.

You can use the Name, Health Issues, and Type fields to locate workflows as well as customize the list displayed in the Orchestrator page. For instance, you can filter your view to display only workflows created in TQO by selecting a type of Workflow Builder.
Workflow management options and pages vary by workflow type. The following sections provide instructions on:
Managing Workflows Created in TQO
The workflow Node View page allows you to complete the setup of a new workflow as well as update and run an existing workflow. From this page, you can:
- Configure a workflow
- Review a workflow’s activity log
- Enable or disable a workflow
- Delete a workflow
- Run a workflow
Tips and Tricks
- You can move the node graph to a new position on the screen by clicking and dragging any node.
- Each workflow must include a data collection and at least one action.
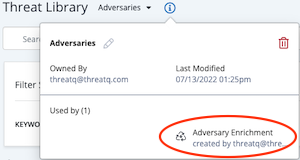
- The info menu for any data collection included in a workflow, lists the workflow name in the Used by section. See the Managing Search Results topic for more information.
- If you delete a data collection associated with a workflow, the workflow is automatically disabled. You must select a new data collection for the workflow and enable the workflow before it can be run again.
Configuring a Workflow Created in TQO
After you create a workflow, you can use the workflow's Node View to further customize it by:
- Adding an action
- Updating an action
- Deleting an action
- Updating a workflow description
- Updating the workflow run frequency
- Selecting a new data collection
You can add up to ten actions to each workflow.
- From the workflow's Node View tab, click the plus sign (+) below the workflow node.
The Node View displays a new Run Action Node. - From the Run Action panel located to the right of the Node View, click the Select an Action field.
- Use one of the following methods to select an action:
- Type the action name in the Search field and click the action when it is displayed in the dropdown list.
- Locate and select the action from the dropdown list.
- If needed, update the configuration options for the action. These options vary based on the action you select but usually include:
- API key
- Context filter(s)
- Objects per run - The number of objects to be processed during a single run, regardless of the number of objects in the source data collection.
Changes made to an action's configuration at the workflow level do not affect the action's default configuration. In addition, changes to an action's default configuration do not change existing workflow-level configurations.
- Click the Save Changes button to save the action's configuration parameters.
The new action node is displayed in the Node View.
TQO allows you to update an action's configuration on a specific workflow as well as update an action's default configuration. You can access an action's default configuration from a workflow's action configuration panel and from the My Integrations page.
Changes made to an action's configuration at the workflow level do not affect the action's default configuration. In addition, changes to an action's default configuration do not change existing workflow-level configurations.
To update an action's configuration options on a workflow:
- From the workflow's Node View, click the action's node.
- Enter your changes in the action configuration panel located to the right of the workflow's Node View.
- Click the Save Changes button.
To update an action's default configuration:
- From the workflow's Node View, click the action's node.
- In the action configuration panel, click the ellipsis next to the action name and select the Edit Default Configuration option.
- Enter you changes in the action's default configuration screen.
- Click the Save button.
- Click the arrow located to the left of the action name to return to your original workflow.
Changes made to an action's default configuration are displayed when you add new instances of the action. These changes do not change existing workflow-level configurations.
If you delete all of the actions assigned to a workflow, the workflow is automatically disabled. You must add at least one action to the workflow to re-enable it.
- From the workflow's Node View tab, click the action you want to delete.
- From the Action panel located to the right of the Node View, click the ellipsis button next to the action name.
- Select the Delete Action option
The Are You Sure? window prompts you to confirm the deletion. - Click the Delete Action button.
Updating a Workflow Description
- From the workflow's Node View tab, click the workflow node.
- From the workflow panel located to the right of the Node View, click the Edit option next to the Description section and enter your changes.
- Click the Done button below the description field.
- Click the Save Changes button.
Updating the Workflow Run Frequency
- From the workflow's Node View tab, click the workflow node.
- From the workflow panel located to the right of the Node View, click the Run Frequency field to select a new run frequency from the dropdown list.
- Click the Save Changes button.
Selecting a New Data Collection
- From the workflow's Node View tab, click the data collection node.
- From the data collection panel located to the right of the Node View, click the Select a data collection field to select a new data collection from the dropdown list.
The data collection panel displays a list of the objects included in the data collection as well as object counts and the search parameters specified by the data collection.You can click the View in Threat Library button to view the data collection details in a new tab. If you update the data collection, you must refresh the Node View to see the changes.
- Click the Save Changes button.
Reviewing the Activity Log for a Workflow Created in TQO
A workflow's Activity Log tab provides you with a summary of each manual or scheduled run of the workflow. This includes:
- Date/time of the run
- Run status at completion
- Data requested
- Response received
- Data enriched
In addition, the Download Files button allows you to download and review the error logs for any run that encountered issues.
- Click the Orchestrator option in the main navigation.
The Orchestrator page lists installed workflows. - Locate and click the workflow to load its Node View.
- Click the Activity Log tab.
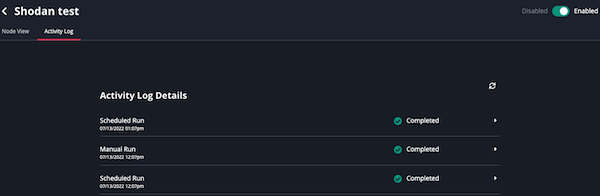
- Click the right arrow next to the run to view run details.
Enabling/Disabling a Workflow Created in TQO
You can enable and disable installed workflows from the Orchestrator page or the workflow's Node View. Disabling a workflow allows you to deactivate it without completely removing it from your instance.
You must select a data collection and at least one action for a workflow before you can enable it.
When you disable a workflow during a run, the Workflow Run In Progress window warns you that you will lose any data that has not been fully ingested and prompts you to confirm your choice by clicking the Terminate and Disable button.
Enable/Disable Workflows - Orchestrator Page
- Click the Orchestrator option in the main navigation.
The Orchestrator page lists installed workflows. - Click the toggle next to the workflow you want to enable/disable.
On the Orchestrator page, Enabled workflows have a toggle with a green background.
Disabled workflows have a toggle with a clear background.
Enable/Disable Workflows - Workflow Node View
- Click the Orchestrator option in the main navigation.
The Orchestrator page lists installed workflows. - Locate and click the workflow you want to enable/disable.
The workflow’s Node View is displayed. - Click the Disabled/Enabled toggle.
Removing a Workflow Created in TQO
You can remove a workflow from the Orchestrator page or the workflow’s Node View. Removing a workflow uninstalls it from your instance. You can also disable a workflow to deactivate it without completely removing it from your instance.
Remove Workflows - Orchestrator Page
- Click the Orchestrator option in the main navigation.
The Orchestrator page lists installed workflows. - Click the checkbox next to the workflow you want to delete.
You can only delete one workflow at a time.
- Click the delete button.
The Are you sure? window prompts you to confirm the workflow removal.

- Click the Delete Workflow button to confirm and remove the workflow.
Remove Workflows - Workflow Node View
- Click the Orchestrator option in the main navigation.
The Orchestrator page lists installed workflows. - Locate and click the workflow you want to remove.
The workflow’s Node View is displayed. - Click the ellipsis button to the right of the workflow's name.
- Select the Delete Workflow option.
The Are you sure? window prompts you to confirm the workflow removal.
- Click the Delete Workflow button to confirm and remove the workflow.
Performing a Manual Workflow Run for a Workflow Created in TQO
You must enable the workflow before you can perform a manual run. If the workflow already has a run in progress, the Run Now button is greyed out and you cannot launch a manual run.
- From the workflow's Node View, click the workflow node.
The Workflow panel is displayed on the right side of the page.

- Click the Run Now button.
Managing Advanced Workflows
Configuring Advanced Workflows
After you upload the YAML file for an advanced workflow, the workflow details page allows you to configure, enable, and run the workflow. In addition, the Activity Log tab in this page provides you with details for each workflow run.
The workflow details page is available only for advanced workflows. Use the workflow node view to configure and manage workflows created in TQO.
- Click the Orchestrator option in the main navigation.
The Orchestrator page lists installed workflows. - Locate and click the advanced workflow to load its details page.
The workflow details page displays and lists the following:- Workflow details, such as the workflow version and workflow ID.
- Configuration tab
- Activity Log tab

- Workflow configuration options can vary. However, most advanced workflows require the following configuration parameters:
- Data Collection - Click the Select a data collection field to access a drop-down list of saved data collections. This list displays all data collections you have been granted permissions for by default. You can click the Owned by Me tab to display only the data collections for which you have owner permissions. Use one of the following methods to select a data collection from either tab:
- Select the data collection from the dropdown list.
- Narrow the list by entering all or part of the data collection name. As you type, the dropdown list displays matches for your entry.
Adding a Data Collection to a Workflow will give all admin users read-only access to it.
- Frequency and Default Status - You can configure the workflow run frequency and default status the workflow assigns to system objects.
Periodic
Selection Description Hourly Run the workflow every hour. Every 6 Hours Run the workflow every six hours. Every 24 Hours Run the workflow every day. Every 2 Days Run the workflow every two days. Every 14 Days Run the workflow every two weeks. Every 30 Days Run the workflow every month. Schedule
Selection Description Daily Allows you to run the workflow at a specific time every day. Weekly Allows you to run the workflow at a specific time, on a specific day, every week. - Feed Health Notifications - You can also enable feed health notifications for the workflow. See the Workflow Health Notifications section for more information.
- Debug Option - The Debug Option checkbox gives you the option to save raw data response files for troubleshooting purposes. Since this option uses a large amount of disk space, it defaults to unchecked. We recommend temporarily enabling the option when you are troubleshooting a workflow issue.
- Data Collection - Click the Select a data collection field to access a drop-down list of saved data collections. This list displays all data collections you have been granted permissions for by default. You can click the Owned by Me tab to display only the data collections for which you have owner permissions. Use one of the following methods to select a data collection from either tab:
- Click Save.
- Click the Enable/Disable toggle to enable the workflow.
Reviewing an Advanced Workflow's Activity Log
A workflow's Activity Log tab provides you with a summary of each manual or scheduled run of the workflow. This includes:
- Date/time of the run
- Run status at completion
- Data requested
- Response received
- Data enriched
In addition, the Download Files button allows you to download and review the error logs for any run that encountered issues.
- Click the Orchestrator option in the main navigation.
The Orchestrator page lists installed workflows. - Locate and click the workflow to load its details page.
- Click the Activity Log tab.
- Click the right arrow next to the run to view run details.

Enabling/Disabling Advanced Workflows
You can enable and disable installed workflows from the Orchestrator page or the workflow's details page. Disabling a workflow allows you to deactivate it without completely removing it from your instance.
When you disable a workflow during a run, the Workflow Run In Progress window warns you that you will lose any data that has not been fully ingested and prompts you to confirm your choice by clicking the Terminate and Disable button.
Enable/Disable Workflows - Orchestrator Page
- Click the Orchestrator option in the main navigation.
The Orchestrator page lists installed workflows. - Click the toggle next to the workflow you want to enable/disable.
On the Orchestrator page, Enabled workflows have a toggle with a green background.
Disabled workflows have a toggle with a clear background.
Enable/Disable Workflows - Workflow Details Page
- Click the Orchestrator option in the main navigation.
The Orchestrator page lists installed workflows. - Locate and click the workflow you want to enable/disable.
The workflow’s details page is displayed. - Click the Disabled/Enabled toggle.
Removing an Advanced Workflow
You can remove a workflow from the Orchestrator page or the workflow’s details page. Removing a workflow uninstalls it from your instance. You can also disable a workflow to deactivate it without completely removing it from your instance.
Remove Workflows - Orchestrator Page
- Click the Orchestrator option in the main navigation.
The Orchestrator page lists installed workflows. - Click the checkbox next to the workflow you want to delete.
You can only delete one workflow at a time.
- Click the delete button.
The Are you sure? window prompts you to confirm the workflow removal.
- Click the Delete Workflow button to confirm and remove the workflow.
Remove Workflows - Workflow Details Page
- Click the Orchestrator option in the main navigation.
The Orchestrator page lists installed workflows. - Locate and click the workflow you want to remove.
The workflow’s details page is displayed. - Click the Uninstall button.
The Are you sure? window prompts you to confirm the workflow removal.
Click the Delete Workflow button to confirm and remove the workflow.
Performing Manual Workflow Runs for an Advanced Workflow
The Run Workflow button in a workflow's configuration screen gives you the option to initiate a manual run between scheduled runs.
- Click the Orchestrator option in the main navigation.
The Orchestrator page lists installed workflows. - Locate and click the workflow you want to run.
The workflow’s details page is displayed. - Click the Run Workflow button.

- Review and/or update the Start Date, Time and Time Zone fields. These fields default to the current date and time. When referencing a Data Collection, the Start Date value will reflect the Last Modified fields for threat objects.
Some workflows only support a Start Date.
-
Click the Queue Run button.
The workflow’s Activity Log displays.

-
If the workflow encountered errors, you can click the Download Files button to download a zip file(s) containing the error log(s).
-
When you open the zip file(s) you are prompted to enter the Password displayed above the Download Files button.