Broadcom ProxySG Exports
The web format of this guide reflects the most current release. Guides for older iterations are available in PDF format.
Export Details
ThreatQuotient provides the following details for this export:
| Current Guide Version | 1.0.0 |
| Support Tier | ThreatQ Supported |
Introduction
This guides describes the implementation between ThreatQ and the Broadcom ProxySG appliance. The implementation is done using the Local Database Content Filtering functionality available in the ProxySG. An export with IOCs is first created on ThreatQ and the export URL is installed on the proxy.
This guide replaces the export steps for Symantec ProxySG. Symantec is now known as Broadcom.
Prerequisites
You should confirm that there is route between ThreatQ and Broadcom ProxySG.
Before starting the integration, users are encouraged to familiarize themselves with the following documents:
- Broadcom ProxySG CLI: https://techdocs.broadcom.com/content/dam/broadcom/techdocs/symantec-security-software/web-and-network-security/proxysg/6-7/generated-pdfs/CLI67.pdf
- Local Content Filtering Database: https://techdocs.broadcom.com/us/en/symantec-security-software/web-and-network-security/proxysg/7-3/getting-started/page-help-administration/page-help-data-services/page-help-providers/page-help-local.html
Creating the Export
The following section will detail how to create the exports in ThreatQ.
See the Managing Exports topic for more details on ThreatQ exports.
- Select the Settings icon > Exports.
The Exports page appears with a table listing all exports in alphabetical order.
- Click Add New Export
The Connection Settings dialog box appears.
- Enter an Export Name.
- Click Next Step.
The Output Format dialog box appears.
- Provide the following information:
Field Value Type of information you would like to export? Indicators Output type plain text Special Parameters indicator.status=Active&indicator.deleted=N&indicator.type=URL&indicator.type=FQDN&indicator.type=IP Address&indicator.type=CIDR BlockOutput Template define category threatq_iocs
{foreach $data as $indicator}
{assign var=parts value="/"|explode:$indicator.value}
{assign var=hostname value=":"|explode:$parts[2]}
{assign var=fqdn value=":"|explode:$parts[0]}
{if $fqdn[0] eq "http" or $fqdn[0] eq "https"}
{assign var=domain value=$hostname[0]}
{else}{assign var=domain value=$fqdn[0]}{/if}
{$domain}
{/foreach}
endThis will strip the port and URL path from the IOCs.
- Click on Save Settings and enable the export via the On/Off toggle switch.
Configure ProxySG to Download Indicators from ThreatQ
There are two methods to install the dynamic list in the ProxySG -
- via the Management Console
- via the Proxy's CLI
The management console UI can accept only a single block list. Starting with ProxySG v6.7.4, you can configure the proxy to read from up to seven dynamic lists. The following two sections go over the methods for installing dynamic block lists.
Via the Management Console
-
Open the ProxySG management console.
- Navigate to Configuration > Content Filtering Local Database.
The following screen will load.
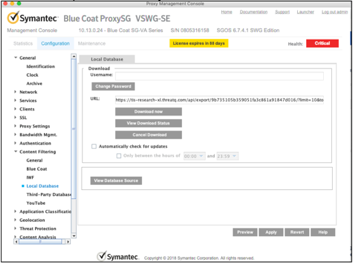
- Insert the export URL from TQ in the URL space and click on the Download now button.
This will initiate a pull of the indicators from the ThreatQ into the proxy. To check on the status of the download, click on View Download Status. Any download related messages will be shown in the download status window.
Via the ProxySG CLI
In addition to the Management Console UI, the proxy has a CLI which provides more configuration options. In the reference section at the end of this document, you can find a PDF document with the CLI commands. To help with testing of the integration below is a sequence of commands that allows a user to install the exports from ThreatQ in a local content database on the proxy.
- Log into the Blue Coat CLI:
ssh <username>@<BlueCoat Hostname/IP>
Use the password set in the initial configuration.
- Enable the admin mode:
enable
You will be prompted for a password which is usually the account password.
- Enter the following command access the config model of the appliance.
config
- Select TERMINAL at the prompt.
- Start working with the content filtering database:
content-filter
- Enter the Local Content Filtering DB mode.
local
- Create a new database name if needed.
create tq_test
- Enter db edit mode to download the URL.
edit tq_test
- Bind the URL of the ThreatQ export to the content database on the ProxySG.
Put double quotes around the URL.
download url "https://<TQ>/api/export/<hash>/?limit=1000&token=<token>" - Download the database now.
download get-now
- View the status of the current, and older, download
view
- Show the contents of the downloaded local database file.
source
- If you want to configure auto downloads there are various options available. To list all the download options use the following command
download ?
Create and Install a Content Filtering Policy
The final step is to install a content filtering policy using the indicators from the ThreatQ export which are being downloaded to a content filtering database on the proxy.
- Open ProxySG (the example here uses the virtual proxy appliance).
- Navigate to Configuration Policy > Visual Policy Manager and click on Launch Java VPM.

- From within the VPM, create a new Web Access Layer by navigating to Policy Add > Web Access Layer.
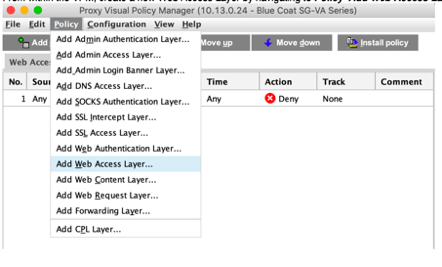
- Assign a name for the new layer, and after it's created right click on the Destination object and select Set.
- Under the drop down in the modal window select All (sort by object name) and then click on Edit in the lower right corner.
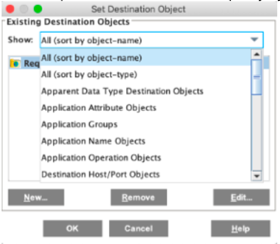
This will open a new window, in which you can select all the categories to be blocked by the ProxySG appliance. The list of URLs exported from ThreatQ will be available under the Local category.
- Expand Local and select the name you've given the export from ThreatQ. In this example, the name is tq_malicious_url.
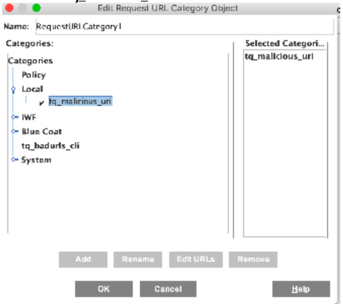
- Click OK, and then again OK to go back to the VPM.
- Highlight the newly created policy layer, and click on the Install policy button in the upper right corner.
Before installing the policy, make sure that the type of Action on the policy is Deny. If it shows Allow, make sure to change it to Deny. The action instruction what type action ProxySG should enforce when it detects that a user sends a request to any of the indicators in the list exported from ThreatQ.
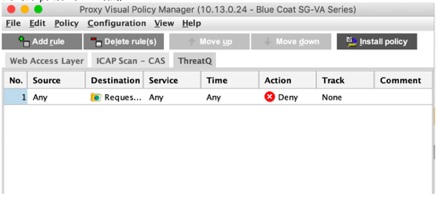
- The new policy is now installed and any active indicators exported from ThreatQ will be blocked by the ProxySG.
Change Log
- Version 1.0.0
- Initial release
PDF Guides
| Document | ThreatQ Version |
|---|---|
| Broadcom ProxySG Exports Guide v1.0.0 | N/A |