Use Case - Spearphishing Attack
This use case provides a real-life example of a spearphish attack and illustrates how ThreatQ can help you detect, analyze, and respond to the attack.
Detecting the Attack
Your organization received a set of spearphish emails. The emails were detected by filters on your email gateway and automatically added into the ThreatQ platform. In addition, you received a separate spearphish email to your email account.
Before you begin to analyze the spearphish attack, you need to upload the email to the TQ platform:
- From the Investigations page, click the Create button.
- Click the Spearphish Parser option.
- From the Add Event window, click the Source field and select the email account that received the spearphish email.
- Enter a status and point of contact for the event.
The Event Status field is displayed only if an administrator has configured Event Statuses in the Object Management page.
- Use one of the following methods to upload the email:
- Drag the email to the window.
- Click the click to browse link to access your File Finder/File Explorer and select the file.
- Paste the email content into the text box on the right.
- Click the Add Event button.
The Spearphish Parser page displays the initial process information from the ingestion. From this page you can:- Set additional parameters such as the status to be applied to all extracted indicators.
- Establish a relationship between this spearphish attack and another object such as an indicator, event, or adversary.
- Click the Next Step button.
The second Spearphish Parser page displays any attachments associated with the imported email and gives you the option to import these attachments.If the imported email did not include attachments, ThreatQ bypasses this page and takes you directly to the third Spearphish Parser page.
- Click the Next Step button.
The left side of the third Spearphish Parser page displays the email content. The right side displays the following tabs:- Spearphish Attributes - Lists the email’s metadata such as the email recipient (To) and subject line (Subject).
- Extracted Indicators - Lists information extracted from the email body that correlates to indicators already defined in TQ. These indicators are labelled as Pre-Existing.
- Click the Create Spearphish button.
The spearphish record is ingested into the Threat Library. - To add your new spearphish record to your spearphish investigation, access the Investigations page and select your spearphish investigation.
- Use the search field to locate and select the spearphish record you just created.
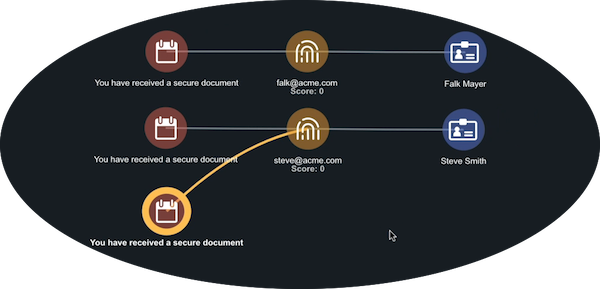
The new spearphish record is displayed in your Evidence Board. This visualization allows you to identify the targets of the spearphish campaign based on which users received the spearphish emails.
Takeaways:
The first thing you notice is that this email was sent to the one the email addresses already associated with your investigation.
Analyzing the Attack
Now that TQ has information on the spearphishing emails, the Evidence Board allows you to work with a visual representation of the emails and users involved in the spearphish attack.
Takeaways:
Take advantage of ThreatQ’s drag and drop options to organize the nodes on your Evidence Board to suit your preferences. The lines connecting the nodes will adjust to accommodate your changes

Step 1: Finding Relationships
In this case, the spearphish campaign seems focused on two people, Steve and Falk. So let’s take a closer look at their relationships:
- In the Evidence Board, click Falk.
The right side of the page displays additional information on Falk. - In the Relationships section, click the arrow next to Attributes to view more information.
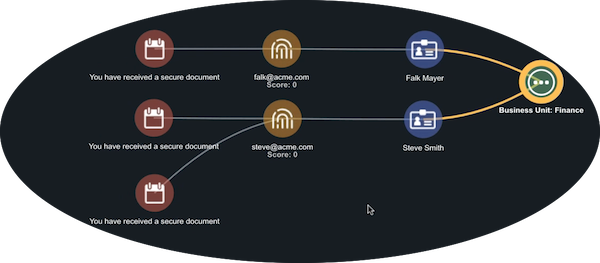
- Falk has a business unit attribute of Finance. Click the plus sign next to Finance to add this attribute to the Evidence Board.
When you do this, you notice that both targeted users are members of the Finance team. This lets you know that the attack is focused on your Finance group.

Step 2: Email Attachments
The next step of your analysis is to take a closer look at the email you added to the investigation to answer the following questions:
Did the emails in this attack have the same attachment file?
- In the Evidence Board, click the email record.
The right side of the page displays additional information on the spearphish email. - In this case, we want to focus on the email attachment. So, scroll down to the Files section.
- Click the arrow next to Files to view the email’s attachments.
- Click the plus sign next to the attachment file to add it to the Evidence Board.
When you do this you notice that all the spearphish emails in this attack had the same attachment.
Have we received other emails with the same attachment?
- In the Evidence Board, click the attachment record.
The right side of the page displays additional information on the email attachment. - Click the arrow next to Events to view a list of other emails, outside of the current investigation, that had the same attachment.
- Click the plus next to the email to add it to the Evidence Board.
Are there any relationships between the other emails and the emails in my investigation?
- Click the new email record.
The right side of the page displays additional information on the email. - In this case, we want to focus on the email recipient. So, scroll down to the Relationships section.
- Click the arrow next to Indicators.
- Click the plus sign next to the email address to add it to the Evidence Board.
- Then, click on the new email address.
The right side of the page displays additional information on the email address. - In this case, let’s take a look at the identity or person associated with the email address.
- In the Relationships section, click the arrow next to Identity to view more information.
- The email address belongs to User 3. Click the plus sign next to User 3 to add this attribute to the Evidence Board. Once you add, User 3 to the Evidence Board, you immediately see that User 3 also belongs to the Finance team. This points to a spearphish attack targeting your Finance team.
Step 3: Recording Your Findings
Now, it’s time to log your findings to share them with your team:
- On the right side of the page, scroll to the Comments section.
- Click the Arrow next to Comments.
- Type a brief synopsis of your finds, such as:
- This is targeting the Finance team.
- Click the Add Comment button.
Takeaways:
So far, TQ has allowed you to identify emails not captured by your email gateway filters, the email address/user targets, and determine that the spearphish attack is a pointed assault on your Financials team.
Step 4: Digging Deeper
The next step is to send the email attachment to a sandbox for malware analysis. We can then bring that analysis into our investigation:
- From the Evidence Board, click the attachment file.
- On the right side of the page, scroll to the Relationships section.
- Click the arrow next to Events.
- Click the plus sign next to the Malware Analysis record to add it to the Evidence Board.
- Click the malware analysis record to view more information in the right panel.
- Scroll to the Indicators section and review the scores assigned to each indicator. Scores are assigned on a scale of 1 - 10 with 10 being the most critical indicator.
- Click the plus sign next to each indicator you want to add to the Evidence Board.
- Click an indicator to view its details.
The Run Operations button allows you to run processes that provide additional information on an indicator.
- Click an indicator.
- Scroll to the Relationships section.
- Click the arrow next to Malware.
- Click the plus sign next to the malware name to add it to your Evidence Board.
This allows you to view any additional relationships between the malware and the other elements of your investigation. In addition, the information panel on the right gives you a description of the malware and other details captured by multiple sources.
Takeaways:
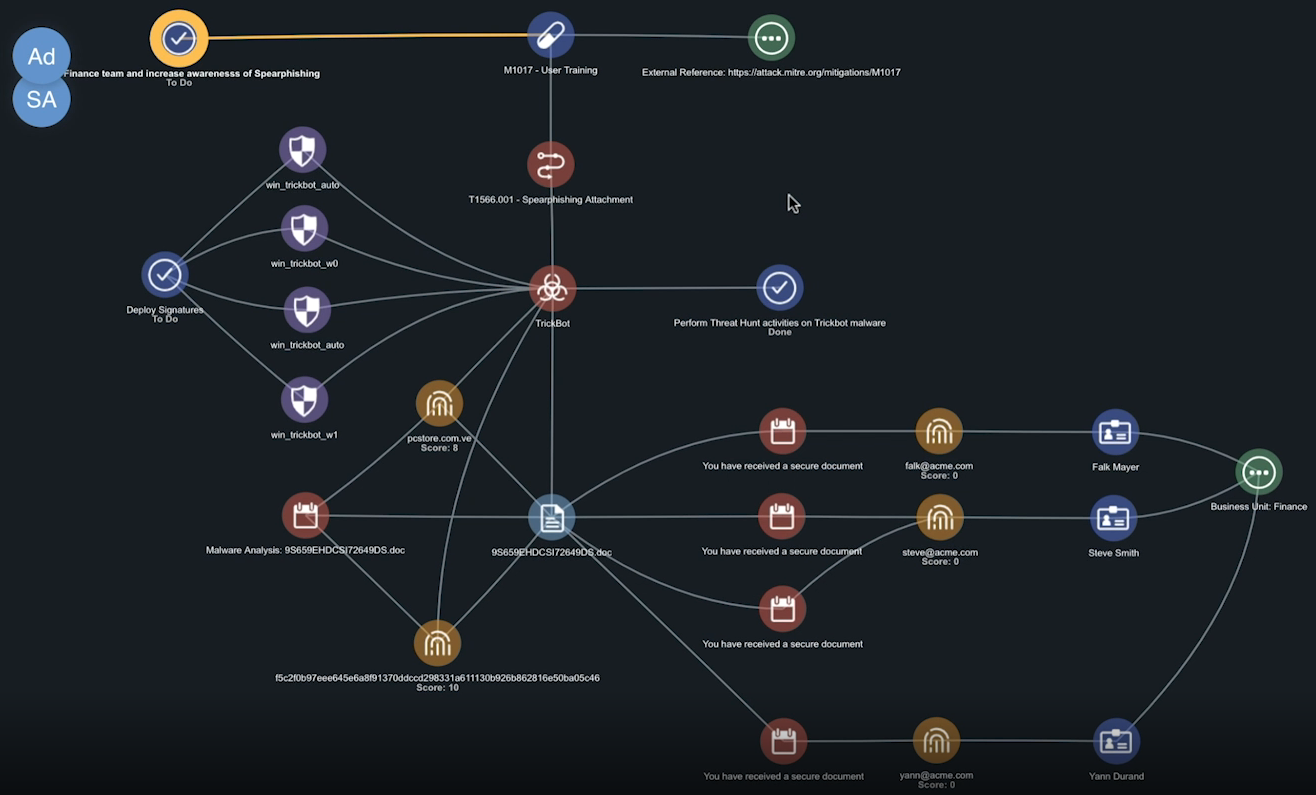
If your users had opened or executed the email attachments on the spearphish emails, TrickBot malware would have been deployed on your network. You now have information on adversaries, attack patterns, and tasks (within your organization) associated with Trickbot.
Responding to the Attack
Armed with information, you can now begin responding to the spearphish attack by deploying mitigations. ThreatQ allows you to focus on three primary levels of response to attack:
- Direct response.
- Data capture and additional actions/tasks.
- Education and protection moving forward.
Direct Response - Deploy Signatures
Create a task to deploy signatures to your Intrusion Prevention System (IPS).
- From the Evidence Board, right-click the malware name.
- Click the Expand option.
- Click Signatures to add all the signatures associated with the malware to your Evidence Board.
- From the Evidence Board, select all of the signatures and right-click on them.
- Click the New Task option.
The Add Task window is displayed. - Create a task to deploy the signatures to your IPS as a proactive measure to defend against a potential threat.
- Click the Save button to save the task and add it to your Evidence Board.
Data Capture and Additional Actions - Attack Patterns
Attack patterns are the techniques used to attack a particular organization. Reviewing the attack patterns associated with TrickBot and adding it to your Evidence Board will give you more information and allow you to formulate a course of action such as deploying user training.
Review and Add Attack Patterns
- From the Evidence Board, click the malware name, such as TrickBot.
- The right-side of the page displays additional information on the malware.
- Scroll to the Relationships section.
- Click the arrow next to Attack_Pattern.
- Review the list for attack patterns similar to your current investigation, such as the spearphishing Attachment attack pattern.
- Click the plus sign next to this attack pattern to add it to the Evidence Board.
Select a Course of Action
- From the Evidence Board, click the attack pattern.
- The right-side of the page, displays additional information on the attack pattern.
- Scroll to the Relationships section.
- Click the arrow next to Course_Of_Action.
- In this case, let select User Training as our course of action by clicking the plus sign next to User Training to add it to the Evidence Board.
- With User Training still selected, you can also scroll to the Relationships section, click the arrow next to Attributes and add reference material to the Evidence Board by clicking the corresponding plus sign.
Create a User Training Task
- From the Evidence Board, right-click User Training.
- Click the New Task option.
The Add Task window is displayed. - Create a task for training of your Finance team as well as to increase organizational awareness.
- Click the Save button to save the task and add it to your Evidence Board.
Wrapping Up the Investigation and Moving Forward
You’ve used ThreatQ to move from “Yikes! What is that email?” to a comprehensive assessment of the spearphish attack as well as long and short-term plans to address the threat. Your customized and expanded Evidence Board is now a hub for tracking the attack as well a reference point for handling future attacks.
