About SSL Client Certificate Authentication
Default ThreatQ Role: Administrative or Maintenance
Custom Role - Action Permissions: Administrative Functions - Edit User Management
ThreatQ supports SSL Client Certificate Authentication by allowing on-premise customers to upload PEM-encoded CA certificate files. After this file is uploaded and configured, individual ThreatQ logins can be associated with a user’s certificate SHA-1 fingerprint. This allows users to authenticate and access ThreatQ via their:
- Common Access Cards (CACs)
- Personal Identity Verification (PIV) cards
- Smart cards
- SSL client certificates
If you want to migrate from LDAP or SAML authentication to SSL Client Certificate Authentication, please contact ThreatQ Support for assistance.
Requirements
- On-premise instance of the ThreatQ Platform 5.9 or greater.
- On-premise instance of the ThreatQ 6x
- PEM-encoded, X.509 CA certificate file
- CAC, PIV card, Smart card, or SSL client certificate
- Administrative or maintenance login
- List of your current TQAdmin configuration settings
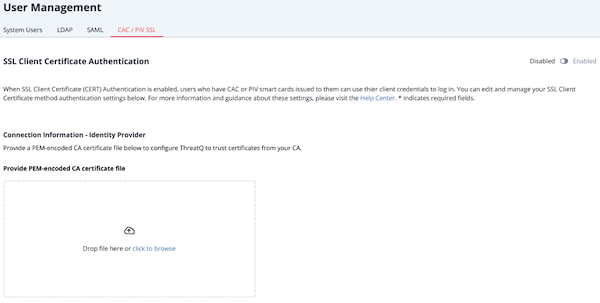
Only Administrative or Maintenance logins have access to the CAC/PIV SSL tab in the User Management page. This tab is used to configure SSL Client Certificate Authentication.
- From the User Management page, click the CAC/PIV SSL tab.

- Upload the CA certificate file using one of the following methods:
- Drag and drop the file into the dialog box.
- Select the click to browse link to locate the file on your local machine.
- After you upload the file:
- The system displays the following message:
Once enabled, CAC / PIV SSL Authentication will take effect for system users upon the next login. - The Disabled/Enabled toggle switches to Enabled.
- The certificate's serial number and expiration date is displayed.
If SAML authentication is active on your ThreatQ instance, the Are you sure? window returns the following warning and prompts you to confirm your choice:
Currently you have SAML authentication enabled on your system. By enabling CAC / PIV SSL authentication, SAML will become disabled immediately. Upon next login, SAML users will no longer be able to authenticate via that method. Would you like to proceed?
You must click the Confirm button to continue.
- The system displays the following message:
- Now that SSL Client Certificate Authentication is enabled, use one of the following methods to add a certificate fingerprint to your profile.
Until you add a certificate fingerprint to your user profile, each time you access a new ThreatQ page you will be prompted to select a certificate.
- Log out of ThreatQ and add your certificate fingerprint during log in.
- Use the System Users tab to add your certificate fingerprint to your user profile.
- Use one of the following methods to add certificate fingerprints for users:
- Users can add their own certificate fingerprint during their next login. If needed, you can set up usernames and passwords in the System Users tab on the User Management page.
- Maintenance or Administrative users can use the System Users tab to add the new certificate fingerprint to user profiles.
Configuring SSL Client Certificate Authentication
- Move your CA certificate file to a directory on your ThreatQ instance.
- Access the ThreatQ host command line via SSH or console.
- Run the following command:
sudo /usr/local/bin/tqadmin configureThe TQadmin configure command displays a series of prompts.
To prevent undesired changes to your system, you must enter a response for each prompt based on your current system configuration. For example, if your organization uses ThreatQ Data Exchange's OpenDXL functionality you must enter "yes" for the Do you want to enable OpenDXL prompt.
- To enable SSL Client Certification, populate the following:
Prompt Description Do you want to enable CAC/mTLS? (yes/no): Enter yes. Enter the file path for your certificate: Enter the path for your CA Certificate.
example: /tmp/mycert.pemEnter the FQDN of the server: Enter the FQDN of the server.
example: myserver.threatq.com - When prompted, enter your YUM username and password.
- Run the following command to save and apply your changes:
sudo /usr/local/bin/tqadmin reapply
- After your changes are saved, the CAC/PV SSL tab in the User Management page displays a status of Currently Enabled.
- Now that SSL Client Certificate Authentication is enabled, use one of the following methods to add a certificate fingerprint to your profile.
Until you add a certificate fingerprint to your user profile, each time you access a new ThreatQ page you will be prompted to select a certificate.
- Log out of ThreatQ and add your certificate fingerprint during log in.
- Use the System Users tab to add your certificate fingerprint to your user profile.
- Use one of the following methods to add certificate fingerprints for users:
- Users can add their own certificate fingerprint during their next login. If needed, you can set up usernames and passwords in the System Users tab on the User Management page.
- Maintenance or Administrative users can use the System Users tab to add the new certificate fingerprint to user profiles.
Adding a User's Certificate Fingerprint - User Profile
After Client Certificate Authentication is enabled, an Administrative or Maintenance user can add a certificate fingerprint to a ThreatQ user profile.
- From the User Management screen, click the User Management tab.
- Locate and click the user's display name.
- From the User Profile tab in the Edit User page, click the Add New button.
- Enter the user's certificate fingerprint.
- Click the Submit button.
Adding Your Certificate Fingerprint - Login Page
- Access your certificate, and enter your PIN. Your certificate must be active in the browser before you navigate to your ThreatQ instance.
- Navigate to your ThreatQ instance.

- Enter your username and password.
- Click the Log in button.
- The Store Fingerprint to Profile window prompts you to save your certificate fingerprint to your ThreatQ user profile.
- Click the Acknowledge & Login button.
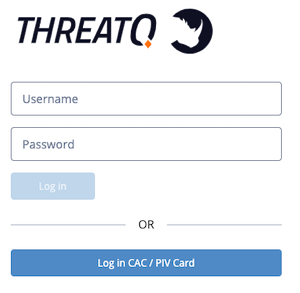
ThreatQ saves your certificate fingerprint. The next time you login, you can click the Log in with CAC/PIV Card button to access ThreatQ.
Using Certificate Authentication to Log In
Maintenance users can log into ThreatQ using either username/password or certificate authentication. Administrative, Primary Contributor, and Read-Only users are required to use certificate authentication to log into ThreatQ if it is enabled.
After you or an Administrative/Maintenance user add a certificate fingerprint to your ThreatQ user profile, click the Log in with CAC/PIV Card button to access ThreatQ.