Proxy
Default ThreatQ Role: Administrative or Maintenance
Custom Role - Action Permissions: Administrative Functions - Edit System Configurations
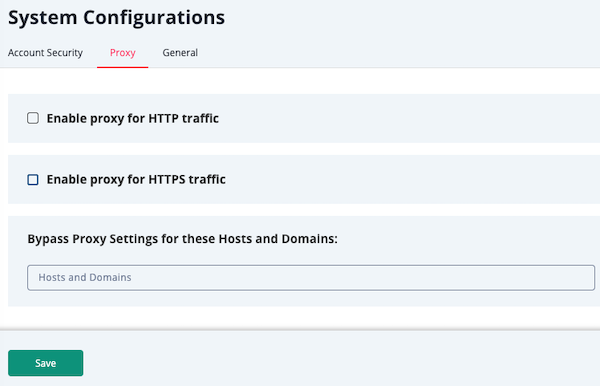
The Proxy configuration page allows you to enable or disable proxies.
Users are required to set their proxy server settings to use http: for their https: traffic.
Accessing Proxy Configuration
- Navigate to Settings
 > System Configurations.
The System Configurations page opens to the Account Security tab selected by default.
- Click the Proxy tab.
The Proxy Configuration tab loads.

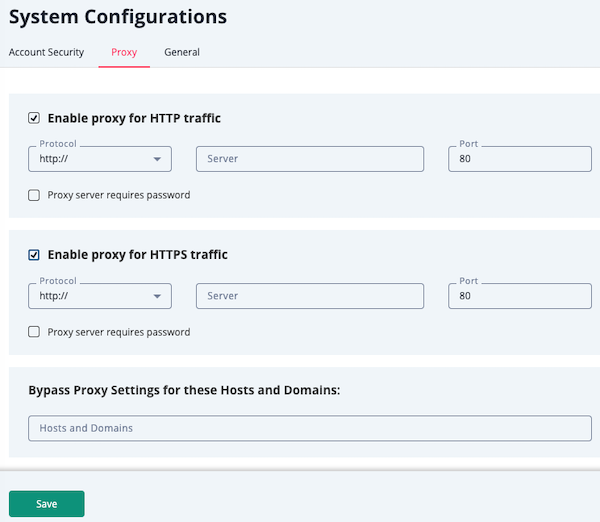
- Select the checkboxes for HTTP and HTTPS traffic options to expand those fields.

- Enter your proxy server IP Address and Port in the field provided for both HTTP and HTTPS sections.
- Optional - Select the Proxy Server Requires Password, if your server requires a username and password, and complete the Username and Password fields. Leave the checkboxes unselected and the username and password fields blank if your server does not require this information.
- Click the Save button. ThreatQ saves the proxy information you added as a Kubernetes secret.
ThreatQ uses the values you add to the Bypass Proxy Setting for these Hosts and Domains field to bypass the proxy for operations, CDFs, and ThreatQ TDR Orchestrator in addition to custom connectors.
If using IP Addresses values in the No_Proxy field, users are required to use the same IP Address format, and not their hostname, when configuring proxy bypass settings for their ThreatQ feeds. Example: entering 10.0.0.1 in the No_Proxy field and then using my-domain-local in your individual integration’s proxy parameters will not result in the feed bypassing the proxy.
Integration-level proxy configurations take priority over the ThreatQ system-level proxy configuration.
- Navigate to Settings
 > System Configurations.
The System Configurations page opens to the Account Security tab selected by default.
- Click the Proxy tab.
The Proxy Configuration tab loads.
- Add any no_proxy settings to the Bypass Proxy Settings for these Hosts and Domains field in the following format:
<address or hostname of server for the setting>If adding multiple no_proxy settings, use a comma-separated format.
- Click the Save button.
PIP and YUM upgrade commands, as well as custom connectors and associated cron jobs, require that you set your proxy information in your environment files. This does not replace the process above but must be performed in addition in order to use custom connectors and the commands. Before you begin, you should collect a list of proxy exceptions. These are entries that you do not want to add to the proxy. The exceptions can be hostnames or FQDNs. In the case where DNS is not available, you can use the /etc/hosts to ensure hostname resolution is recommended.
-
SSH into your ThreatQ instance.
-
Open the environment file using the vi command:
vi /etc/environment -
Press the i character to enter insert mode. Enter your following entry into the file while replacing the placeholders with your information. These settings are case-sensitive so you must include both the lowercase, ex: http, and uppercase, ex: HTTP, versions.
You can add exceptions to the no_proxy strings to prevent specific entries that should not be forwarded to the proxy. The minimal value for no_proxy should be the loopback IP address and "localhost" plus the TQ entry for itself "threatq". Do not use CIDR notation or wildcards with no_proxy entries as they are not accepted formats. In that situation, list the IP addresses.
If Proxy Server Requires a Password
http_proxy=http://<username>:<password>@<Proxy IP>:<Proxy Port>
HTTP_PROXY=http://<username>:<password>@<Proxy IP>:<Proxy Port>
https_proxy=http://<username>:<password>@<Proxy IP>:<Proxy Port>
HTTPS_PROXY=http://<username>:<password>@<Proxy IP>:<Proxy Port>
no_proxy=localhost,127.0.0.1,threatq,<ThreatQ IP>, <ThreatQ Hostname>
NO_PROXY=localhost,127.0.0.1,threatq,<ThreatQ IP>, <ThreatQ Hostname>If Proxy Server Does Not Require a Password
http_proxy=http://<Proxy IP>:<Proxy Port>
HTTP_PROXY=http://<Proxy IP>:<Proxy Port>
https_proxy=http://<Proxy IP>:<Proxy Port>
HTTPS_PROXY=http://<Proxy IP>:<Proxy Port>
no_proxy=localhost,127.0.0.1,threatq,<ThreatQ IP>, <ThreatQ Hostname>
NO_PROXY=localhost,127.0.0.1,threatq,<ThreatQ IP>, <ThreatQ Hostname> -
Press the ESC key and enter the following command to close the editor:
:wq <Enter Key>The next several steps will show you how to ensure that custom connector CRON jobs are able to use the proxy settings. This is achieved by sourcing the environment script so that it is available to all child sessions and applications.
-
Open the proxy.sh file using the vi command:
vi /etc/profile.d/proxy.sh -
Press the i key to enter Insert mode and enter the following lines:
set -a
source /etc/environment
set +a
This will ensure the automatic export of any variables created.
-
Press the ESC key and enter the following command to close the editor:
:wq <Enter Key> -
Log out of your session and then log back in.
-
Run the following command to confirm your settings:
printenv | grep -i proxy -
Remove any other proxy-related files from the
/etc/profile.ddirectory.