Object Statuses
Default ThreatQ Role: Administrative, Maintenance, or Primary Contributor
Custom Role - Action Permissions: Objects & Context - Manage Object Statuses
The Object Statuses tab allows you to create and maintain statuses for custom objects and all seeded system objects except for Adversaries, Files, Signatures, and Tasks objects.
The display of the status field in an object's add modal, object details page, and preview panel is triggered by the creation of at least one status for the object type.

Viewing Object Statuses
- Navigate to Settings
 > Object Management.
The Object Management page opens.

- Click the Object Statuses tab.
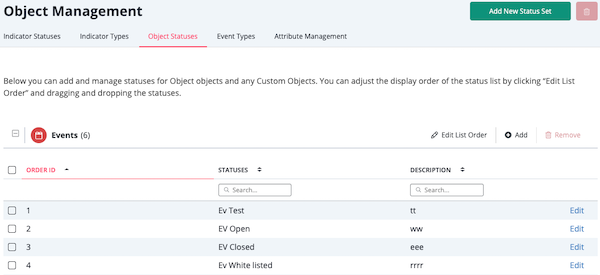
The Object Statuses tab opens.

The Object Statuses tab contains a section for each object type. Within each section, you can use the following functions to locate a status:
Function Description Filter table by Object Status Enter a keyword in the Statuses search field to filter by status. Filter list by Description Enter a keyword in the Description search field to filter by status description. Sort table by Order ID, Status name, or Description Click the arrow to the left of a column to sort the status list by that column. For instance, click the arrow next to the Statuses column to sort the list of statuses alphabetically (ascending/descending) by status name.
Adding an Object Status
The Object Statuses tab gives you the option to add a single status at a time or to add multiple statuses at a time.
To add a single status for an object type:
- In the Object Statuses tab, locate the object type to which you want to add a status.
- Click the Add option located above the object type section.
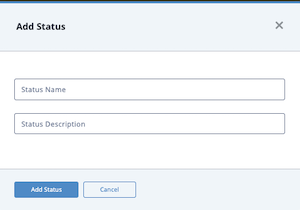
The Add Status window opens.

- Enter the status name and description (optional).
- Click the Add Status button.
To add multiple statuses for an object type:
- From Object Statuses tab, click the Add New Status Set button.
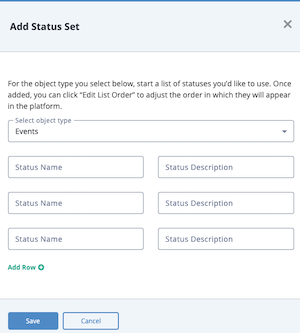
The Add Status Set window opens.

- Select the object type for which you want to add statuses.
- Enter the name and description (optional) for each status.
- To enter more than three statues, click the Add Row option to display additional fields.
- Click the Save button.
Editing an Object Status
- From the Object Statuses tab, click the Edit option next to the status you want to update.
-
The Edit Status window opens.
- Enter your changes.
- Click the Save button.
Editing Object Status Order
Status order controls the order in which statuses are displayed in drop down fields such as the Status field on the object details page. The Edit List Order option allows you to modify this order.
- In the Object Statuses tab, locate the object type status you want to update.
- Click the Edit List Order option for the object type.
- From the Edit List Order window, drag and drop status names to change the order in which they are displayed in ThreatQ.
- Click the Save button.
Deleting an Object Status
You cannot delete a status that is currently assigned to an object. You must remove the status from all objects before you can delete it.
The Object Statuses tab allows you to delete a single status as well as multiple statuses associated with the same object type, or multiple statuses associated with different object types.
- In the Object Statuses tab, check the box next to the status you want to delete.
- If you are deleting a single status or a group of statuses associated with the same object type, you can click the Remove option above the object type section or you can click the Delete icon in the upper right corner.
If you are deleting statuses for more than one object type, click the Delete icon in the upper right corner.
A confirmation window prompts you to confirm the deletion. - Click the Delete statuses button.