Configuring an Advanced Workflow
Default ThreatQ Role: Administrative or Maintenance
Custom Role - Action Permissions: See the TQO Requirements topic.
After you upload the YAML file for an advanced workflow, the workflow details page allows you to configure, enable, and run the workflow. In addition, the Activity Log tab in this page provides you with details for each workflow run.
The workflow details page is available only for advanced workflows. Use the workflow node view to configure and manage workflows created in TQO.
- Click the Orchestrator option in the main navigation.
The Orchestrator page lists both workflows built with the workflow builder and installed workflows (Advanced Workflows). Advanced Workflows will be marked as such in the Type column.
- Locate and click the advanced workflow to load its details page.
The workflow details page displays and lists the following:- Workflow details, such as the workflow version and workflow ID.
- Configuration tab
- Activity Log tab
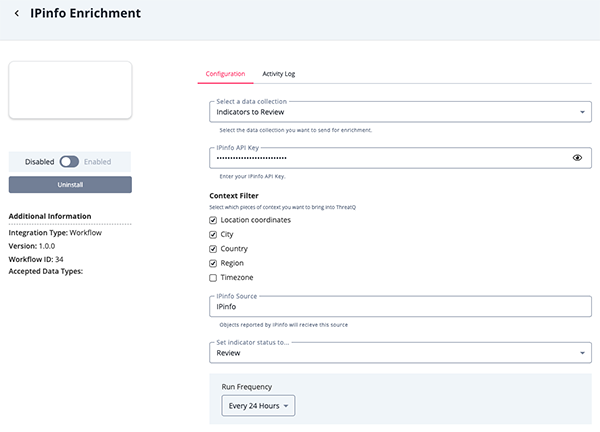
- Workflow configuration options can vary. However, most advanced workflows require the following configuration parameters:
- Data Collection - Click the Select a data collection field to access a drop-down list of saved data collections. This list displays all data collections you have been granted permissions for by default. You can click the Owned by Me tab to display only the data collections for which you have owner permissions. Use one of the following methods to select a data collection from either tab:
- Select the data collection from the dropdown list. You can narrow the list by entering all or part of the data collection name. As you type, the dropdown list displays matches for your entry.
Adding a Data Collection to a Workflow will give all admin users read-only access to it.
- Select the data collection from the dropdown list. You can narrow the list by entering all or part of the data collection name. As you type, the dropdown list displays matches for your entry.
- Data Collection - Click the Select a data collection field to access a drop-down list of saved data collections. This list displays all data collections you have been granted permissions for by default. You can click the Owned by Me tab to display only the data collections for which you have owner permissions. Use one of the following methods to select a data collection from either tab:
- Select a default status that the workflow will assign to system objects that are ingested by the workflow.
- Select a Run Frequency. Options include:
Periodic
Selection Description Hourly Run the workflow every hour. Every 6 Hours Run the workflow every six hours. Every 24 Hours Run the workflow every day. Every 2 Days Run the workflow every two days. Every 14 Days Run the workflow every two weeks. Every 30 Days Run the workflow every month. Schedule
Selection Description Daily Allows you to run the workflow at a specific time every day. Weekly Allows you to run the workflow at a specific time, on a specific day, every week. - Select whether or not to receive Feed Health Notifications - See the Workflow Health Notifications section for more information.
- Debug Option - The Debug Option checkbox gives you the option to save raw data response files for troubleshooting purposes. Since this option uses a large amount of disk space, it defaults to unchecked. We recommend temporarily enabling the option when you are troubleshooting a workflow issue.
- Click Save.
- Click the Enable/Disable toggle to enable the workflow.