Getting Started - Configuring the TAXII Server
Default ThreatQ Role: Administrative or Maintenance
Custom Role - Action Permissions: Data Exchange - Edit Data Exchange Feeds
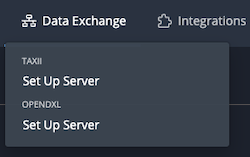
From the Data Exchange Menu select the Set Up Server option under the TAXII section.

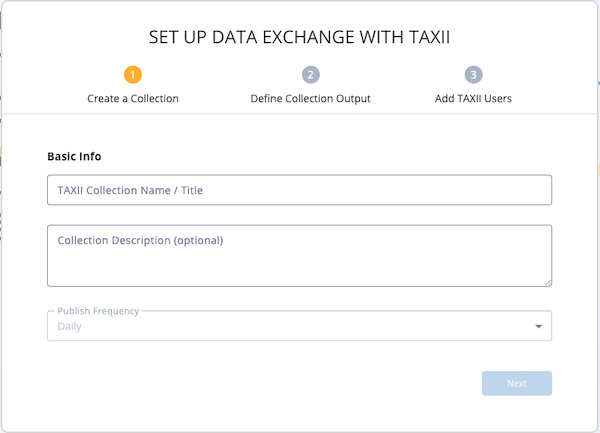
The Set Up Data Exchange with TAXII wizard opens. This wizard guides you through configuring your TAXII server, creating your first TAXII collection, selecting the data collection for the TAXII collection, and adding TAXII user credentials.
This wizard is only available for the initial configuration of your TAXII server. To access it again, you must delete all existing TAXII collections and credentials. After doing this, you may need to clear your browser cache to access the Set Up Server option.
- In the Create a Collection section, enter the name of the new TAXII collection and a brief description of the collection (optional). The Publish Frequency defaults to Daily.
You can click and drag the lower right corner of the Collection Description field to expand it.

- Click the Next button to move to the Define Collection Output section.

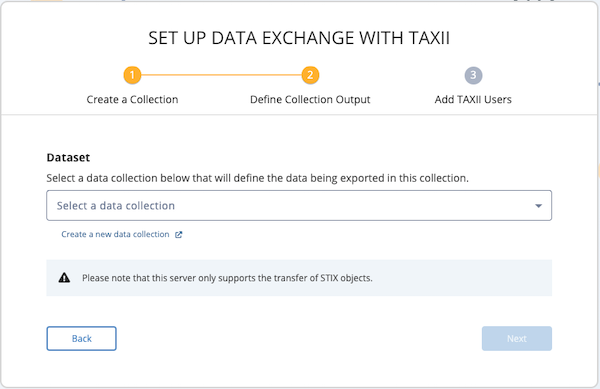
- From this section, use one of the following methods to specify a data collection for the TAXII collection:
- Select an existing data collection - Click the Select a data collection field and select an existing data collection.
- Create a new data collection - Click the Create a new data collection option to access the Threat Library in another tab and create a new data collection.
The selection field only lists data collections that you have permission to access and that include STIX objects. The data collection can include other object types but must include STIX objects and the TAXII collection will only pull STIX object data.
- Click the Next button to move to the Add TAXII Users section.

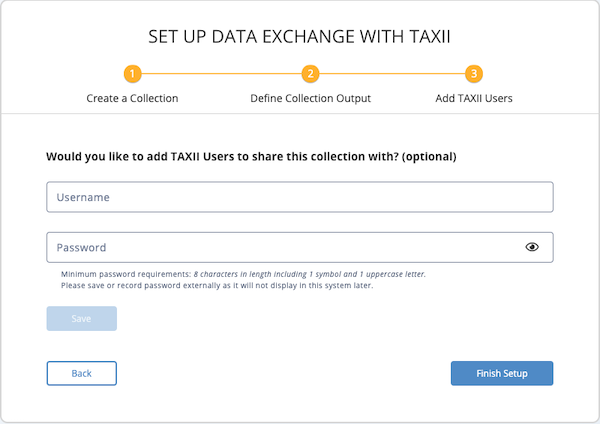
- Optional. From this section, add the first TAXII user by entering the username and password. Go to step 6.
Or, go to step 7 to finish creating the TAXII collection without adding users.To view the password you entered, click the eye icon in the right side of the field.
Be sure to capture the TAXII password information you enter. This information is encrypted and not viewable after entry. If misplaced, you cannot retrieve the password. However, you can assign a new password.
- Click the Save button to save the user entry. Then, click the Add User button to add another. Repeat this process as needed to add more users.
From the Add TAXII Users section, you can use the edit or delete icons to update your entries.
- After you enter the TAXII users, click the Finish Setup button. The TAXII Users & Collections screen is displayed.
When you create a TAXII collection, every Admin user is assigned read-only permission for the associated data collection unless they already have permission to access it. In addition, each time you add a new Admin user, the new user is automatically granted viewer permissions for any data collections associated with a TAXII collection.
- Before you can enable a TAXII collection, it must have at least one user. Then, you can click the toggle next to the TAXII Collection name to enable it.
When you enable a TAXII collection, the first data pull begins in five minutes. The next data pull occurs twenty four hours later.