Creating a TAXII Collection
Default ThreatQ Role: Administrative or Maintenance
Custom Role - Action Permissions: Data Exchange - Edit Data Exchange Feeds
After you set up your TAXII server and first TAXII collection, you can use the TAXII Users & Collections page to create additional collections.
- From the Data Exchange Menu select the Users & Collections option under the TAXII section.
The TAXII Users & Collections page is displayed.

- Click the Create Collection button.
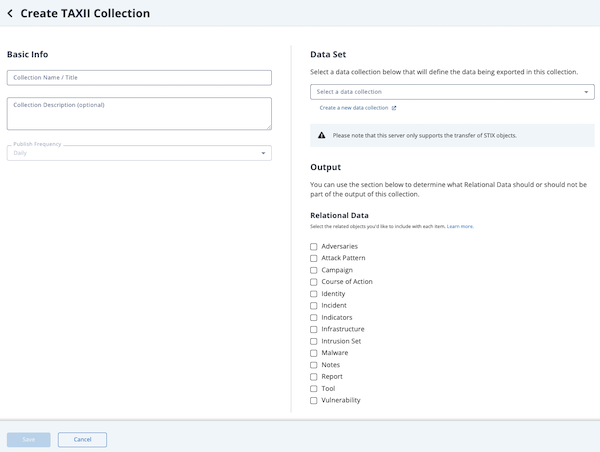
The Create TAXII Collection page is displayed.

- In the Basic Info section, enter the name of the new TAXII collection and a brief description of the collection. The Publish Frequency defaults to Daily.
You can click and drag the lower right corner of the Collection Description field to expand it.
- Use one of the following methods to specify a data collection for the TAXII collection:
- Select an existing data collection - Click the Select a data collection field and select an existing data collection.
- Create a new data collection - Click the Create a new data collection option to access the Threat Library in another tab and create a new data collection. After you create the new data collection, return to the setup wizard’s tab and select the new data collection.
The selection field only lists data collections that you have permission to access and that include STIX objects. The data collection can include other object types but must include STIX objects and the TAXII collection will only pull STIX object data.
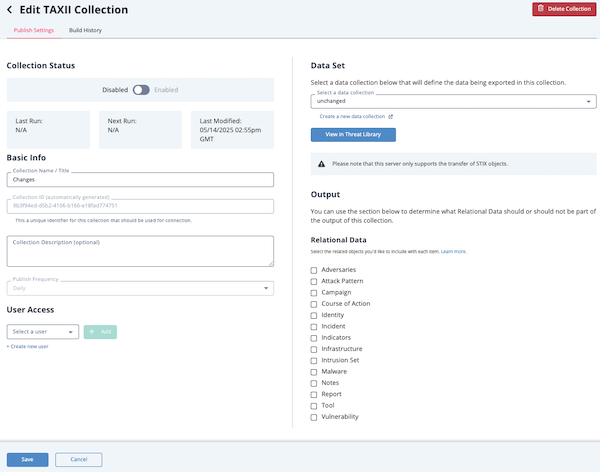
After you select a data collection, the View in Threat Library button is displayed below the Select a data collection field. Click this button to access the Threat Library view of the data collection so that you can review or update the objects specified by the collection.
- In the Relational Data section, check the object types you want to include in the TAXII collection.
- Click the Save button.
The Edit TAXII Collection page is displayed.

- In the User Access section, use one of the following methods to add a user to the TAXII collection:
- Add an existing TAXII user - Click the Select a user field and locate the user by browsing the drop down list or using the search field. After you select the user, click the Add button.
- Add a new TAXII user - Click the Create new user option to launch the Create New User window. Enter the username and password. By default, the user is assigned access to the TAXII collection you are creating. However, you can use the Add option to give the user access to additional TAXII collections. Then, click the Save button to return to the Edit TAXII Collection page.
Be sure to capture the TAXII password information you enter. This information is encrypted and not viewable after entry. If misplaced, you cannot retrieve the password. However, you can assign a new password.
After you add a TAXII user, the username is displayed in the User Access section and you can use the Search box to locate a specific username and/or click the delete icon next to a user name to remove it from the collection.
- You can repeat preceding continue adding users to the collection.
- From the Edit TAXII Collection page, click the Save button to save your changes to the collection.