Data Feeds
In ThreatQ 5x, the Create and Edit Feed pages include an expanded list of Relational Data options.
Data Feeds are used to transmit threat intel data from one instance to another. You select a Data Collections to configure the information to share with other instances, determine the support context included with the intel, and select the instances to share this data with. You also have the ability to override the source of the Data Feeds. After you create the feed, the recipients receive a system notification. They can then subscribe to the feed to begin receiving data from it.
It is recommended that you allow your subscribers to connect to your instance before assigning a Data Feed. This allows your instance to push out the Data Feed immediately. If you assign a Data Feed to an instance that has yet to connect, the Data Feed will be pushed at the next frequency if there are new objects in the Data Feed.
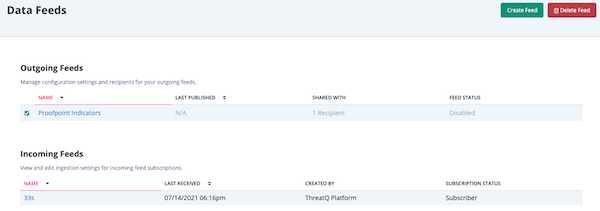
You can manage feeds from the Data Feeds page and the Topology View. The Data Feeds page allows you to create/edit feeds and provides you with a comprehensive list of the Data Feeds you send (Outgoing Feeds) and the ones you receive (Incoming Feeds). Based on the Feed type, Outgoing or Incoming, you can perform different actions.
For incoming feeds, you can:
For outgoing feeds, you can:
Creating a Data Feed
- Click the Data Exchange icon in the top navigation bar of ThreatQ and select Data Feeds.
You can also click the Create Feed button under the Outgoing Feeds pane in your Topology View after selecting your instance node. This will automatically load the Create Feed form in step 2.
The Data Feeds page loads. To make it easier to work with your active feeds, both the Incoming and Outgoing Feeds sections are sorted by feed status. With Enabled feeds listed at the top.

- Click the Create Feed button.
The Create Feed form loads. Both Publishers and Subscribers can create feeds. Publishers can make a feed available to all clients connected to the data transport. Subscribers can only share feeds with Publishers and do not have this option.

- Populate the following form sections to specify the content and recipients of your feed:
Section Description Feed Status Defaults to Disabled. Click the toggle to enable the feed. Basic Info - Feed Name - Enter the name you want to use for your feed.
- Publish Frequency - Select Daily or Hourly depending on how often you want the feed to be published to Subscribers
- Transport - At this time, you can only use the default transport provided by TQX. Additional transport options will be made available in future ThreatQ platform releases.
Description Enter a brief description of the feed. Recipients If you are a Publisher, you can check the Offer Feed to Public box to give all clients connected to the Transport the option to opt into the feed. After you save your feed settings, the Recipients section displays the clients eligible to opt into the feed.
OR
If you are a Publisher or Subscriber, you can click the +Add button to access the Add Recipients window which lists all the connection bundles you created. Select a recipient and click Add Recipient.Subscribers do not have to be connected to be assigned to a Data Feed. The Subscriber will not receive the Data Feed connection profile or system objects until they have connected to the transport and subscribed to the feed.
Dataset Select the Threat Library Data Collection to be exported with feed.
OR
Click the Create a new data collection option to open the Threat Library in a new tab and create a Data Collection.Output Criteria By default, a data feed includes the object types associated with its data collection with the exception of tasks and files. In addition, you can use the checkboxes in the Supporting Context section to include additional information: - Attributes
- Contact Information
- Description
- Event Date
- File Information
- First Seen
- Last Seen
- Objective
- Published At
- Source Code
- Spearphish Details
- Tags - All tags related to an object are pulled.
Only fields used in the data exported are selectable. Fields not associated with the data collection selected are greyed out.
Select the relational data to be included in the transfer. Based on the object you select the following data is included in the feed:System Object Fields Indicator type_id, status_id, class, value Adversary name Event type_id, title Signature type_id, status_id, name, value Custom Objects type_id, status_id, value Data Modifications To override the default source name for the feed, check the Overwrite Source checkbox and enter the new source name. A Subscriber can view the Data Feed source name under object sources in their object details page.
- Populate the following form sections to specify the content and recipients of your feed:
- Click the Save button.
The recipients of the feed receive a system notification that a new feed is available for subscription. This notification includes a link to the Data Feeds page which allows the recipient to review feed details before subscribing.

Editing a Data Feed
The Edit Feeds page allows feed owners to edit a Data Feed. The Recipients section within this page also allows them to review information on feed recipients such as:
- Client Name - The recipients to whom you offered the feed.
- Subscription Status - Subscribed recipients are subscribed and actively receiving data from the feed. Offered recipients have been offered a feed but have not yet subscribed to it. Inactive recipients subscribed at one point and have since unsubscribed.
- Last Received - Date/time the recipient last received data from the feed.
There are two ways to edit a feed:
Method 1 - Data Feeds Link
- Click the Data Exchange link in the top navigation and select Data Feeds.
- Click a Data Feed in the Outgoing Feeds section to load the Edit Feed page.
Method 2 - Topology View
- Click the Data Exchange link in the top navigation and select Connections.
- Click your instance node in the Topology View.
- Click the gear
 icon next to the feed under the Outgoing Feeds pane to open the Edit Feed page.
Subscribing to/Unsubscribing from a Feed
From the topology view, you can easily determine your feed subscription by the appearance of the subscribe/unsubscribe toggle next to the feed name:
 - A green toggle indicates you are currently subscribed. When you hover on a green (subscribed) toggle, the Unsubscribe from feed tool tip is displayed.
 - A white and grey toggle indicates you are currently unsubscribed. In addition, you can hover on subscription toggles to access a description of the actions available to you. For instance, when you hover on a grey (unsubscribed) toggle, the Subscribe to feed tool tip is displayed.
 - A grey toggle with an ellipsis indicates your subscription request is in a pending state. During this time, a Subscription pending tool tip is displayed.
When you subscribe to a feed, your request enters a brief pending state until you receive an automatic confirmation from the feed publisher. When a subscription is pending, you can click the toggle icon to delete it. When you do this, the Are you sure window? prompts you to confirm the deletion.
Unsubscribing from a feed does not remove the objects you have already ingested nor does it reverse any source overrides applied to the feed.
Method 1 - Feed Ingestion Setting Page
- From the Data Feeds page, click an Incoming Feed.
- From the Feed Ingestion Settings page, click the Unsubscribed/Subscribed toggle to change your feed setting.
- Click the Save button.
Method 2 - Topology View, Incoming Feeds - Feed Ingestion Settings
- From the Connections page, click your local node or a remote node in the Topology View.
- In the Incoming Feeds section, click the gear icon next to the feed to which you want to subscribe.
The Feed Ingestion Settings page is displayed. - Click the Feed Status toggle to subscribe to/unsubscribe from the feed.
- Click the Save button.
Method 3 - Topology View, Incoming Feeds - Subscribe/Unsubscribe Toggle
- From the Connections page, click your local node in the Topology View.
- In the Incoming Feeds section, click the toggle next to the feed you want to subscribe to or unsubscribe from.
If you are unsubscribing from the feed, the Are you sure? window prompts you to confirm your choice.
If you are subscribing to the feed, the Subscribe to Feed window allows you to review the Feed details. In addition, you can update the status assigned to indicators and signatures.

- Click the Subscribe button to confirm your subscription to the feed. Your subscription moves to pending status until confirmed. Once confirmed, a subscription confirmation is displayed in the lower right corner.
Specifying Feed Ingestion Settings
The Feed Ingestion Settings page allows you subscribe to/unsubscribe from a feed and to change the status assigned to Indicators and Signatures ingested from a Data Feed from the default status of Review to a status of Retain Existing, Active, Expired, Indirect, Review, or Whitelisted.
if the Review status does not exist on the receiving instance, then the status type defaults to the first status in the list for that object type.
If the status you assign to an Indicator or Signature is deleted, objects from the feed will not be ingested until the default status is updated from the Feed Ingestion Settings page for the feed.
Method 1 - Data Feeds Form
- Click the Data Exchange link in the top navigation and select Data Feeds.
- In the Incoming Feeds section, click one of your incoming feeds.
- The Feed Ingestion Settings page is displayed.

- Click the Unsubscribed/Subscribed toggle to subscribe to/unsubscribe from the feed.
- In the Status Setting column, select a default status for ingested Indicators and/or signatures.
- Click the Save button.
Method 2 - Topology View
- Click on the Data Exchange link in the top navigation and select Connections.
- Click on your local node or a remote node in the Topology View.
- In the Incoming Feeds section, click the gear icon next to the feed you want to update.
The Feed Ingestion Settings page is displayed. - Click the Feed Status toggle to subscribe to/unsubscribe from the feed.
- In the Status Setting column, select a default status for ingested Indicators and/or signatures.
- Click the Save button.
Adding a Recipient
You can share a Data Feed with another instance if you are the owner of that feed.
Publishers can share feeds with other Subscribers. Subscribers can only share feeds with the Publisher.
Method 1 - Data Feeds Form
You can add recipients to your Data Feed from the Data Feeds form.
- Click the Data Exchange link in the top navigation and select Data Feeds.
- In the Outgoing Feeds section, click the Data Feed you want to edit to access the Edit Feed page.
- Click the Add button and check the box next to the instance you want to add.
- Click the Add Recipient button.
Method 2 - Topology View
- Click the Data Exchange link in the top navigation and select Connections.
- Click your transport node in the Topology View.
- In the Client Discovery section, click an instance name to reveal its details.
- Click the Share Feed button.
The Share Feed Dialog box will open. - Select the feed to share with the instance and click on Share Feed.
You also have the option to create a new feed by clicking the Create New Feed button to access the Create Feed page.
Removing a Recipient
Use the following steps to remove recipients with whom you are sharing your Data Feed.
Method 1 - Data Feeds Form
- Click the Data Exchange link in the top navigation and select Data Feeds.
- Click the Data Feed to access the Edit Feed page.
- In the Recipients section, click the delete icon
 to the right of the recipient's name.
 - Click Delete Recipient when prompted to confirm removal.

Method 2 - Topology View - Subscriber Node
- Click the Data Exchange link in the top navigation and select Connections.
- Click the recipient's node.
- Locate the feed to remove in the node's Outgoing Feeds section and click the delete icon.

- When prompted, click the Delete Feed button, to remove the recipient from the feed.
This will not delete the actual Data Feed. It will remove the instance from the feed's recipient list.
Deleting a Data Feed
The Delete Feed button in the Data Feeds page allows you to delete one or more feeds. However, you can only delete the feeds you have created.
Method 1 - Data Feeds page (delete one or more feeds)
- From the Outgoing Feeds section in the Data Feeds screen, check the box next to each feed you want to delete.
- Click the Delete Feed button.
The Are You Sure? window lists the number of feeds to be deleted and prompts you to confirm the deletion.

- Click the Delete feed button.
Method 2 - Edit Feed Page (Delete a Single Data Feed)
You can also delete a Data Feed from the Edit Feed page by clicking the Delete Feed button.