ThreatQ ACE Operation
The web format of this guide reflects the most current release. Guides for older iterations are available in PDF format.
Integration Details
ThreatQuotient provides the following details for this integration:
| Current Integration Version | 1.1.2 |
| Compatible with ThreatQ Versions | >= 5.22.0 |
| Support Tier | ThreatQ Supported |
Introduction
The ThreatQ ACE operation utilizes the ThreatQ ACE library for parsing unstructured text for contextual intelligence such as IOCs, malware, adversaries, and tags.
The operation provides the following action:
- Parse - parses a selected object's unstructured description text for contextualization.
The operation is compatible with the following system objects:
- Adversaries
- Assets
- Campaigns
- Events
- Files
- Incidents
- Malware
- Reports
- Custom Objects
- Cluster
- Compromised Account
- Compromised Asset
- Compromised Card
- Hunt Mission
- IMEI
- Money Mule
- Malware Analysis
- Monitoring
- Organization
- Persona
- RFI
- Suspected Incident
- Threat Assessment
The custom objects listed above are supported but are not required to install and run the operation. See the Installing Custom Objects section for details on how to install a custom object.
Installation
The ThreatQ Marketplace download for this operation contains the operation .whl file and custom object files. The custom objects are not required to install the operation. To install the operation, extract the .whl file from the downloaded zip file and proceed with the standard operation installation process.
Perform the following steps to install the integration:
The same steps can be used to upgrade the integration to a new version.
- Log into https://marketplace.threatq.com/.
- Locate and download the integration zip file.
- Extract the zip's contents.
- Navigate to the integrations management page on your ThreatQ instance.
- Click on the Add New Integration button.
- Upload the operation .whl file using one of the following methods:
- Drag and drop the .whl file into the dialog box
- Select Click to Browse to locate the .whl file on your local machine
ThreatQ will inform you if the operation already exists on the platform and will require user confirmation before proceeding. ThreatQ will also inform you if the new version of the operation contains changes to the user configuration. The new user configurations will overwrite the existing ones for the operation and will require user confirmation before proceeding.
The operation is now installed and will be displayed in the ThreatQ UI. You will still need to configure and then enable the operation.
Configuration
ThreatQuotient does not issue API keys for third-party vendors. Contact the specific vendor to obtain API keys and other integration-related credentials.
To configure the integration:
- Navigate to your integrations management page in ThreatQ.
- Select the Operation option from the Type dropdown (optional).
- Click on the integration entry to open its details page.
- Review any additional settings, make any changes if needed, and click on Save.
- Click on the toggle switch, located above the Additional Information section, to enable it.
Actions
The operation provides the following action:
| Action | Description | Object Type | Object Subtype |
|---|---|---|---|
| Parse | Parses the given object for context. | Adversary, Campaign, Incident, Event, File, Malware, Report | N/A |
Parse
The Parse action parses the selected object's unstructured description text for contextualization.
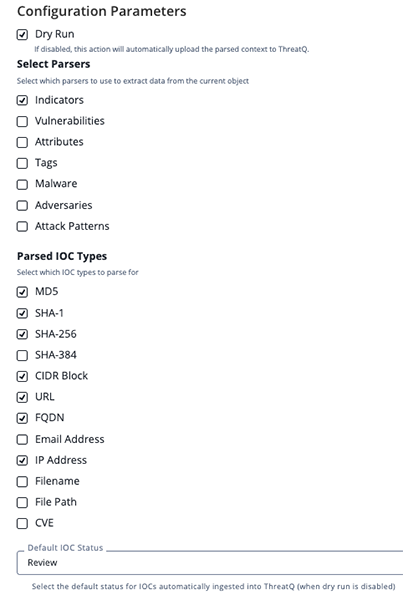
Parse Parameters
The Parse action provides the following configuration parameters:
| Parameter | Description |
|---|---|
| Dry Run | Disable this option to have the operation automatically upload the parsed context to the ThreatQ platform. |
| Select Parsers | Select which parsers to use in extract data from the current object. Options include:
|
| Parsed IOC Types | Select which IOCs types to parse for with the operation. Options include:
|
| Default IOC Status | Select the default status of IOCs that are automatically ingested into the platform. This option only applies when you are have disabled the Dry Run option. |
Example - Parsed Tags

Example - Parsed Attributes

Example - Parsed Adversaries

Example - Parsed Malware

Example - Parsed Indicators

Example - Parsed Vulnerabilities

Example - Parsed MITRE ATT&CK Techniques

Installing Optional Custom Objects
The ThreatQ ACE operation does not require the installation of any custom objects in order be installed on your ThreatQ instance. The operation does support the following optional custom objects:
|
|
The custom objects listed above are included in the integration zip file downloaded from the ThreatQ Marketplace. Use the following steps to install one of the above optional custom objects:
When installing the custom objects, be aware that any in-progress feed runs will be cancelled, and the API will be in maintenance mode.
Use the following steps to install the custom object in ThreatQ v6:
- Download the integration bundle from the ThreatQ Marketplace.
- Unzip the bundle and locate the custom object files.
The custom object files will typically consist of a JSON definition file, install.sh script, and a images folder containing the svg icons.
- SSH into your ThreatQ instance.
- Navigate to the following location:
cd /var/lib/threatq/misc/
- Upload the custom object files, including the images folder.
The directory structure should be as the following:
- misc
- install.sh
- <custom_object_name>.json
- images (directory)
- <custom_object_name>.svg
- misc
- Run the following command:
kubectl exec -it deployment/api-schedule-run -n threatq -- sh /var/lib/threatq/misc/install.sh /var/lib/threatq/misc
The installation script will automatically put the application into maintenance mode, move the files to their required directories, install the custom object, update permissions, bring the application out of maintenance mode, and restart dynamo.
- Delete the install.sh, definition json file, and images directory from the
miscdirectory after the object has been installed as these files are no longer needed.
- Download the integration zip file from the ThreatQ Marketplace and unzip its contents.
- SSH into your ThreatQ instance.
- Navigate to tmp directory:
cd /tmp/
- Create a new directory:
mkdir ace_op
- Upload the <object_file_name>.json and install.sh script into this new directory.
- Create a new directory called images within the ace_op directory.
mkdir images
- Upload the <object_file_name>.svg.
- Navigate to the /tmp/ace_op.
The directory should resemble the following:
- tmp
- ace_op
- <object_file_name>.json
- install.sh
- images
- <object_file_name>.svg
- ace_op
- tmp
- Run the following command to ensure that you have the proper permissions to install the custom object:
chmod +x install.sh
- Run the following command:
sudo ./install.sh
You must be in the directory level that houses the install.sh and json files when running this command.
The installation script will automatically put the application into maintenance mode, move the files to their required directories, install the custom object, update permissions, bring the application out of maintenance mode, and restart dynamo.
- Remove the temporary directory, after the custom object has been installed, as the files are no longer needed:
rm -rf ace_op
Known Issues / Limitations
- The ThreatQ ACE Operation may encounter issues when parsing data from PDFs due to formatting included in these files. For instance, a file path may be truncated due to PDF wrapping which splits the path into two lines.
Change Log
- Version 1.1.2
- Added the ability to parse CVEs as either indicators or vulnerabilities.
- Added a new option to the Parsed IOC Types parse action parameter:
CVE.
- Version 1.1.1
- Updated the operation to access the updated ACE libraries in ThreatQ version 5.22.0.
- The operation will now ingest multiple descriptions for an object (if applicable).
- Updated the operation for improved parsing of hashes from files.
- Updated minimum ThreatQ version to 5.22.0.
- Version 1.1.0
- Added support for the Asset object type and the following custom objects: IMEI, Organization, Compromised Account, Compromised Card, Money Mule, Cluster, Compromised Asset, Hunt Mission, Malware Analysis, Monitoring, Persona, RFI, Suspected Incident, Threat Assessment.
- Version 1.0.1
- The ACE library dependency is now embedded with the operation and no requires manual installation.
- Updated the minimum ThreatQ version to 5.15.0
- Version 1.0.0
- Initial release
PDF Guides
| Document | ThreatQ Version |
|---|---|
| ThreatQ ACE Operation v1.1.2 | 5.22.0 or Greater |
| ThreatQ ACE Operation v1.1.1 | 5.22.0 or Greater |
| ThreatQ ACE Operation v1.1.0 | 5.15.0 or Greater |
| ThreatQ ACE Operation v1.0.1 | 5.15.0 or Greater |
| ThreatQ ACE Operation v1.0.0 | 4.35.0 or Greater |