Securonix SynQ Extension
The web format of this guide reflects the most current release. Guides for older iterations are available in PDF format.
Integration Details
ThreatQuotient provides the following details for this integration:
| Current Integration Version | 1.0.0 |
| Compatible with ThreatQ Versions | >= 6.15.0 |
| Compatible with Securonix Versions | >= 6.4 |
| Support Browsers | Google Chrome >= 143.x Microsoft Edge >= 145.x Firefox >= 148.0 |
| Support Tier | ThreatQ Supported |
Introduction
The Securonix SynQ Extension is a browser-based integration that brings together ThreatQ threat intelligence and Securonix SIEM capabilities into a single, unified analyst workflow. Designed to streamline threat investigation and enrichment, the extension enables users to identify, extract, and analyze indicators, attack patterns, and related intelligence directly from any web page without leaving their browser.
By combining real-time ThreatQ intelligence with Securonix detection data, the extension provides immediate contextual insights, including risk scores, indicator status, and correlated sightings. Analysts can take action in place such as enriching indicators, managing tags and sources, attaching intelligence to incidents, and creating or updating ThreatQ events while maintaining full visibility into related activity across both platforms.
Through its interactive interface, automated parsing capabilities, and seamless integration with investigative workflows, the Securonix SynQ Extension reduces context switching, improves efficiency, and accelerates threat analysis and response for security teams.
Prerequisites
The following is required to install and run the extension:
- A ThreatQ instance running version 6.15.0 or greater.
- A ThreatQ Account with the Primary Contributor role or equivalent if using ThreatQ custom roles.
- ThreatQ authentication credentials depending on the authentication method selected when configuring the integration.
- Your ThreatQ Username, Password, and Client ID if using the Sign in with User Credentials option. You can find your Client ID on your ThreatQ user profile page.
- Your ThreatQ Client ID and Client Secret if using the Sign in with OAuth 2.0 Credentials option.
See the Generating ThreatQ OAuth 2.0 Credentials section of this guide for more information.
- A Securonix instance running version 6.4.0 or greater.
- Securonix authentication credentials:
- Securonix Username
- Securonix Password
- Securonix authentication credentials:
- One of the following web browsers:
- Google Chrome >= 143.x
- Microsoft Edge >= 145.x
- Firefox >= 148.0
Generating ThreatQ OAuth 2.0 Credentials
The Client ID/Secret generated by the command can be used by custom integrations to interact with the API but cannot be used to log into the user interface.
- SSH to your ThreatQ installation.
- Create a new client id and client secret password using the following command:
kubectl exec --namespace threatq --stdin --tty deployment/api-schedule-run -- ./artisan threatq:oauth2-client --name="securonixsynq"
You should see output for the new custom integration user:
session_timeout_minutes: 1440
name: securonixsynq
type: private
client_id: ntdjzwe3mduyyjqxyjdiyza5mzyxmtkx
client_secret: YThlOTBlZjM0YTYxNWM1YjVkODdmMTdjNGY5MzZkYTg4M2RmYmRiZGJmNjk1OTRm
updated_at: 2020-01-14 14:03:27
created_at: 2020-01-14 14:03:27
Installation
Perform the following steps to install the extension:
- Navigate to your browser's web store.
- Search for the following term:
Securonix SynQ. - Locate and click the Securonix SynQ entry in the search results.
- Click on the Add to <your browser> button.
The extension will be installed on your browser. You will still need to configure the extension.
Configuration
Perform the following steps to configure and deploy the extension.
- Pin the extension to your browser.
- Click on the Rhino icon to access the extension's UI.
- Click on the setting gear icon to access the extension's configuration and settings options.
- Complete the following tabs:
Configuring ThreatQ Connection
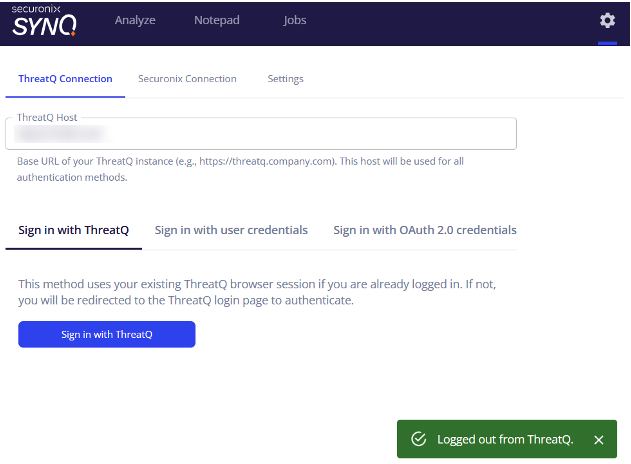
The ThreatQ Connection tab allows you to connect the extension to your ThreatQ instance. The extension provides you with three methods of authenticating with your ThreatQ instance.
- Click on the ThreatQ Connection tab.
- Enter the base URL of your ThreatQ instance in the ThreatQ Host configuration parameter.
- Proceed with selecting a sign in method. Options include:
Sign in with ThreatQ
The Sign in with ThreatQ option utilizes the active session you have with the ThreatQ platform.
- Select the Sign in with ThreatQ tab for the ThreatQ Connection method.
- Click on the Sign in with ThreatQ button.
- The extension will use your active ThreatQ session to authenticate. In the event that you do not an active session in the browser, you will be directed to the platform's login page.
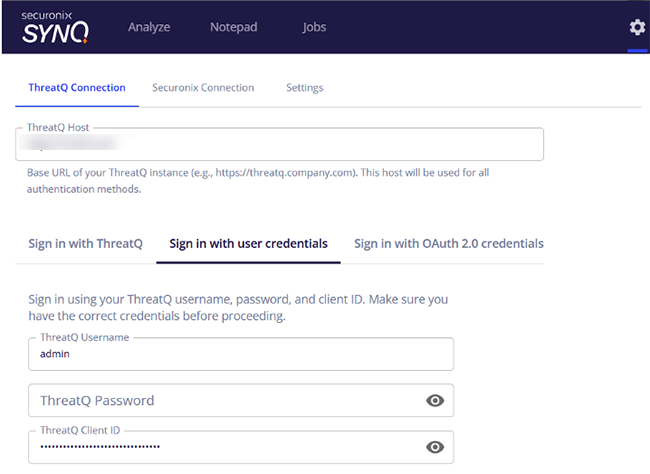
Sign in with User Credentials
The Sign in with User Credentials option utilizes your local ThreatQ login credentials.
- Select the Sign in with User Credentials tab for the ThreatQ Connection method.
- Enter the following parameters:
Parameter Description ThreatQ Username Enter your ThreatQ username. ThreatQ Password Enter the password associated with the username above. ThreatQ Client ID Enter your Threat Client ID. This ID is located on your ThreatQ user profile page. - Click on the Save & Test Connection button to test your settings. The extension will respond with a
ThreatQ connection successfulmessage if it was able to authenticate with ThreatQ.
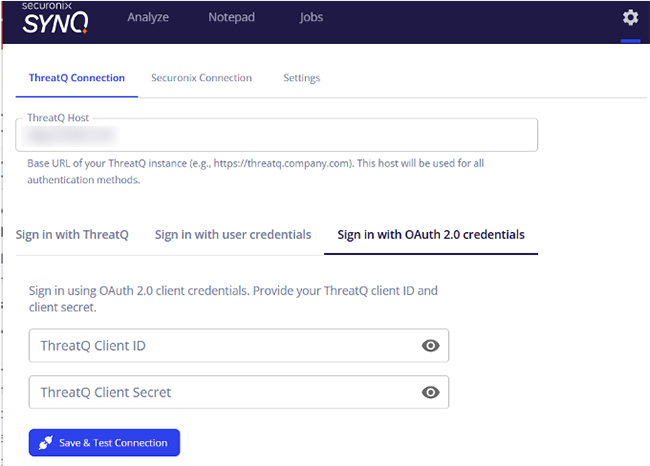
Sign in with OAuth 2.0 Credentials
The Sign in with OAuth 2.0 Credentials option utilizes OAuth credentials generated for the integration.
Review the Generating ThreatQ OAuth 2.0 Credentials section for steps on generating credentials.
- Select the Sign in with OAuth 2.0 Credentials tab for the ThreatQ Connection method.
- Enter the following parameters:
Parameter Description ThreatQ Client ID Enter the Client ID generated using the OAuth credentials command. ThreatQ Client Secret Enter the password associated Client ID above. - Click on the Save & Test Connection button to test your settings. The extension will respond with a
ThreatQ connection successfulmessage if it was able to authenticate with ThreatQ.
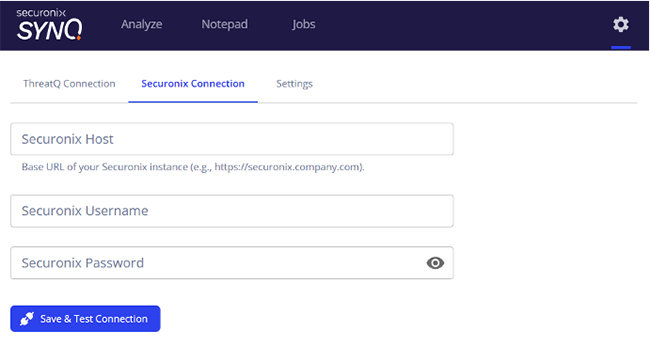
Configuring Securonix Connection
- Click on the Securonix Connection tab.
- Enter the following configuration parameters:
Parameter Description Securonix Host Enter the base URL for your Securonix host. Do not include URL pathways. Securonix Username Enter your Securonix username. Securonix Password Enter the password associated with the username above. - Click on the Save & Test Connection button to test your settings. The extension will respond with a
Securonix connection successfulmessage if it was able to authenticate with Securonix.
Configuring Settings
The Settings tab allows you to configure extension browser behavior and operation.
- Click on the Settings tab.
- Enter the following settings parameters:
Parameter Description Background Scanning Enable this parameter to allow the extension to automatically scan your current browser page for indicators and preload them in the Analyze page within the extension popup. Default Indicator Status Select the default status for indicators that are added via the browser extension. Default Source Name Enter a default source name for all objects loaded into the browser Extension. This default source name will be applied upon uploading the selected objects to ThreatQ. - Click on the Save & Test Connection button to test your settings.
Usage
The following section will detail the layout of the extensions and an overview of its main features.
Domain Capture
There are two entry points to using the extension once it has been installed and configured. The following is a brief description of each entry point.
- Extensions Toolbar Popup - The extension can be accessed via your browser's toolbar, to the right of your URL bar. If you do not see a ThreatQ icon, you may need to click the puzzle piece icon and pin the Securonix Extension.
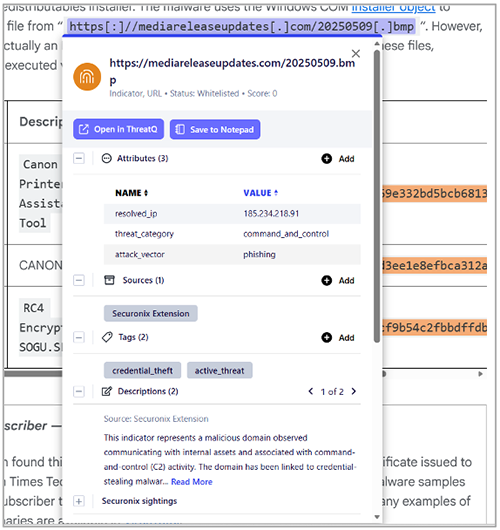
- Current Web Page (when background scanning is enabled) - When background scanning is enabled, the extension automatically highlights detected Indicators and Attack Patterns on the current web page. Hovering over any highlighted Indicator or Attack Pattern opens an enrichment popup displaying detailed ThreatQ and Securonix information. From this popup, you can review the current intelligence context and perform supported investigation and enrichment actions. For additional details, refer to the ThreatQ & Securonix Enrichment Panel section.
Tab Layout
The extension can be navigated and its operation configured via its three main tabs:
- Analyze
- Notepad
- Jobs
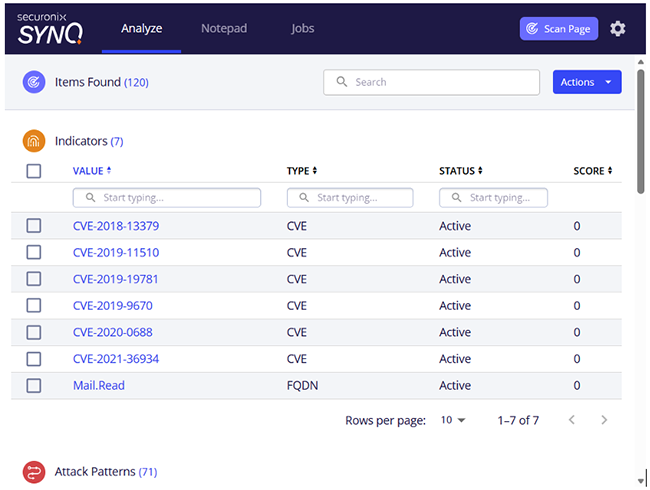
Analyze Tab
The Analyze tab displays data related to the currently active browser tab and persisted only for that tab. When background scanning is enabled, the data is automatically extracted and reflected in the Analyze tab. If background scanning is disabled, clicking the Scan Page button will manually extract data from the current page and update the Analyze tab. When you switch to a different browser tab, the Analyze tab updates to reflect data from the newly active page.
Scan Page
The Scan Page button in the top navigation bar is enabled exclusively on the Analyze tab. When triggered, it parses the currently active web page and extracts detected Indicators and Attack Patterns for further analysis.
Global Search
The global search capability enables you to perform unified searches across both the Indicators and Attack Patterns tables. The global search enhances investigation workflows by enabling rapid filtering and correlation of Indicators and Attack Patterns within a single, consolidated search experience.
Once an object performs a successful lookup, a redirect icon appears near the object value. Clicking this icon opens a modal that displays detailed information about the selected Indicators, Attack Patterns, Adversaries and Reports. From this modal, you can update the status and score, add or view sources and tags, and review descriptions and other relevant details.
See the ThreatQ & Securonix Enrichment Panel section for more information.
The Analyze tab contains four table sections: Indicators, Attack Patterns, Adversaries and Reports:
Indicator Table Column Definitions
| Column | Description | ||
|---|---|---|---|
| Value | The extracted indicator value identified from the content such as IP address, domain, URL, or hash. | ||
| Type | The classification of the indicator. Supported indicator types include
|
||
| Status | Represents the current status of the indicator. If the indicator has not been looked up, the default status configured in the settings is applied. Once a lookup is performed, the status is synchronized with the corresponding value from ThreatQ. | ||
| Score | Indicates the indicator risk score. A default score of 0 is assigned initially and is updated automatically based on the ThreatQ lookup results. |
Attack Pattern Table Column Definitions
| Column | Description |
|---|---|
| Value | The extracted attack pattern value identified from the content. |
Adversaries Table column definitions
| Column | Description |
|---|---|
| Value | The extracted adversaries value identified from the content. |
Reports Table Column Definitions
| Column | Description |
|---|---|
| Value | Value The extracted web page title. |
Actions
The Actions dropdown menu provides the ability to perform bulk actions on your selected data. The actions can be applied to all items in the table or a user-selected list.
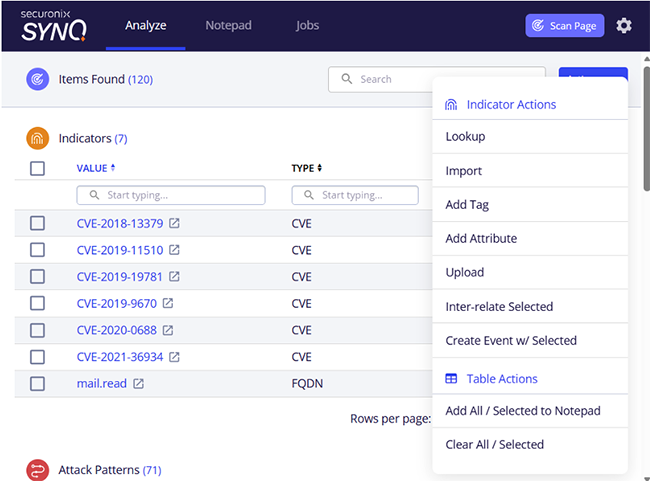
Bulk actions available for the Analyze tab include:
| Column | Description |
|---|---|
| Lookup | Perform a lookup for the selected indicators/Attack Patterns/Adversaries/Reports. If found, the score and status will be added to the entry within the table. |
| Import | Takes the selected (or all) indicators and runs them through the ThreatQ Indicator Import workflow in a new tab. |
| Add Tag | Bulk add tags to objects within the Analyze tab. |
| Add Attribute | Bulk add attributes to objects within the Analyze tab. |
| Upload | Quickly uploads the indicator without using the indicator import workflow. The action will use the defaults status set on the Settings tab. |
| Inter-Relate Selected | Relates all selected indicators/Attack Patterns/Adversaries/Reports to each other within ThreatQ. |
| Create Event with Selected | Creates an event for the selected indicators/Attack Patterns/Adversaries/Reports within ThreatQ. You will be prompted for details for the Event after selecting the action. |
| Add All / Selected to Notepad | Adds the selected indicators/Attack Patterns to your notepad.
The indicators/Attack Patterns/Adversaries/Reports will not be removed from the Analyze page until you change tabs. |
| Clear All / Selected | Clears the selected indicators/Attack Patterns/Adversaries/Reports in your Analyze table. |
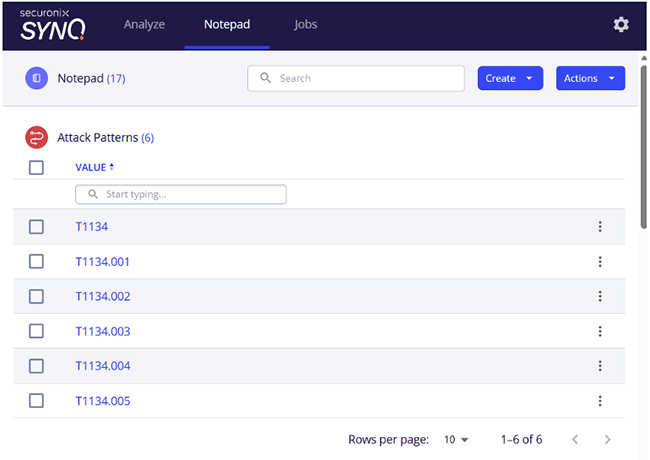
Notepad Tab
The Notepad tab serves as a cache and persistent storage for the indicators, Attack Patterns, Adversaries and Report you have curated and saved for investigation. You can add Indicators, Attack Patterns, or Adversaries to this tab either via the popup on the current web page or through Bulk Actions in the Analyze tab.
Once saved, the data remains available even after you close your browser. From the Notepad tab, you can view detailed object information, create relationships, and perform additional actions as needed.
Actions
The Actions dropdown menu provides the ability to perform bulk actions on your selected data. The actions can be applied to all items in the table or a user-selected list.
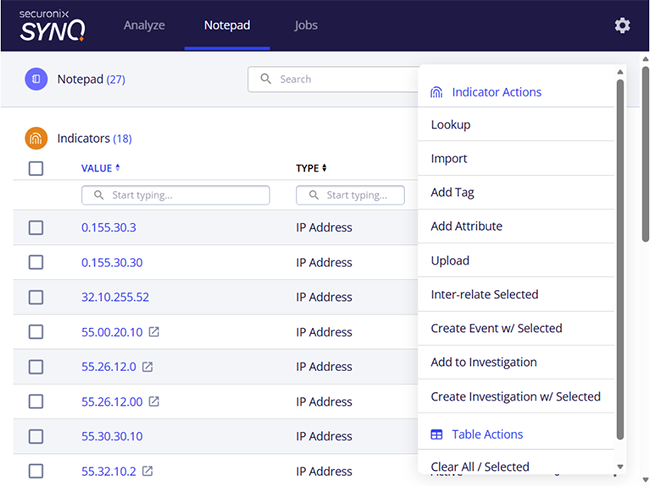
Bulk actions available for the Notepad tab include:
| Column | Description |
|---|---|
| Lookup | Perform a lookup for the selected indicators/Attack Patterns/Adversaries/Reports. If found, the score and status will be added to the entry within the table. |
| Import | Takes the selected (or all) indicators and runs them through the ThreatQ Indicator Import workflow in a new tab. |
| Add Tag | Bulk add tags to objects within the Analyze tab. |
| Add Attribute | Bulk add attributes to objects within the Analyze tab. |
| Upload | Quickly uploads the indicator without using the indicator import workflow. The action will use the defaults status set on the Settings tab. |
| Inter-Relate Selected | Relates all selected indicators/Attack Patterns/Adversaries/Reports to each other within ThreatQ. |
| Create Event with Selected | Creates an event for the selected indicators/Attack Patterns/Adversaries/Reports within ThreatQ. You will be prompted for details for the Event after selecting the action. |
| Add to Investigation | Adds all the selected indicators/Attack Patterns/Adversaries/Reports to selected Investigation from the prompted modal. |
| Create Investigation with Selected | Creates an investigation for the selected indicators/Attack Patterns/Adversaries/Reports, within ThreatQ. You will be prompted for details for the Investigation. |
| Clear All / Selected | Clears the selected indicators/Attack Patterns/Adversaries/Reports in your Analyze table. |
Global Search
The platform also provides a global search capability that enables you to perform unified searches across the Indicators, Attack Patterns, Adversaries and Reports tables. The global search enhances investigation workflows by enabling rapid filtering and correlation of Indicators, Attack Patterns, Adversaries and Reports within a single, consolidated search experience.
Create Indicator / Attack Patterns / Adversaries
The Notepad lets you create new Indicators, Attack Patterns or Adversaries using the Create options in the top-right corner. This allows you to manually record relevant findings, enrich the investigation with custom data, and ensure that important Indicators, Attack Patterns or Adversaries are properly tracked.
Row Level Actions
Perform row-level actions such as editing, removing, uploading, lookup, or removing the values. Additionally, you can add Indicators, Attack Patterns, Adversaries and Reports to an existing investigation or create a new investigation and add them directly when the Indicator/Attack Pattern/Adversaries/Reports is successfully looked up.
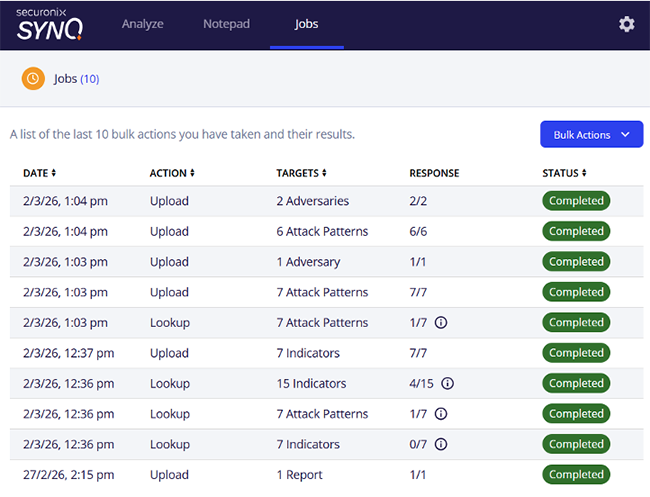
Jobs Tab
The Jobs tab will show any background tasks that are being executed, in the execution queue, or have finished executing. Any bulk action from the Analyze or Notepad page will create a job to handle the action, and you will be able to see them listed in this tab. You will be able to see the status and response for each task, which can give you visibility into what the extension is currently "working on."
You are also given Bulk Actions on this page to clear all the jobs.
The data available in the Jobs tab table is as follows:
| Column | Description |
|---|---|
| Date | Displays the date and time when the job was created. |
| Action | Indicates the operation performed by the job, such as adding tags, adding Indicators, Attack Patterns, Adversaries and Reports to an investigation, interrelating objects, or other supported bulk actions. |
| Targets | Displays the total number of Indicators, Attack Patterns, Adversaries and/or Reports selected for the job execution. |
| Response | Displays the number of Indicators, Attack Patterns, Adversaries and Reports on which the action was successfully executed. This column also includes informational icons that provide detailed status messages or error descriptions via tooltips. |
| Status | Represents the current execution state of the job. Supported statuses include Pending (job queued and awaiting execution), In Progress (job currently running), Completed (job successfully finished), and Failed (job interrupted or terminated due to an error). |
Configuration
The Configuration tab contains the configuration parameters for the extension.
See the Configuration section for more details.
ThreatQ & Securonix Enrichment Panel
The enrichment panel provides consolidated intelligence and detection context for a selected Indicator, Attack Pattern, Adversaries or Reports. The panel can be accessed either by clicking the object value directly from the extension lookup results or by hovering over a highlighted Indicator, Attack Pattern, Adversaries or Reports directly on the web page. It displays detailed enrichment information including risk score, status, attributes, tags, source intelligence, descriptions, correlated Securonix sightings, and all ThreatQ objects linked to the selected Indicator or Attack Pattern, enabling quick investigation and informed decision-making.
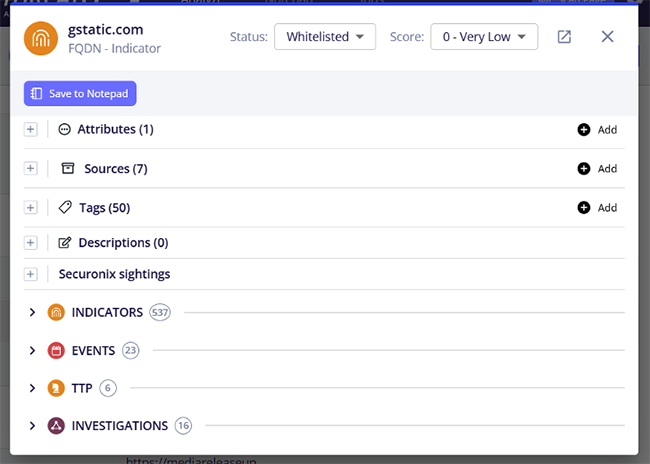
In addition to viewing enrichment data, the panel supports interactive investigation workflows such as updating the indicator status and score, adding or modifying tags and sources, creating ThreatQ sighting events directly from Securonix sightings, and fetching specific Securonix incidents to attach detailed contextual information.
The table below describe each of these capabilities in detail.
| Capability | Description |
|---|---|
| View and Update Indicator Risk Score and Status | This section displays the current risk score and status of the selected indicator. Analysts can review and update both values based on ongoing investigation findings, observed behavior, and available contextual intelligence, allowing the indicator’s risk posture to be adjusted as the investigation evolves. 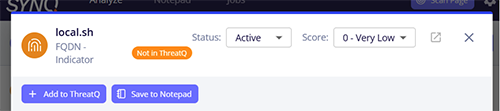
|
| Create and Manage Indicator Sources and Tags | This section allows you to view, add, and manage sources and tags associated with the selected indicator or Attack Pattern. Sources help identify the origin of the intelligence, while tags provide contextual classification for efficient categorization, correlation, and search. These values can be updated based on investigation insights and evolving threat context. 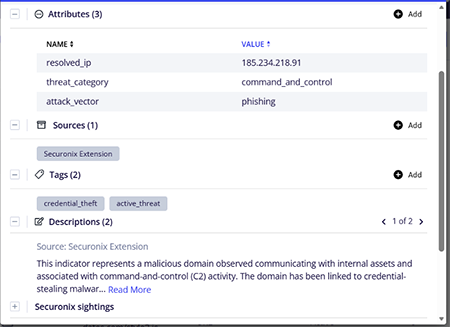
|
| View Correlated Securonix Sightings | This section displays correlated Securonix sightings for the selected indicator, including the first and most recent event timestamps observed within the last seven days. Sightings are shown in the user’s local time zone, with the corresponding UTC timestamp available on hover.
You can pivot directly to Securonix Spotter to conduct deeper investigation and gain additional behavioral and contextual insights related to the indicator. Based on the observed Securonix sightings, users can also create or update a corresponding ThreatQ Sighting event to maintain synchronized threat intelligence context. For more information on create/update sighting event, see the Create or Update ThreatQ Sighting Events from Securonix Sightings capability row. 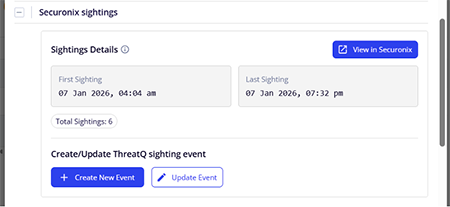
|
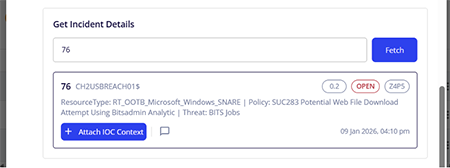
| Attach Indicator Context or Add Investigation Comments to Securonix Incidents | This section enables you to enrich active Securonix incidents with detailed ThreatQ intelligence context for a specific indicator. While investigating a recent attack or suspicious activity in Securonix, you can provide the incident ID and attach structured indicator context directly to the incident.
By selecting Attach IOC Context, the extension automatically adds relevant details such as Indicator Value, Indicator Type, ThreatQ reference URL, Indicator Status, Indicator Score, and Intelligence Source to the specified Securonix incident. Additionally, analysts can add custom investigation notes by selecting Add Comment, allowing manual insights and observations to be recorded alongside the attached context. This capability helps maintain investigation continuity by correlating ThreatQ intelligence with Securonix incident workflows. |
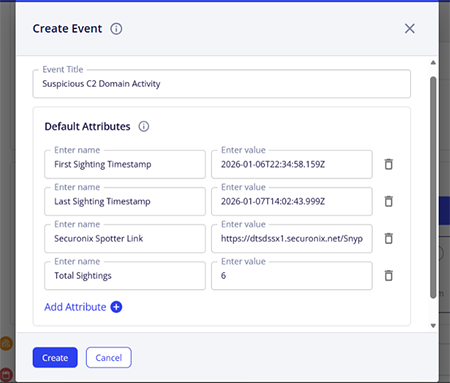
| Create or Update ThreatQ Sighting Events from Securonix Sightings | This section allows you to create or update ThreatQ Sighting events directly from correlated Securonix sightings. When creating a new event, selecting Create Event automatically populates a predefined set of default attributes, including First Sighting Timestamp (UTC), Last Sighting Timestamp (UTC), Total Sightings Count, and the Securonix Spotter link for deeper investigation.
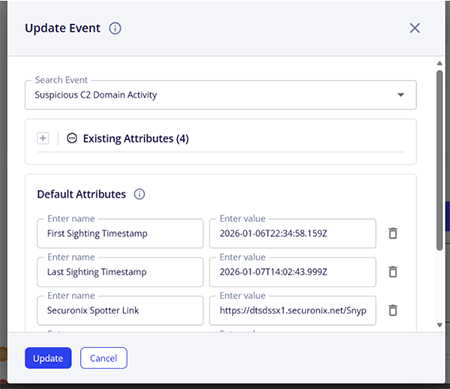
The event description is also added and includes the first and last raw sighting events along with the Securonix Spotter reference, ensuring sufficient investigative context is captured at creation time. Once created, the new ThreatQ Sighting event is visible under the ThreatQ Objects section beneath the Securonix Sightings panel. The Update Event option enables you to select an existing ThreatQ Sighting event from a dropdown list and update it with the latest Securonix sighting data. Upon selection, all existing event attributes are displayed, along with an indication of attributes that will be overridden if they already exist. You can also add new attributes as needed. When an event is updated, its description is refreshed with the most recent raw sighting events and the updated Securonix Spotter link, ensuring the ThreatQ event remains synchronized with the latest Securonix observations. |
| View All ThreatQ Objects Associated with the Indicator, Attack Pattern, Adversaries or Reports | This section displays all ThreatQ objects associated with the selected Indicator, Attack Pattern, Adversaries or Reports. It provides visibility into linked entities such as investigations, events, and other related objects. Analysts can review key details for each associated object directly within the panel and select any object to navigate to the corresponding record in ThreatQ for deeper analysis and context. 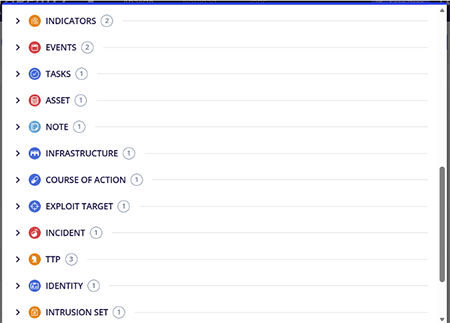
|
Context Menu
The context menu, initialized by the right-clicking on the screen, provides a way to quickly interact with the extension. Extension actions available will differ based on whether the information has been highlighted on the screen.
Highlighted Context
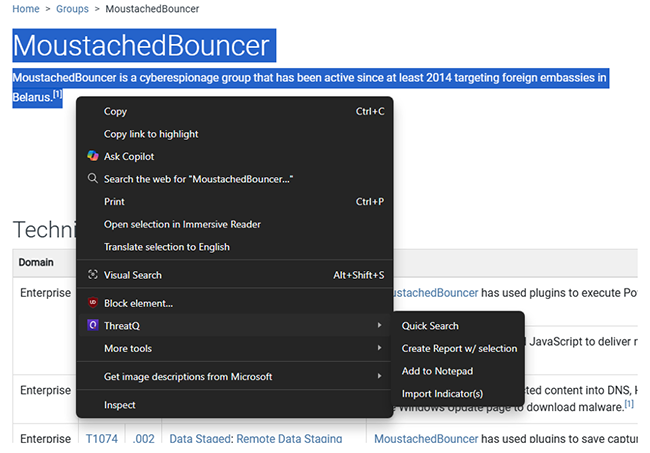
The following actions are available if you open the context menu while highlighting data:
| Action | Description |
|---|---|
| Quick Search | Perform a quick search is see if the indicator/Attack Pattern/Adversaries are already in the ThreatQ. If found, the data is added to the notepad |
| Create Report w/ Selection | Select highlighted text and create a report from it. |
| Add to Notepad | Add the selected indicator/Attack Pattern/Adversaries directly inside the Notepad section. If selection does not match any known pattern, you will be prompted to select the type manually.
Firefox users on version < 149 will need to set the |
| Import Indicator(s) | Import the highlighted indicators/attack patterns/adversaries. |
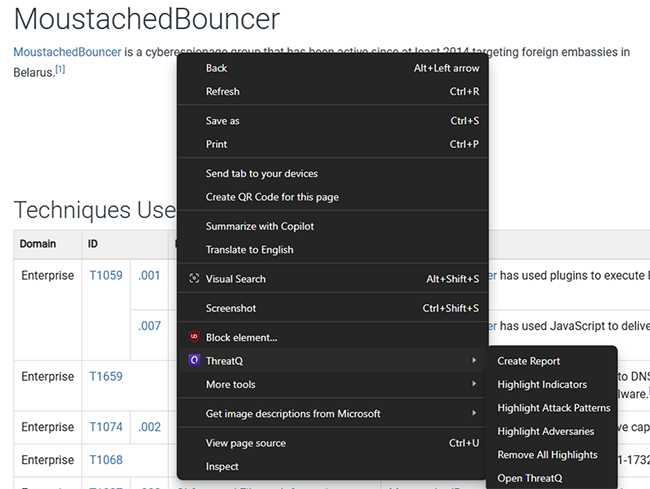
Non-Highlighted Context
The following actions are available if you open the context menu without highlighting data:
| Action | Description |
|---|---|
| Quick Search | |
| Create Report w/ Selection | |
| Add to Notepad | |
| Import Indicator(s) |
Troubleshooting & FAQs
The following are common scenarios you may encounter when installing and configuring the extension.
Save & Test Connection fails for the ThreatQ or Securonix
If your connection fails when saving your ThreatQ connection or Securonix connection configuration, it is most likely due to the host not being reachable. Confirm that your hostname is reachable from your local machine. To test this, you can open up a terminal or command prompt and try to ping the hostname. If it fails, that is why the extension cannot connect. If it succeeds, the issue may lie elsewhere.
The extension is not parsing indicators/Attack Patterns/Adversaries/Reports automatically
Indicators, Attack Patterns, Adversaries or Reports are not parsed automatically by default. The extension provides two methods to parse Indicators, Attack Patterns, Adversaries or Reports. The first option is Background Scanning, which, when enabled, automatically parses and highlights Indicators, Attack Patterns, Adversaries or Reports on supported web pages in real time. The second option is the Scan Page action available on the Analyze page. This option allows users to manually trigger parsing and extraction of Indicators and Attack Patterns on demand.
The extension doesn't parse all the type of Indicators
The extension does not parse all indicator types. Currently, it supports extraction of the following indicator types only: IPv4 Address, IPv6 Address, URL, FQDN, Email Address, MD5, SHA-1, and SHA-256. The current indicator also supports a defanged version of the above-mentioned indicator types.
Why are the first and last Securonix sightings limited to the last seven days?
Securonix sightings displayed in the extension are limited to the last seven days because the Securonix Search API supports queries for a maximum lookback period of seven days. As a result, only sightings within this timeframe are retrieved and shown. For extended analysis beyond seven days, use the View Securonix option to navigate to Securonix Spotter, where you can investigate the indicator across broader time ranges.
Uninstalling the Extension
The steps to uninstall the extension are as follows
- Open your browser.
- Click on the puzzle piece icon to the right of your browser's URL bar.
- Select the Manage Extensions button at the bottom.
- Click the Remove button within the extension's card entry from the Extensions page.
Change Log
- Version 1.0.0
- Initial release
PDF Guides
| Document | ThreatQ Version |
|---|---|
| Securonix SynQ Exension Guide v1.0.0 | 6.15.0 or Greater |