Hadoop Deployment
The web format of this guide reflects the most current release. Guides for older iterations are available in PDF format.
Integration Details
ThreatQuotient provides the following details for this integration:
| Current Integration Version | 3.3.0 |
| Compatible with ThreatQ Versions | >= 4.41.0 |
| Support Tier | ThreatQ Supported |
Introduction
This guides describes the implementation of a NiFi process flow used to read and parse NetFlow log files as well as match the destination IP address for each record against a threat intelligence table in HBase.
The resulting modified dataset is then written to HDFS, and optionally to a Hive table. Additionally, the NetFlow records that matched to HBase are published to a Kafka topic, and read by an Elasticsearch instance downstream.
Prerequisites
The following personnel and dependencies have been identified to ensure for a smooth deployment of the agreed-upon products and/or services.
Networking
All required firewall rules are applied to allow for communications to, from, or between the applicable products, services, and/or API endpoints. Specifically:
- Ports are opened and firewall rules configured between ThreatQ and NiFi.
- Ports are opened and firewall rules configured for communication among all applications in the Hadoop cluster.
- At a minimum all ports listed in these documents should be opened in a Cloudera Hadoop deployment:
- Network access control modifications, proxy and firewall configurations to allow for the necessary communications between internal and external tools and data feeds.
- If applicable, the customer will inform ThreatQuotient of any custom network configurations that would require modification(s) to the standard ThreatQ configuration to include, but not limited to:
- DNS resolution
- Proxy configuration
- Routing tables
Hardware / Software / Virtual Appliance(s)
- All ThreatQuotient equipment/virtual appliances are provisioned, online, and in-service.
- All third-party products and/or services are installed, configured, and operating normally.
- If ThreatQ is already installed, ThreatQuotient engineers will require:
- The username/password for command line root access to the appliance via SSH port 22.
- The username/password for the maintenance account in order to access the appliance via the UI.
NiFi
This section covers the prerequisites for NiFi.
Import XML Template
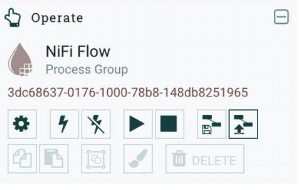
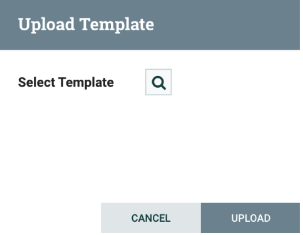
Navigate to the NiFi UI. On the Instruments menu, click the right-most button, Upload Template.
Next, click the magnifying glass to the right of Select Template. This opens the window that allows you to navigate to the XML template to import.
Add the Template to the Canvas
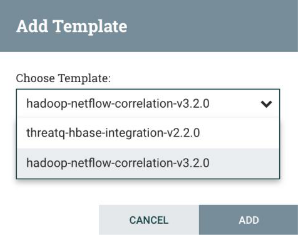
To add the template to your canvas, go to the NiFi UI and drag a Template from the instruments onto the canvas.

This opens a modal window with a dropdown from which you can choose the template that was just imported. Select the template threatq-netflow-correlation- <version> which parses NetFlow files and matches their content against threat intelligence in HBase.
JVM Heap Maximum
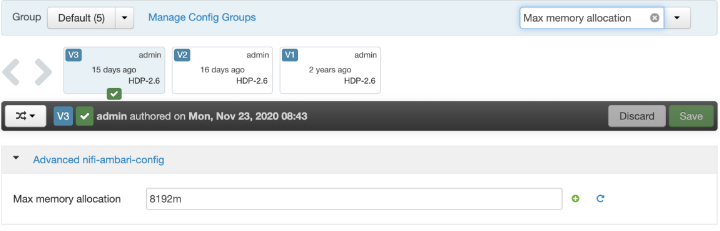
The default memory allocation for NiFi is 512MB, which needs to be increased to at least 4GB, but the recommended is 8GB. To increase it, navigate to Ambari, click the NiFi application, and then click Configs for NiFi. Search for “Max memory allocation”, as shown in the snapshot below. Change the value to 8192m and save it. After the changes are made, Ambari prompts you to restart all the NiFi services. Click restart and wait for the application to restart.
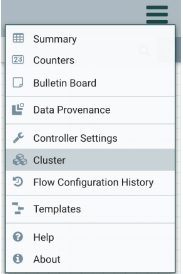
After the restart is complete, validate the number of resources used by NiFi. In Ambari-managed Hadoop clusters, this can be done by navigating to the NiFi UI, click on the hamburger menu in the upper right corner, and then click on the Cluster settings. On the NiFi resources, navigate to the JVM tab, which shows the Java heap usage.
This is also a good way to determine the optimal memory needed for NiFi. Run the NiFi flow multiple times with different loads, and make sure that the Heap Utilization metric on the JVM tab stays below 70%. That leaves a buffer to handle occasional flows with peak memory demand.

User Permissions
NiFi runs as the user specified in the bootstrap.conf file, the content of which is accessible via Ambari. This user should have the proper permissions to:
- Parse the NetFlow files with nfdump
- Write to HDFS
- Publish to Kafka topics
- Perform lookups against HBase
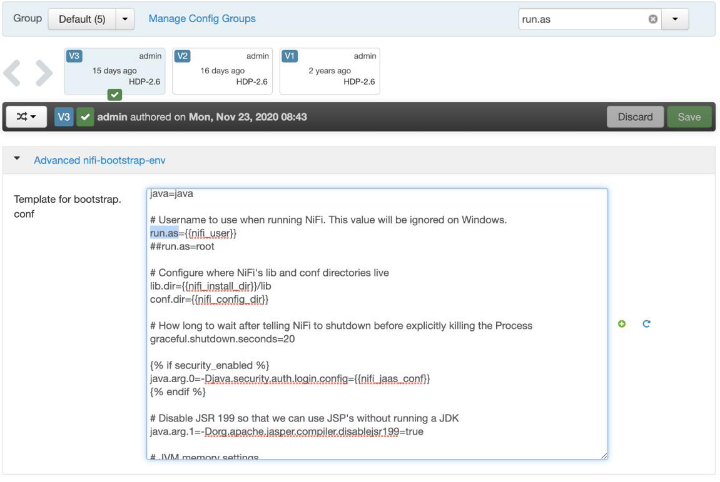
If you need to change the user, navigate to the NiFi configuration in Ambari, and in the search, type run.as. This should bring up the content of the bootstrap.conf file. Make the required changes and restart all the services Ambari asks for. In the example below, NiFi runs as the “nifi” user.
Required Packages
Install nfdump on the instance that runs NiFi. This package is used for extracting the content of the NetFlow files.
sudo yum install -y nfdump
After installation of the package, validate that nfdump works. The example below extracts the first 300 lines from a NetFlow file.
Kafka
In Kafka, create a topic with the same name as in the PutKafka processor in NiFi. Refer to the section NiFi Flow Configuration for the topic in the PutKafka processor. Below is a simple example that creates a topic called “incidents” and lists all Kafka topics. Use the parameters (partitions, replication factor, Zookeeper host/port) applicable to your environment. For a production environment, we recommend using a higher partitions and replication factor.
ssh <user>@<Kafka Host>
./bin/kafka-topics.sh --zookeeper <Zookeeper Host>:<Zookeeper Port> --create –-topic Kafka Topic --partitions 1 --
replication-factor 1
./bin/kafka-topics.sh --zookeeper <Zookeeper Host>:<Zookeeper
Port> --list
For more information refer to these documents:
- Kafka in a Cloudera Hadoop deployment:
https://docs.cloudera.com/HDPDocuments/HDP3/HDP-3.1.5/kafka-working- with-topics/content/creating_a_kafka_topic.html - General Kafka documentation:
https://kafka.apache.org/documentation/
HBase
The NiFi flow described in this document ingests NetFlow log data, parses the individual records from that file, and searches for each destination IP address in the NetFlow records within an HBase table.
At a minimum, the NiFi flow expects that there is an HBase table already configured to ingest Threat Intelligence from ThreatQ. In the provided XML template, the HBase table has the following configuration:
- Name: threatqdata
- Column family: msg
- Column qualifier: status
If the HBase table in the customer’s environment has different properties, the above values need to be modified in NiFi.
The proper configuration of HBase is key to optimizing the NiFi flow and reducing the time it takes to search an HBase table for the destination IP address from each NetFlow log record. HBase configuration and fine tuning is beyond the scope of this document. For further information, please consult your IT team, and if applicable, your Hadoop deployment vendor.
HDFS
User Permissions
The NiFi flow contains a processor that writes files to HDFS. For the processor to work properly, it is important that the user NiFi runs under has read and write permissions on HDFS. If the user does not have those permissions, the processor will fail with a Permission Denied error.
Store the Processed Logs from NiFi
Create a folder in HDFS to store the NetFlow logs processed using the NiFi flow. The path to that folder is required to configure the HDFS processor as described in the Save the Results to HDFS section.
ELK Stack
The NiFi flow uses Kafka to send all NetFlow records that match to the Threat Intelligence in HBase into an Elastic index. In order for this work, the integration requires that the ELK stack – Elasticsearch, Logstash and Kibana - is deployed and configured. Additionally, firewall rules should be in place to allow traffic to flow between the Kafka host(s) and Elastic.
The only configuration required is adding an ingestion source for Logstash. The following are the steps to add a new source:
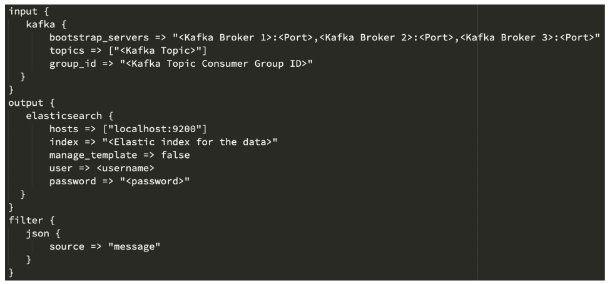
vi /etc/logstash/conf.d/kafka_input.conf
Enter the following configurations for Input, Output and Filter. This template contains the minimum required configurations to establish the connection between Elastic and Kafka.
NiFi Process Flow
The following sections detail the configuration of each processor in the NiFi flow that parses NetFlow logs and matches them against threat intelligence in HBase. The flow has also been provided separately as an XML file to import into NiFi. The provided template contains default values that are enough to set up a working flow. Make sure to review the process flow and modify any of the processors that are not applicable to your production environment.
After the NiFi template has been imported, it is displayed on the canvas as a Processor Group. Double click it to open.
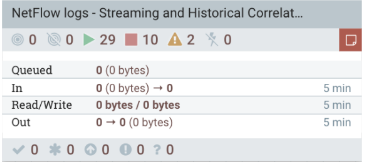
The process flow in the template will be similar to this diagram:
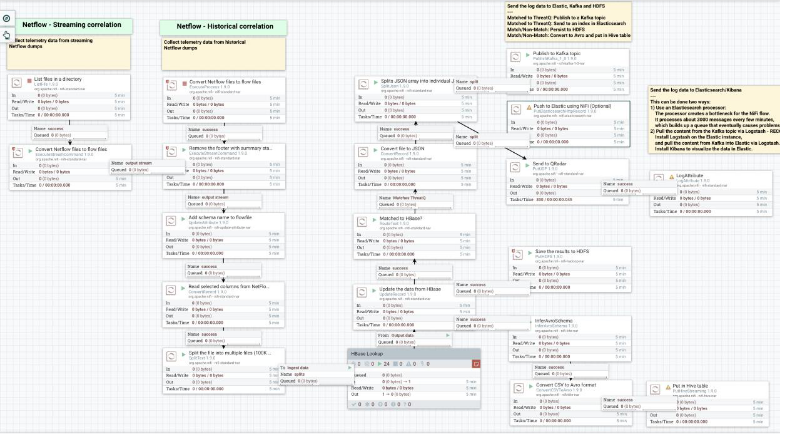
There are two separate starting points in the flow – Streaming and Historical correlations. The only difference between the two flows are the initial processors at the beginning of the flows as shown in the diagram above.
List Files in a Directory
Select the ListFile processor, and configure it as shown below. This processor reads the files created in a directory.
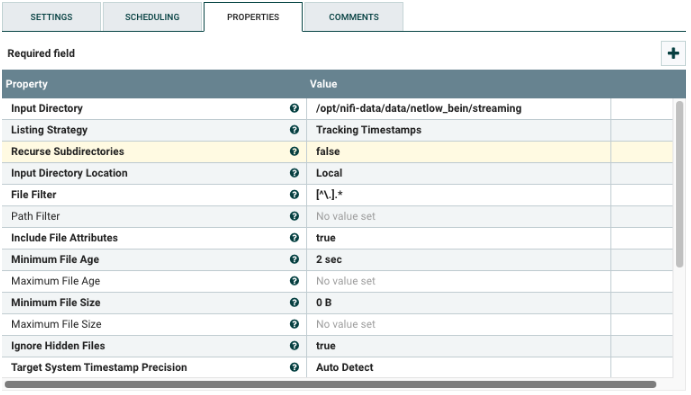
Change the following values:
| Property | Description |
|---|---|
| Input Directory | Change the path for the Input Directory to your environment. |
| Recurse Subdirectories | If files are located in the subfolders, set this value to true. |
| Input Directory Location | If the files are not on the NiFi instance, provide the hostname or IP Address. |
Convert Netflows Files to NiFi Flowfiles (Streaming)
The following steps are for converting NetFlow files to NiFi flowfiles for NetFlow streaming correlation.
Select the ExecuteStreamCommand processor, and configure it as shown below. This dumps the content of a NetFlow file to a NiFi flowfile.
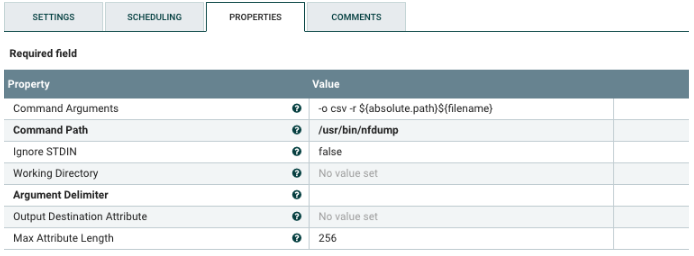
Change the following values:
| Property | Description |
|---|---|
| Command Path | If needed, change the path to nfdumo executable. |
Convert Netflows Files to NiFi Flowfiles (historical)
The following steps are for converting NetFlow files to NiFi flowfiles for NetFlow historical correlation.
Select the ExecuteStreamCommand processor, and configure it as shown below. This dumps the content of a NetFlow file to a NiFi flowfile.
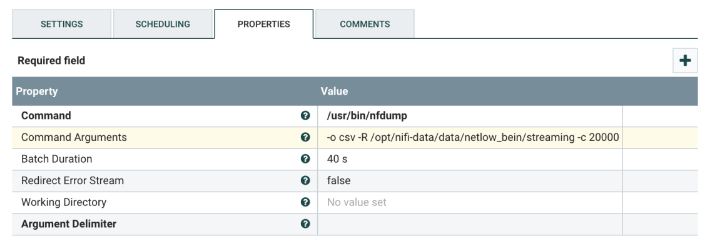
Change the following values:
| Property | Description |
|---|---|
| Command | If needed, change the path to nfdump executable. |
| Command Arguments | Change the path to the NetFlow log files. Additionally, the argument -c 2000 is used for testing the flow. Remove the argument with its value when the flow is ready to run in production. |
Remove Footer with Summary Statistics
Select the ExecuteStreamCommand processor, and configure it as shown below. This removes the last four lines of the output form nfdump.

Change the following value:
| Property | Description |
|---|---|
| Command Path | If needed, change the path to the head executable. |
Add a Schema to the Flowfile
Select the UpdateAttribute processor, and configure it as shown below. This processor adds a schema name to the flowfile.
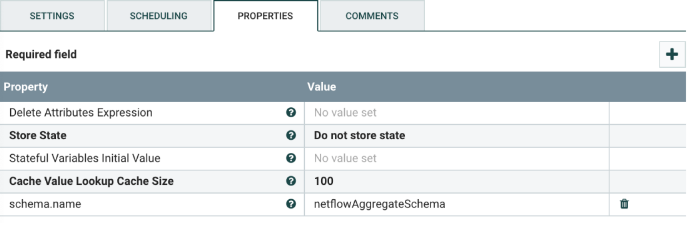
Do not change the schema name.
Read Selected Columns from NetFlow Flowfile
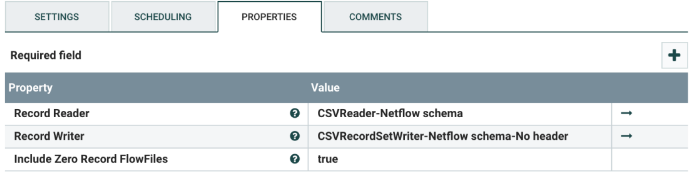
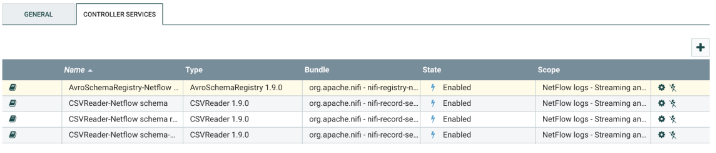
Select the ConvertRecord processor, and configure it as shown below. The processor reads the NetFlow flowfile using a CSVReader controller and writes out a new flowfile via the CSVRecordSetWriter controller. The new flowfile contains only a subset of the original fields. The fields that are includes are listed in the AvroSchemaRegistry controller below.
- To enable the CSVReader-Netflow schema controller, click the arrow on the right. That will take you to another screen that lists all the controllers.
To add fields to the NetFlow flowfile, update the AvroSchemaRegistry controller.
- Click the gear for the CSVReader-Netflow schema controller.
- Click on the arrow for the AvroSchemaRegistry-Netflow schema controller.
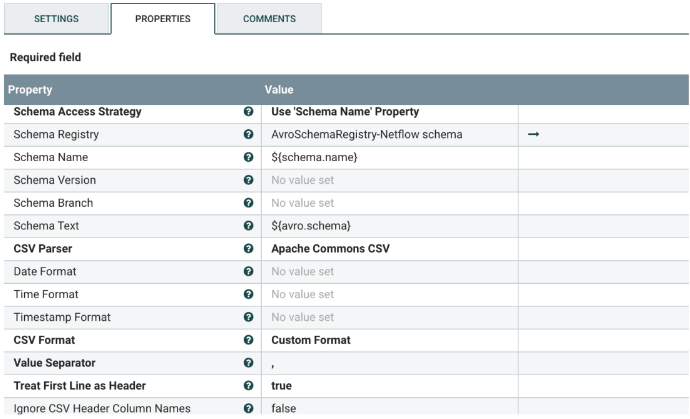
- Click the gear next to AvroSchemaRegistry-Netflow schema.
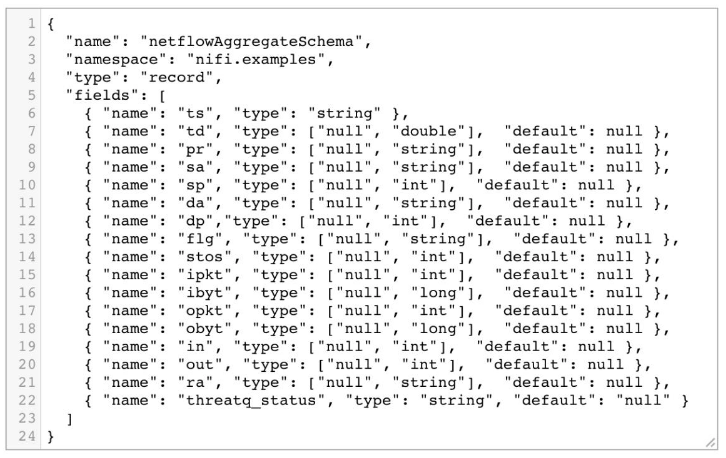
- The following controller setting opens and shows the Avro Schema. To see the subset of the fields that are read from the NetFlow file open the value for the netflowAggregateSchema property.
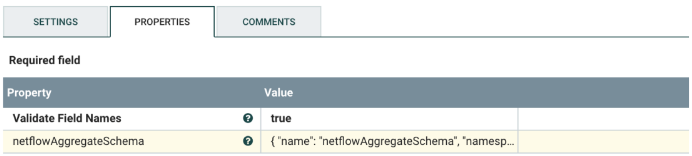
- Expand the window to display the definition for the Avro Schema which should look similar to the following snapshot.
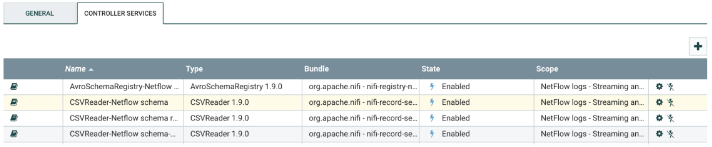
Enable all controller services by clicking on the lightning bolt for each of the following:
- CSVReader-Netflow schema
- CSVRecordSetWriter-Netflow schema-No header
- AvroSchemaRegistry-Netflow schema
Split the Flowfile into Multiple Flowfiles
Select the SplitText processor, and configure it as shown below. This processor splits the original NetFlow flowfile into individual files, each with the number of lines defined by the Line Split Count property in the processor.
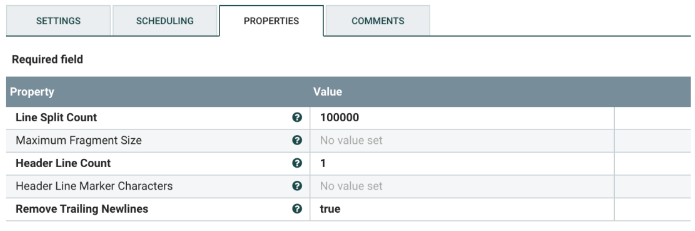
In the provided template, the Line Split Count is set to 100,000. This value needs to be changed to an optimized value for your HBase instance.
Change the following value:
| Property | Description |
|---|---|
| Line Split Count | Change the line split to a value that is optimized for your HBase instance. |
Match to HBase
After splitting the complete NetFlow flowfile into smaller files, each of them is matched against the threat intelligence data in HBase. For that purpose, a processor group is added which, in the default template, has twenty separate LookupRecord processors that do the matching against HBase in parallel. Double click the processor group to see the processors.
Distribute Hbase Lookup Load
Select the DistributeLoad processor, and configure it as shown below. This processor sends each of the flowfiles from upstream to separate LookupRecord processors.
For the proper configuration, attach as many LookupRecord processors as the Number of Relationships value.
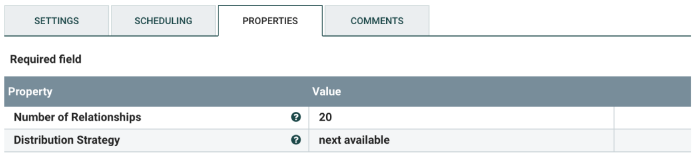
Change the following values:
| Property | Description |
|---|---|
| Number of Relationships | The value can be changed to use less, or more, LookupRecord processors downstream. |
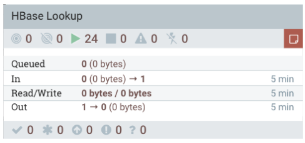
Lookup Records in HBase (20x Processors)
Select the LookupRecord processor, and configure it as shown below. The number of processors should be equal to the value of the Number of Relationships property in the DistributeLoad processor. All of the LookupRecord processors should use the same configurations.
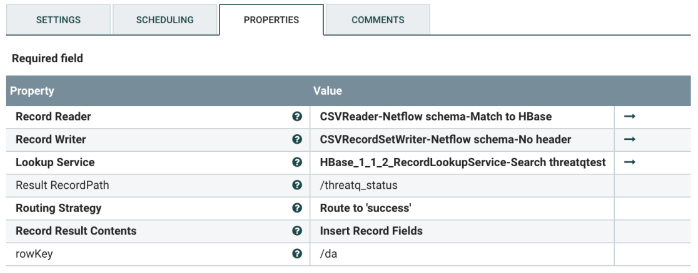
Change the following values:
| Property | Description |
|---|---|
| Record Reader | The record reader controller for the input flowfile. There is no need to change it, unless the input flowfile format is changed. |
| Record Writer | The record writer controller for the output flowfile. There is no need to change it, unless the output flowfile format and/or the columns are changed. |
| Lookup Service | HBase lookup service. Change it only if there is a new version. |
| Result RecordPath | The name of the flowfile field that identifies if a NetFlow log record is successfully matched against threat intel in HBase. Do not change the name, unless the name is also changed in the Avro Schema. |
| rowKey | The Property value is an HBase table property against which the NetFlow logs are matched. For example, using rowKey means that the NetFlow logs should be matched against the row key in HBase.
The value /da is the Destination IP Address from the NetFlow logs which will be matched against HBase. |
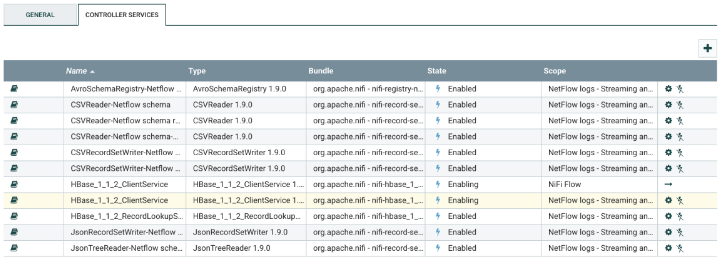
The following are the steps to configure the HBase lookup service controller in NiFi.
- Click on the arrow to the right of HBase_1_1_2_RecordLookupService.
- Click on the gear for the HBase_1_1_2_RecordLookupService
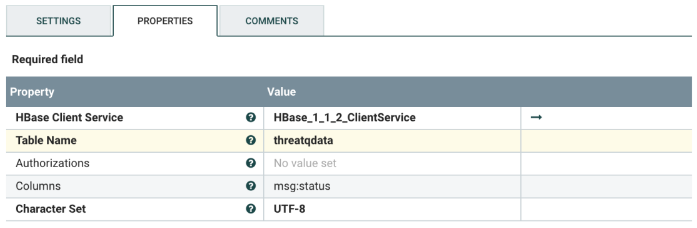
- Change the following values:
Property Description HBase Client Service This is the HBase lookup service controller. Do not change it, unless you have a different version. Table Name The name of the HBase table that contains the threat intelligence data. Columns A key:value pair of the <column family>:<column> in HBase. Use the <column family> and column configured in your HBase table. - Click on the arrow for the HBase_1_1_2_ClientService
- Click on the gear for the HBase_1_1_2_ClientService.
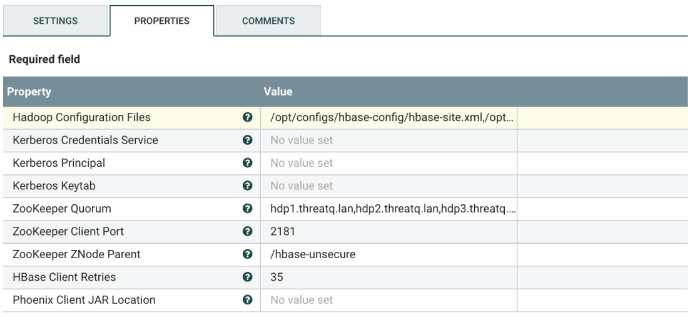
- Change the following values:
Property Description Hadoop Configuration Files Provide the path to the following Hadoop configuration files: hbase-site.xml, hdfs-site.xml, hive-site.xml, core-site.xml. Kerberos Credentials Service If using Kerbos, enter the credentials service. Kerberos Principal If using Kerbos, enter the principal. Kerberos Keytab If using Kerbos, enter the keytab. ZooKeeper Quorum Comma-separated list fo Zookeeper hosts.
Change the provided list in the template to your environment's values.ZooKeeper Client Port The port Zookeeper listens on. The default is 2181.
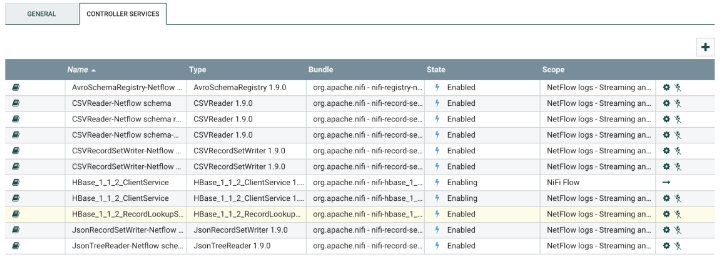
Enable all the controller services by clicking on the lightning bolt for each of the following:
• HBase_1_1_2_RecordLookupService-Search threatqtest
• HBase_1_1_2_ClientService
• CSVReader-Netflow schema-Match to HBase
• CSVRecordSetWriter-Netflow schema-No header
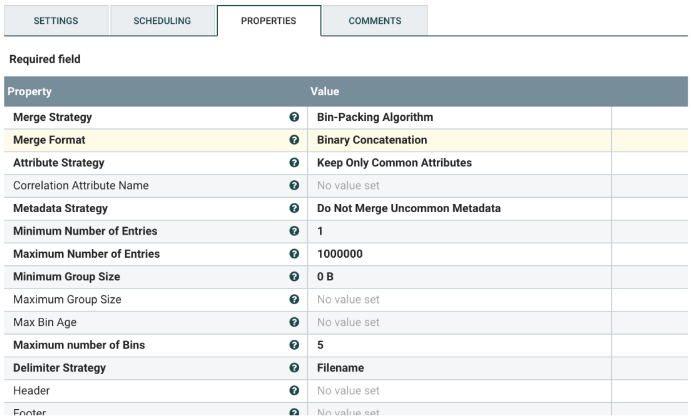
Merge Content
Select the MergeContent processor, and configure it as shown below. No need to change any configurations, unless required by your specific environment architecture.
Update the Data from HBase
Select the UpdateRecord processor, and configure it as shown below. This processor modifies the threatq_status column from the matching against HBase. In the provided template, that column has the value of “Send to HBase” if the NetFlow record is found in HBase, null otherwise.
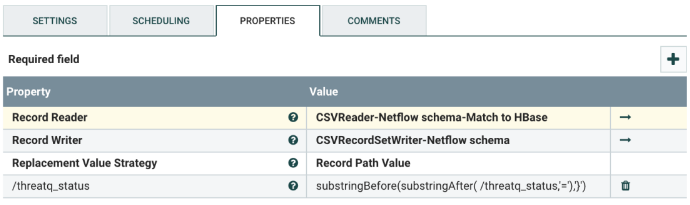
Change the following values:
| Property | Description |
|---|---|
| Record Reader | The record reader controller for the input flowfile. There is no need to change it, unless the input flowfile format is changed. |
| Record Writer | The record writer controller for the output flowfile. There is no need to change it, unless the output flowfile format and/or the columns are changed. |
| /threatq_status | The name of the key in the Avro Schema that contains the result from the match against HBase. If a NetFlow record is matched against the threat intel in HBase, the threatq_status field will be non- null (e.g. Send to HBase). Otherwise, the value is null. There is no need to change it, unless the name of that field has been changed in the Avro Schema. |
Enable all the controller services by clicking on the lightning bolt for each of the following:
• CSVReader-Netflow schema-Match to HBase
• CSVRecordSetWriter-Netflow schema
• AvroSchemaRegistry-Netflow schema
Save the Results to HDFS
Select the PutHDFS processor, and configure it as shown below. The NetFlow log that was read at the beginning of the NiFi flow is written to HDFS, but with the following changes:
- Only the columns listed in the Avro Schema are preserved in the final file (see the Read Selected Columns from NetFlow Flowfile section.
- The threatq_status column is added which has the value of “Send to HBase” if the NetFlow log record is found in HBase, null otherwise.
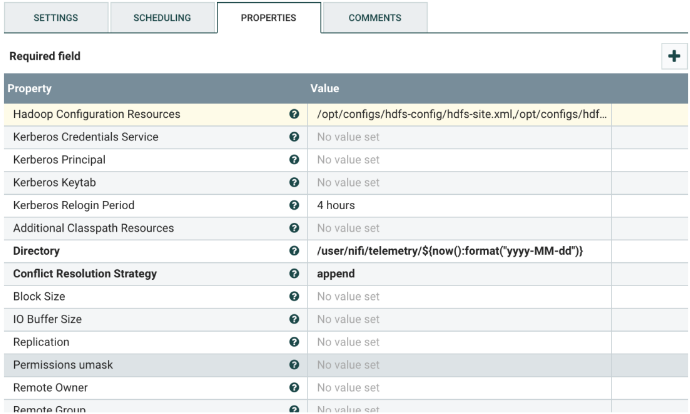
Change the following values:
| Property | Description |
|---|---|
| Hadoop Configuration Files | Provide the path to the following Hadoop configuration files:
If needed, copy these files to the NiFi host from the respective hosts in the Hadoop cluster. |
| Kerberos Credentials Service | If using Kerberos, enter the credentials service. |
| Kerberos Principal | If using Kerberos, enter the principal. |
| Kerberos Keytab | If using Kerberos, enter the keytab. |
| Directory | The path to the directory where the files will be written in HDFS. The user that NiFi runs as, should have read/write access to that folder. |
| Conflict Resolution Strategy | The default value is to append the content from a single flowfile. Different flowfiles will be written into separate files on HDFS. |
Matched to HBase?
Select the RouteText processor, and configure it as shown below. This processor will route all the NetFlow log records that match to HBase further into the NiFi flow. Those that do not match are dropped at this point.
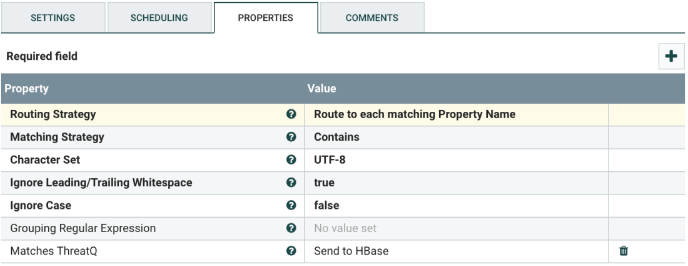
Change the following values:
| Property | Description |
|---|---|
| Matches ThreatQ | The value assigned to the threatq_status field, if the NetFlow log record is found in HBase. In the provided template that value is “Send to HBase”. If there is no match, the value is null. |
Convert File to JSON
Select the ConvertRecord processor, and configure it as shown below. This converts the CSV schema to JSON.
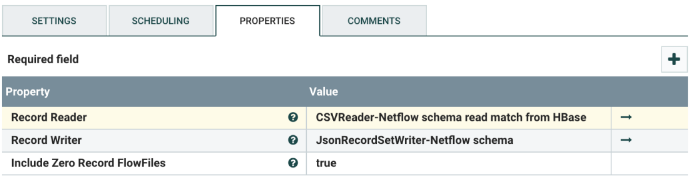
Change the following values:
| Property | Description |
|---|---|
| Record Reader | The record reader controller for the input flowfile. There is no need to change it, unless the input flowfile format is changed. |
| Record Writer | The record writer controller for the output flowfile. There is no need to change it, unless the output flowfile format and/or the columns are changed. |
Enable all the controller services by clicking on the lightning bolt for each of the following:
• CSVReader-Netflow schema read match from HBase
• JsonRecordSetWriter-Netflow schema
• AvroSchemaRegistry-Netflow schema
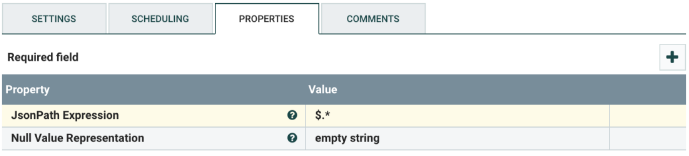
Split JSON to Individual Files
Select the SplitJson processor, and configure it as shown below. This processor splits a large JSON object into its separate elements. The output is JSON.
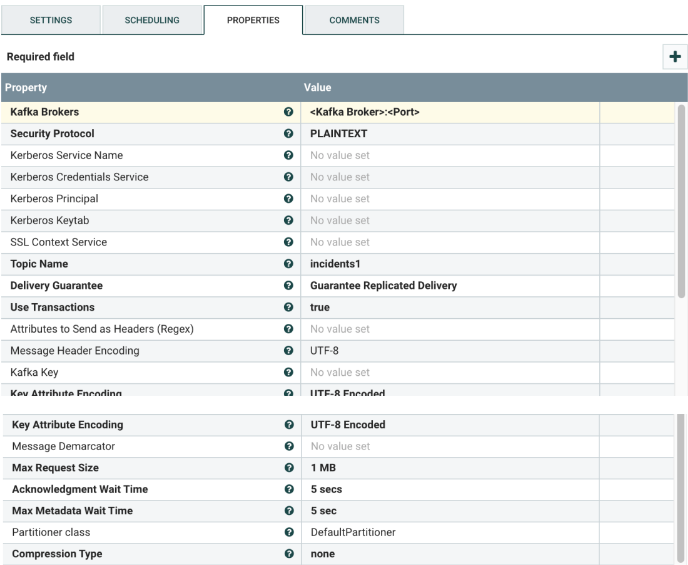
Publish to Kafka Topic
Select the PublishKafka_<version> processor, and configure it as shown below. This is a Kafka Producer that publishes messages to a specific Kafka topic.
The PublishKafka processor in the template uses the Kafka v1.0 Producer API. If your Kafka API is a different version, change the PublishKafka processor to the appropriate version. The available Kafka Producer versions in NiFi v1.9.0 are v0.10, v0.11, v1.0 and v2.0. To change it, add a new processor and select the desired processor version from the list. Change the following values:
Change the following values:
| Property | Description |
|---|---|
| Kafka Brokers | Comma-separated list of Kafka brokers in the following format: <Kafka Broker>:<Port>
The default value in the template uses port 6667, which should be changed if your Kafka broker uses a different port. |
| Kerberos Service Name | If using Kerberos, enter the service name. |
| Kerberos Credentials Service | If using Kerberos, enter the credentials service. |
| Kerberos Principal | If using Kerberos, enter the principal. |
| Kerberos Keytab | If using Kerberos, enter the keytab. |
| Topic Name | The name of the Kafka topic to which NiFi should publish the data. The topic should be created prior to configuring the processor. |
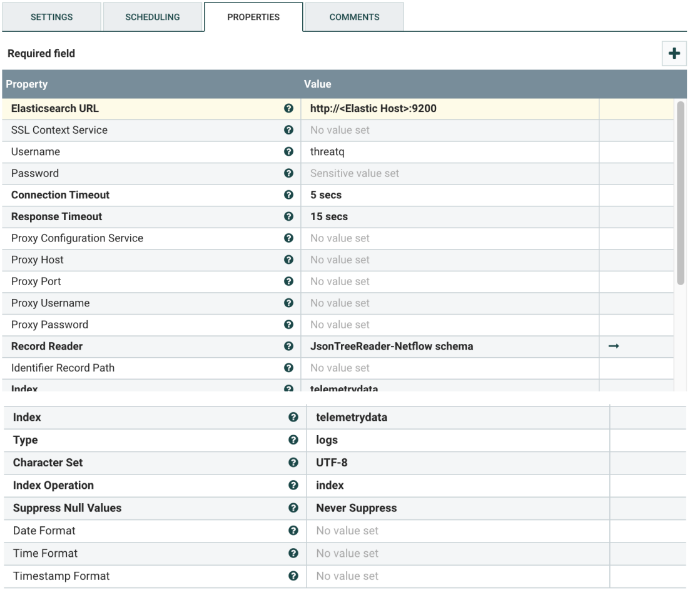
Push to Elasticsearch Index (Optional)
This is an optional processor. The recommended process is for Elasticsearch to read the content from a Kafka topic, via Logstash, as described in the “ELK Stack” section above. The PutElasticsearchHttpRecord processor uses the Elasticsearch Bulk API which loads all content in memory and during peak times the processor could create a bottleneck for the whole NiFi flow, and slow down processors located upstream (e.g. LookupRecord against HBase) .
Select the PutElasticsearchHttpRecord processor, and configure it as shown below. This processor ingests the NetFlow records that were found in HBase to an Elastic index.
Change the following values:
| Property | Description |
|---|---|
| Elasticsearch URL | The Elasticsearch URL followed by the port. The default port is 9200. |
| SSL Context Service | The SSL Context Service used to provide client certificate information for TLS/SSL connections. Only applies if the Elasticsearch cluster is secured with TLS/SSL. |
| Username | Username for authenticating with Elasticsearch. |
| Password | Password for authenticating with Elasticsearch. |
| Record Reader | The record reader controller for the input flowfile. There is no need to change it, unless the input flowfile format is changed. |
| Index | Name of the Elasticsearch index to insert to. |
| Type | The type of this document used by Elasticsearch for indexing and searching. |
| Index Operation | The type of the operation to use. Default is index. |
Enable all the controller services by clicking on the lightning bolt for each of the following:
• JsonTreeReader-Netflow schema
• AvroSchemaRegistry-Netflow schema
Adding NetFlow Log Data to Hive Table (Optional)
The following processors are used to ingest the NetFlow flow files into Hive table. This is optional and should only be used if the customer needs to have all the data available for analysis.
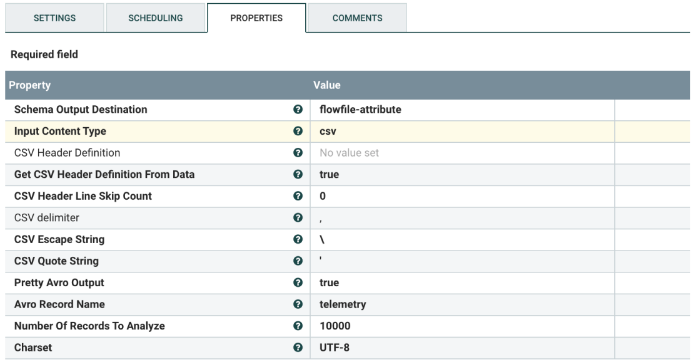
Infer Avro Schema
Select the InferAvroSchema processor, and configure it as shown below.
Change the following values:
| Property | Description |
|---|---|
| Input Content Type | The value in the provided template is csv. Do not change it, unless changes to the schema have been done upstream in the flow. |
| Avro Record Name | Value to be placed in the Avro record schema “name” field. |
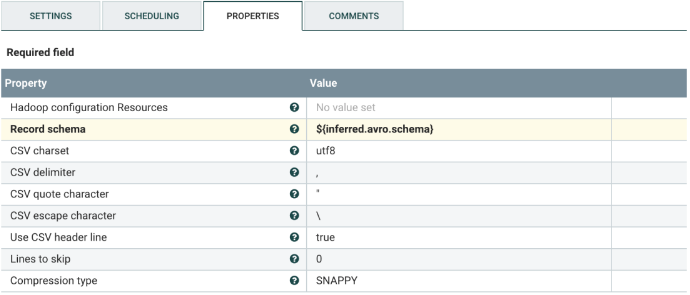
Convert CSV to Avro Format
Select the ConvertCSVToAvro processor, and configure it as shown below.
Put in Hive Table
Select the PutHiveStreaming processor, and configure it as shown below. This processor ingests the flow content to the designated Hive table.
The Hive table with its schema should be created prior to enabling this processor.
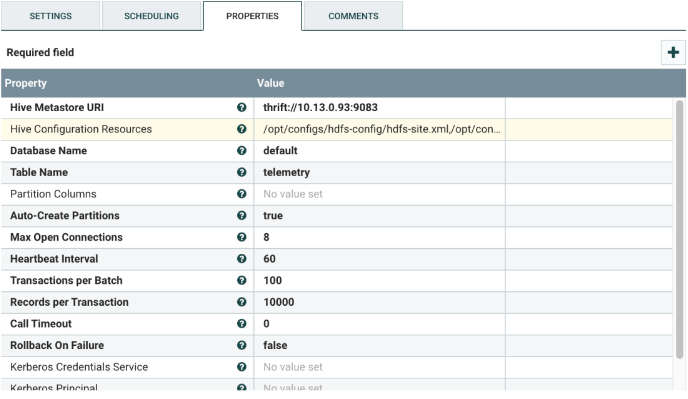
Change the following values:
| Property | Description |
|---|---|
| Hive Metastore URI | The Hive store URI. The default port is 9083.
The value should be in the format: thrift://<Hive Host>:<Port> |
| Hive Configuration Resources | Provide the path to the following Hive configuration files:
If needed, copy these files to the NiFi host from the respective hosts in the Hadoop cluster. |
| Database Name | Name of the Hive database created in Hive. |
| Table Name | Name of the Hive table to which data should be ingested. |
Change Log
- Version 3.3.0
- Updated the connectors to Elastic, HBase, and HDFS.
- Version 3.0.0
- Added the ability to parse NetFlow logs.
- Version 1.0.0
- Initial release