Trellix TIE Connector
The web format of this guide reflects the most current release. Guides for older iterations are available in PDF format.
Integration Details
ThreatQuotient provides the following details for this integration:
| Current Integration Version | 1.4.1 |
| Compatible with ThreatQ Versions | >= 5.12.0 |
| Trellix Application Version | >= 5.10.0 |
| Trellix Hosting Type | On-Premise |
| Python Version | 3.6 |
| Support Tier | ThreatQ Supported |
Introduction
The Trellix TIE Connector interacts with the Trellix TIE server. The TIE server is a database of malicious files and their reputations. The integration pulls the indicator hashes from the ThreatQ Threat Library, performs a potentially custom mapping of indicator attributes to the Trellix file reputations, and then pushes these indicators to the TIE server.
Key features of this integration include:
- User configurable rate limiting: ThreatQ will not push more than the configured indicators per day in the TIE server. 100,000 indicators per day is the hard limit. The rate limit is honored regardless of how often the connector runs.
- ThreatQ indicator scores are mapped to Trellix reputation scores via user configuration. A user can export only indicators of interest out of the ThreatQ platform via configuration.
- Ability to use Trellix ePO's provisioning capability to get a signed certificate for communication with the TIE server.
- Ability to enrich any hash indicators in ThreatQ sent to Trellix TIE with additional information from the Trellix ecosystem.
- Ability to publish to multiple DXL fabrics, which are the communication layers for given segments of an enterprise. The communication occurs over one or multiple DXL servers, providing near seamless functionality. Publishing across multiple fabrics is a powerful mechanism.
- Ability to track the share status of indicators and re-push reputations, if desired by an analyst.
Prerequisites
The following is required by the connector:
- ePO hostname or IP Address.
- ePO username and password.
- The OpenDXL Python client used by this integration must have permission to send messages to the
/mcafee/service/tie/file/reputation/settopic which is part of theTIE Server Set Enterprise Reputationauthorization group. - Certificate and Certificate Authority (CA) imported in the Trellix ePO.
- DXL Authorization enabled.
- Confirm that all prerequites on the following link have been met: https://opendxl.github.io/opendxl-tie-client-python/pydoc/basicsetreputationexample.html#prerequisites.
Time Zone
The time zone steps are for ThreatQ v5 only. ThreatQ v6 users should skip these steps.
You should ensure all ThreatQ devices are set to the correct time, time zone, and date (UTC is recommended), and using a clock source available to all.
To identify which time zone is closest to your present location, use the timedatectl command with the list-timezones command line option.
For example, enter the following command to list all available time zones in Europe:
Europe/Amsterdam
Europe/Athens
Europe/Belgrade
Europe/Berlin
Enter the following command, as root, to change the time zone to UTC:
Provisioning Trellix ePolicy Orchestrator (ePO)
To communicate with the Trellix TIE server, you must have a certificate and the equivalent Certificate Authority (CA) must be imported in the Trellix ePO.
ThreatQuotient recommends using the a Trellix command line provisioning tool included with the integration. The integration wraps the Trellix command line provisioning tool and provides a command line utility that can be invoked as follows:
ThreatQ v6
ThreatQ v5
tq-trellix-tie-prov --epo-ip <epo_ip> --epo-port <epo_port> --epo-login <epo_login> --epo-pass <epo_pass>
You can also pass a nonstandard EPO port and other optional arguments to the program above. To find additional options, simply invoke the program with -h.
If it is undesirable to supply the password on the command line, you can omit it and instead invoke the utility as:
ThreatQ v6
ThreatQ v5
The program will then prompt you for the password.
If this connector is being used to connect to multiple DXL brokers, the -cn or --conn-name option will be used to differentiate among those connectors. This option should be passed to the provisioning script (and the exact same --conn-name should be used in the actual connector as described below).
If you do not wish to use the command line provisioning tools option, you can follow the steps in the link provided below regarding external certificate authority provisioning:
https://opendxl.github.io/opendxl-client-python/pydoc/epoexternalcertissuance.html
Enabling DXL Authorization
ThreatQ's integration with the Threat Intelligence Exchange relies on the Set Enterprise Reputation topic over DXL (/Trellix/service/tie/file/reputation/set). As a result, ThreatQ's certificate will need to be authorized to publish on this topic.
See the following link for additional information: https://opendxl.github.io/opendxl-client-python/pydoc/marsendauth.html.
After completing the steps in Provisioning the Trellix ePolicy Orchestrator (ePO), complete the following steps:
- Log into the ePO user interface.
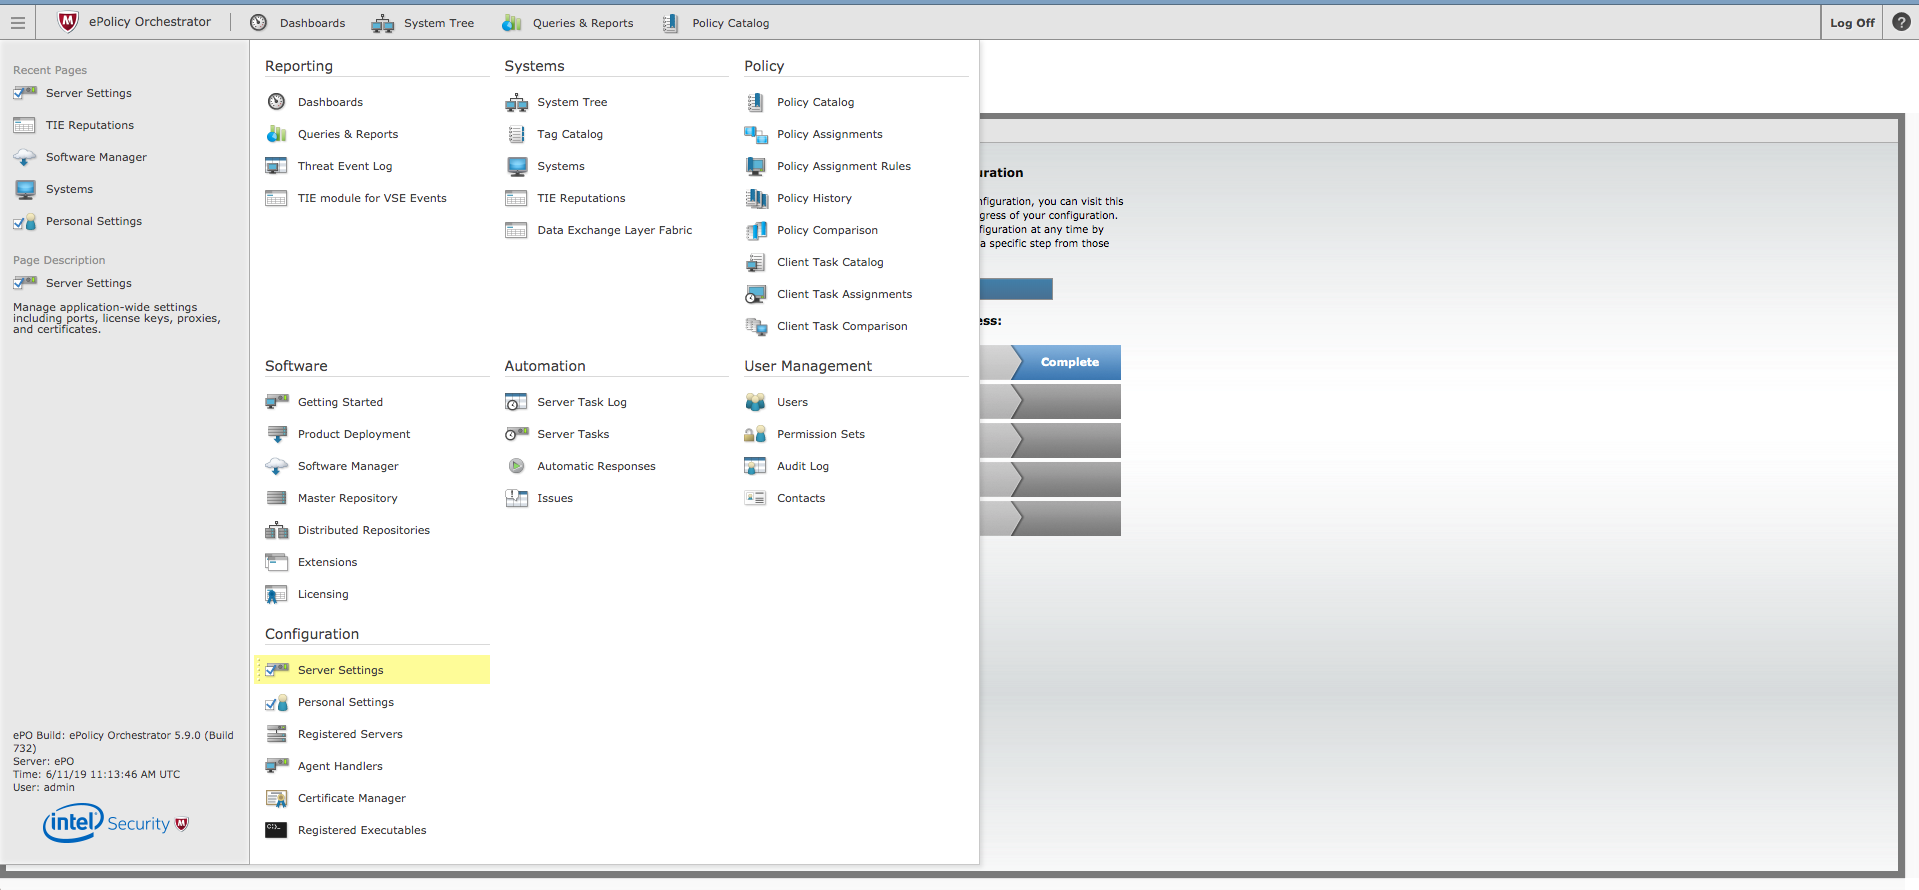
- Click the menu button, located at the upper left portion of the page, and select Server Settings under Configuration.
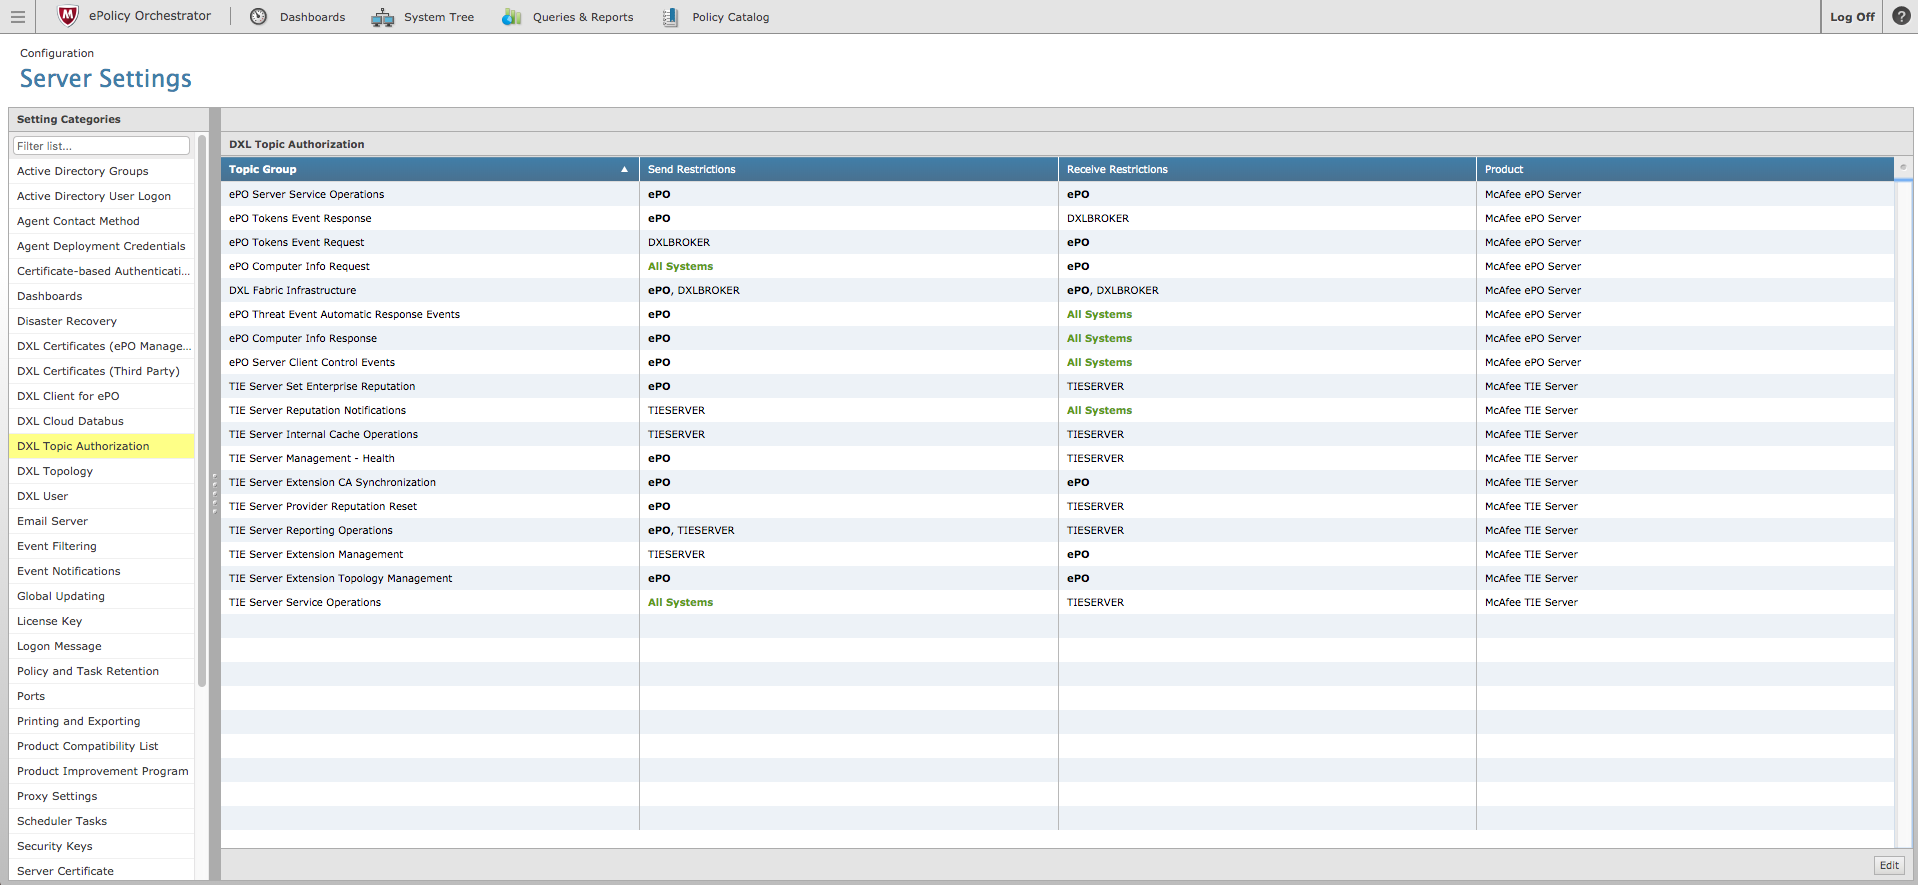
- Select DXL Topic Authorization under Setting Categories.
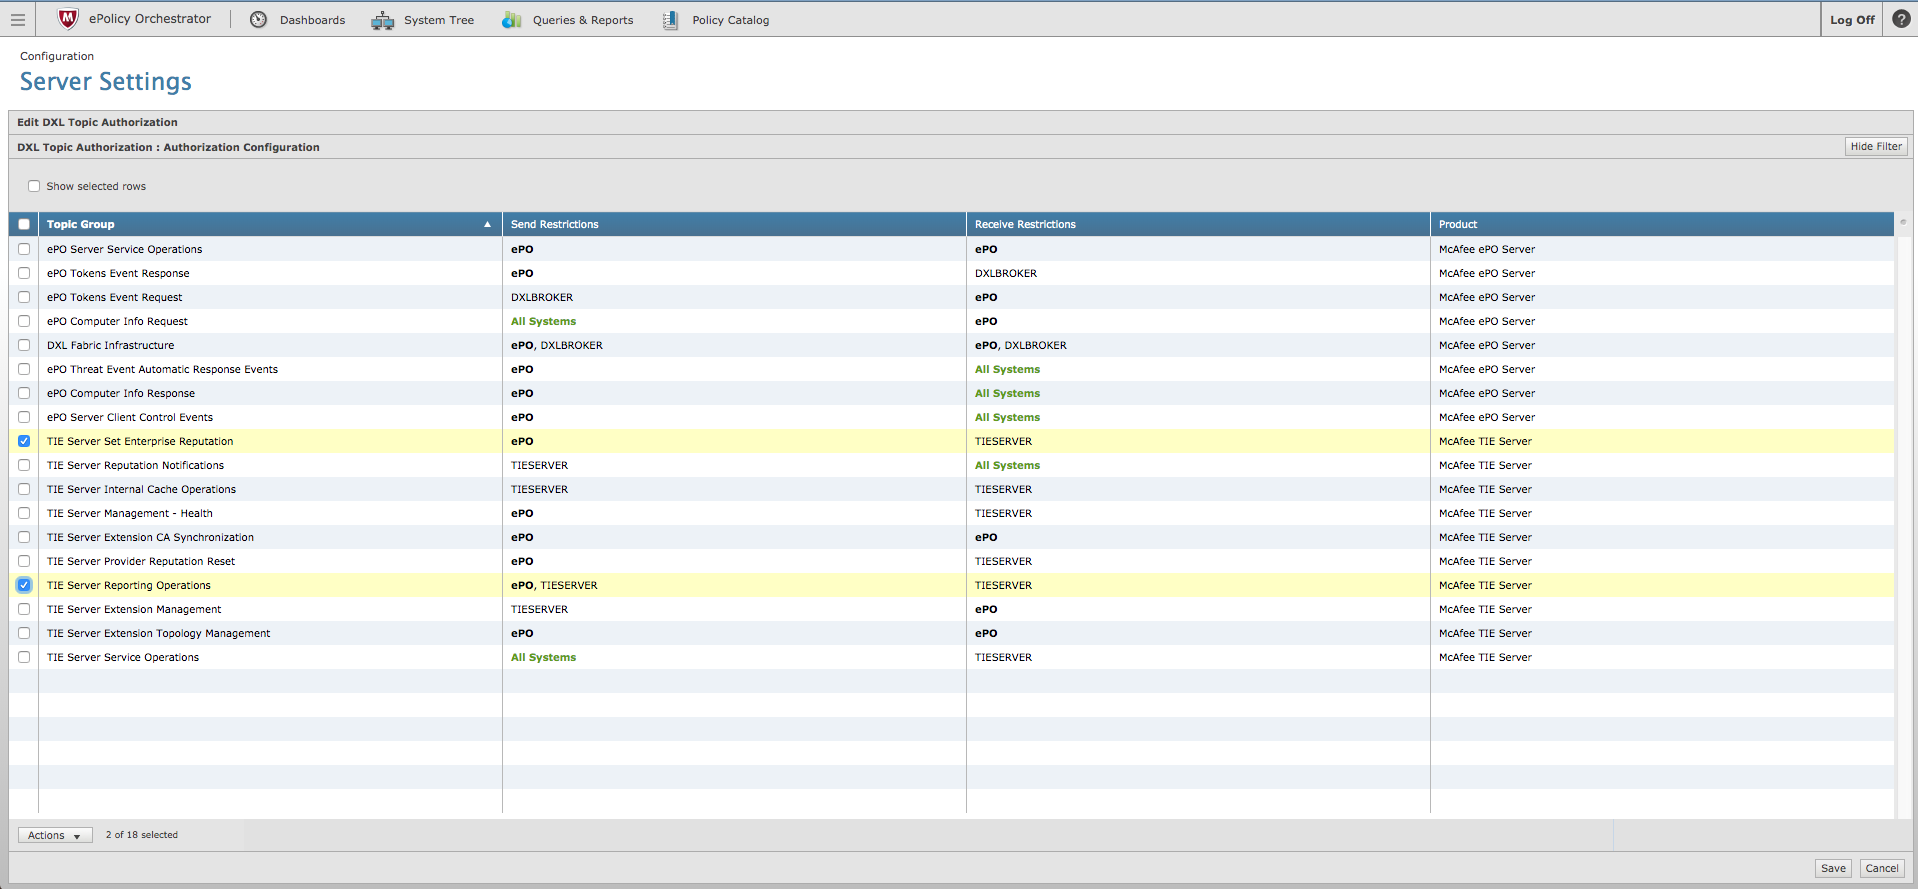
- Click Edit, located in lower right portion of the page, and then select the check boxes associated with the TIE Server Set Enterprise Reputation topic group and the TIE Server Reporting Operations group.
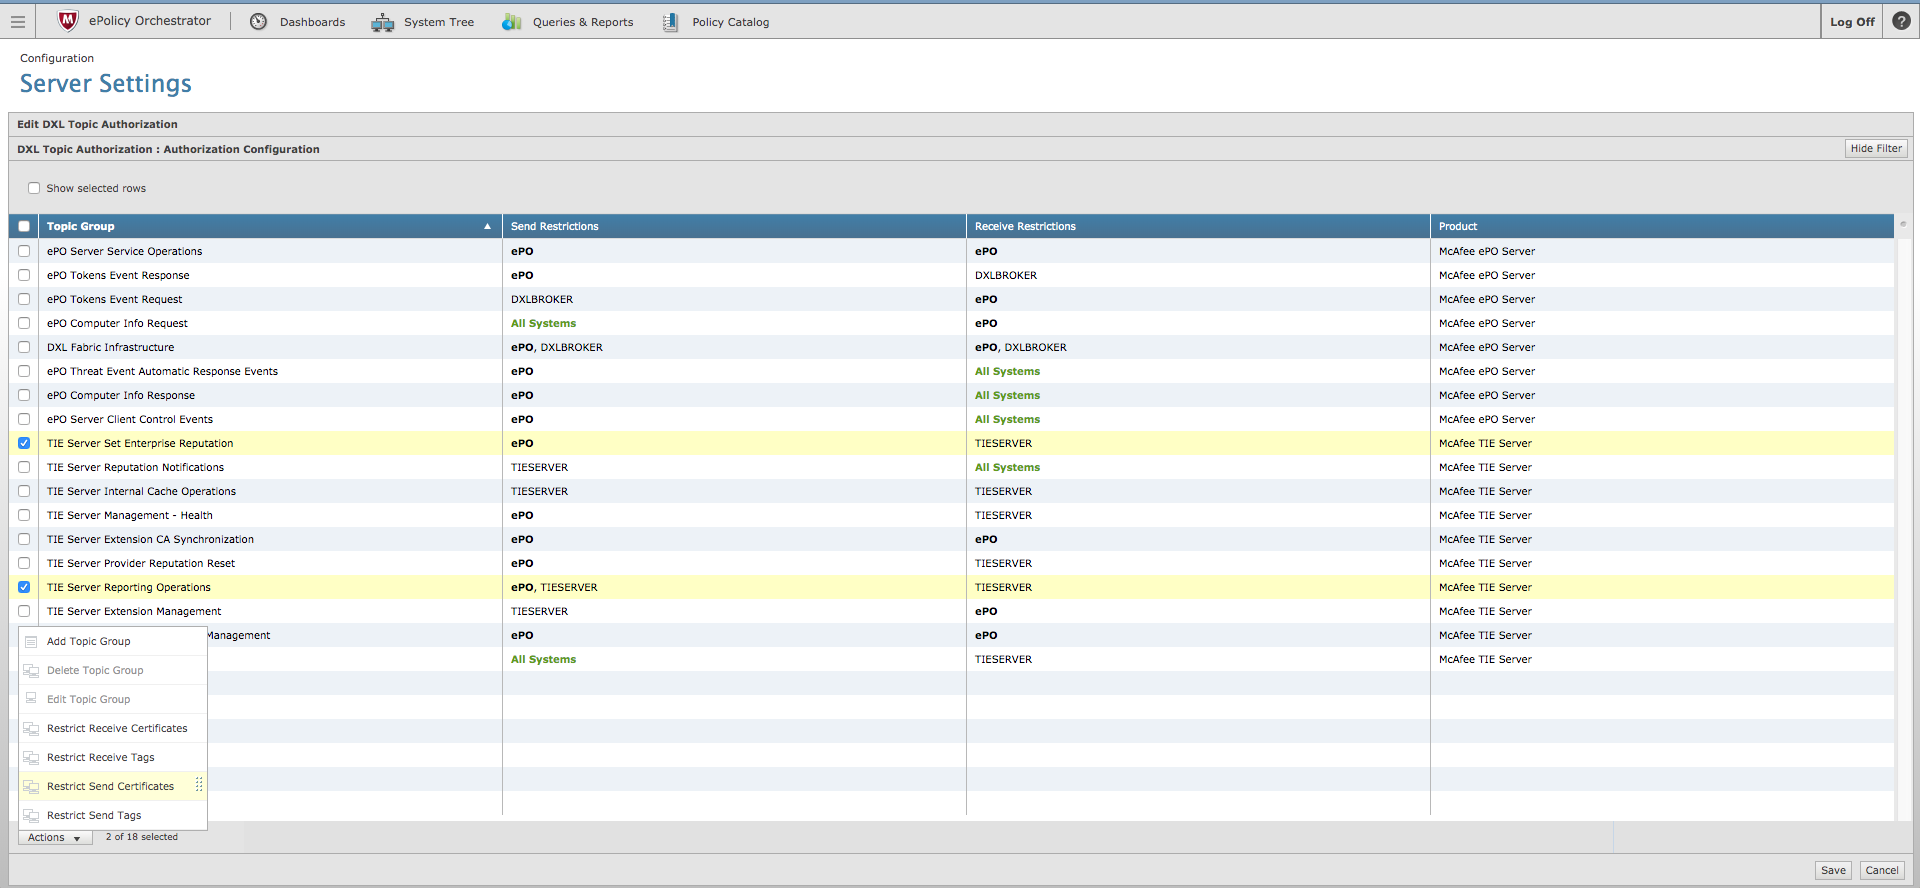
- Click on the Actions dropdown and select Restrict Send Certificates.
- Identify the threatq certificate that was created during the provisioning step.
The value will start with CN=threatq.
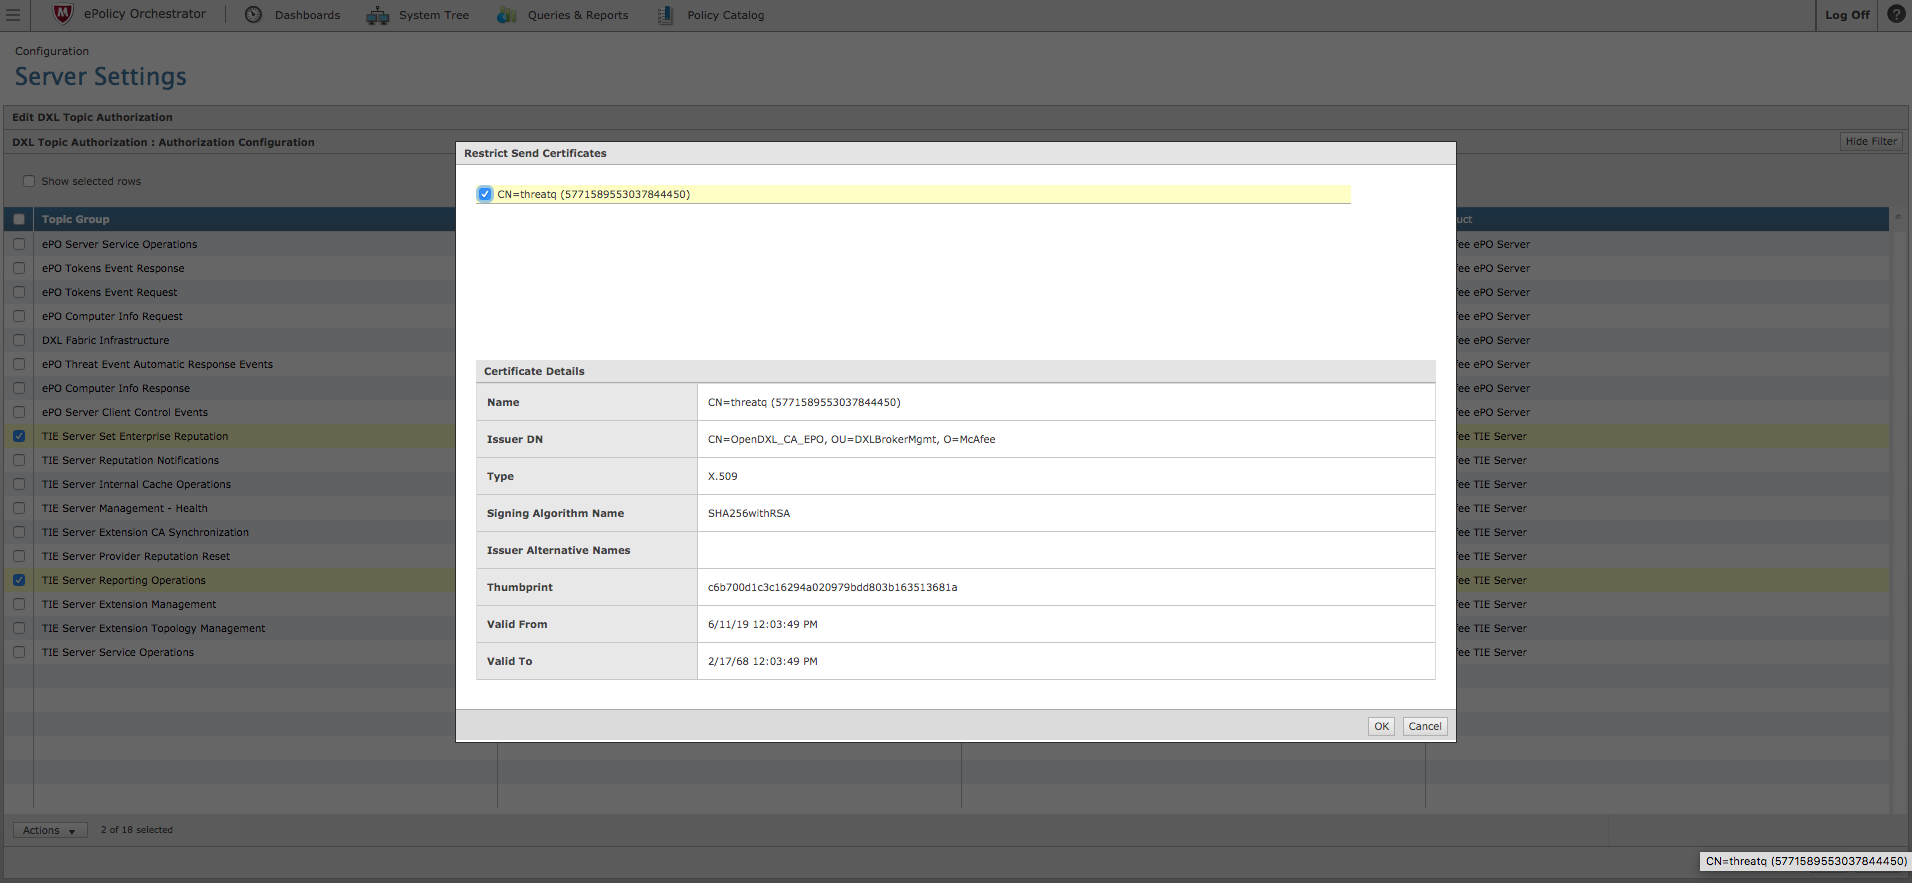
- Click OK.
- Verify that the TIE Server Set Enterprise Reputation and TIE Server Reporting Operations now each have one certificate listed within the Send Restrictions column.
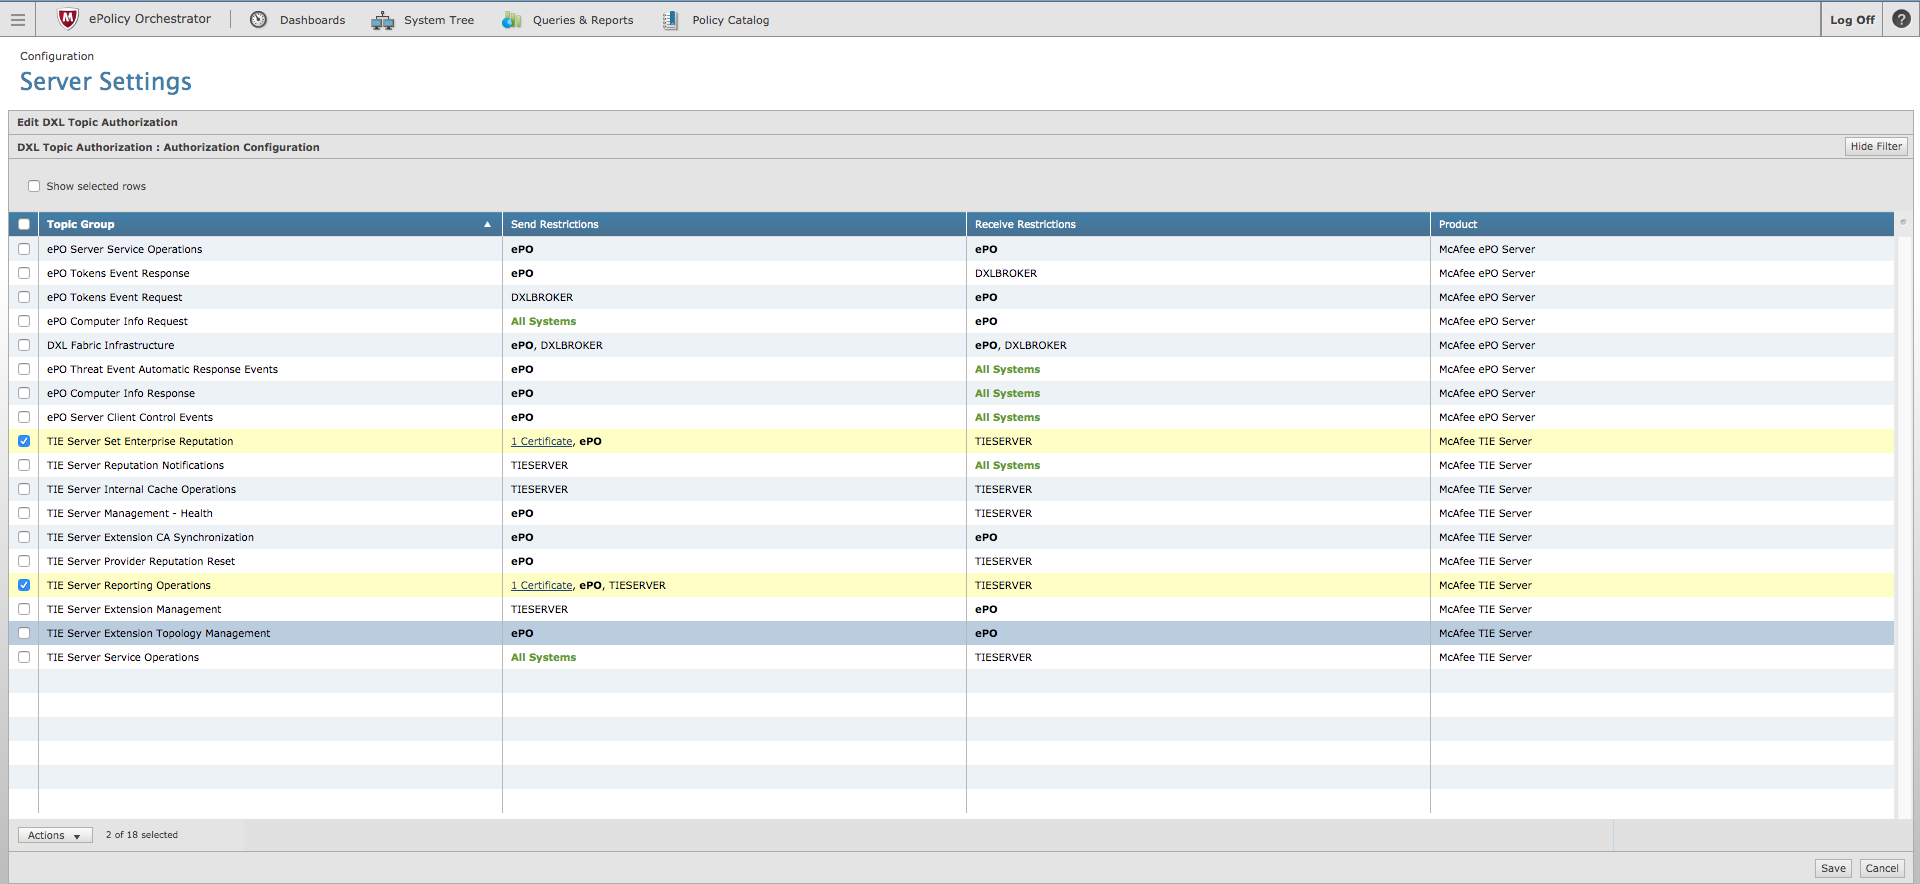
- Click Save located in the lower left portion of the page.
It may take several minutes or a few hours for the topic authorizations to take effect. Running the ThreatQ-TIE connector during this time will cause it to hang and eventually time out.
Integration Dependencies
The integration must be installed in a python 3.6 environment.
The following is a list of required dependencies for the integration. These dependencies are downloaded and installed during the installation process. If you are an Air Gapped Data Sync (AGDS) user, or run an instance that cannot connect to network services outside of your infrastructure, you will need to download and install these dependencies separately as the integration will not be able to download them during the install process.
Items listed in bold are pinned to a specific version. In these cases, you should download the version specified to ensure proper function of the integration.
| Dependency | Version | Notes |
|---|---|---|
| threatqsdk | >= 1.8.10 | N/A |
| threatqcc | >= 1.4.4 | N/A |
| requests | >= 2.25.1 | N/A |
| asn1crypto | >= 1.5.1 | N/A |
| dxlclient | == 5.6.0.4 | Pinned |
| dxltieclient | == 0.3.0 | Pinned |
| distlib | * | N/A |
Installation
Upgrading Users - Review the Change Log for updates to configuration parameters before updating. If there are changes to the configuration file (new/removed parameters), you must first delete the previous version's configuration file before proceeding with the install steps listed below. Failure to delete the previous configuration file will result in the connector failing.
The steps below detail how to install the connector in standard environment with network access. Additional steps are included for users operating without network access (air gapped environment). For air gapped customers, an additional dependency package must be downloaded. Some installation commands will also differ based on your environment (network vs air gapped).
- Download the connector integration file from the ThreatQ Marketplace.
Air gapped Users Only - additional step: download the Trellix TIE Connector dependency package from
https://download.threatq.com/offline-integrations/tq-conn-trellix-tie-<version>.tar.gz. This download contains the connector dependencies required the integration. - Transfer the connector whl file (and dependency package if air gapped) to the
/tmp/directory on your instance. - SSH into your instance.
- Move the connector whl file (and dependency package if air gapped) from its
/tmp/location to the following directory:/opt/tqvenv. - Air gapped Users Only - unzip the dependency package using the following command:
sudo tar -xvf tq-conn-trellix-tie-<verison>.tar.gz
- Navigate to the custom connector container:
kubectl exec -n threatq -it deployments/custom-connectors -- /bin/bash
- Create your python 3 virtual environment:
python3.6 -m venv /opt/tqvenv/<environment_name>
- Active the new environment:
source /opt/tqvenv/<environment_name>/bin/activate
- Run the pip upgrade command:
pip install --upgrade pip
- Install the required dependencies:
pip install setuptools==59.6.0 threatqsdk threatqcc "asn1crypto>=1.5.1" distlib requests "dxltieclient==0.3.0" "dxlclient==5.6.0.4"
Air gapped users should skip this step as these dependencies are included in the dependency package.
- Install the connector:
Standard Install Command (network access)
pip install /opt/tqvenv/tq_trellix_tie-<version>-py3-none-any.whlAir gapped Install Command:
pip install /opt/tqvenv/tq_conn_trellix_tie-<version>-py3-none-any.whl --no-index --find-links /opt/tqvenv/trellix_tie_connector/ - Perform an initial run of the connector:
/opt/tqvenv/<environment_name>/bin/tq-trellix-tie --cron="0 */2 * * *"
The
--cronargument above is used to generate a cron job for the connector. After running the command above, the cronjob will be created under the /etc/cron.d/ directory. This entry will initially be commented out upon creation - see the CRON chapter for more details. - Enter the following parameters when prompted:
Parameter Description ThreatQ Host Leave this field blank as it will be set dynamically. ThreatQ Client ID This is the OAuth id that can be found at Settings Gear → User Management → API details within the user’s details. ThreatQ Username This is the Email Address of the user in the ThreatQ System for integrations. ThreatQ Password The password for the above ThreatQ account. Status This is the default status for objects that are created by this Integration. Example Output
/opt/tqvenv/<environment_name>/bin/tq-trellix-tie --cron="0 */2 * * *"
ThreatQ Host:
ThreatQ Client ID: <ClientID>
ThreatQ Username: <EMAIL ADDRESS>
ThreatQ Password: <PASSWORD>
Status: Review
Connector configured. Set information in UI
You will still need to configure and then enable the connector.
- Navigate to the ThreatQ Marketplace and download the .whl file for the integration.
- Create the following directory:
mkdir /opt/tqvenv/
- Install python 3.6:
sudo yum install -y python36 python36-libs python36-devel python36-pip
- Create a virtual environment:
python3.6 -m venv /opt/tqvenv/<environment_name>
- Activate the virtual environment:
source /opt/tqvenv/<environment_name>/bin/activate
- Run the pip upgrade command:
pip install --upgrade pip
- Install the required dependencies:
pip install setuptools==59.6.0 threatqsdk threatqcc "asn1crypto>=1.5.1" distlib requests "dxltieclient==0.3.0" "dxlclient==5.6.0.4"
- Transfer the whl file to the
/tmpdirectory on your ThreatQ instance. - Install the connector on your ThreatQ instance:
pip install /tmp/tq_trellix_tie-<version>-py3-none-any.whl
A driver called
tq-trellix-tiewill be installed. After installing, two script stub will appear in/opt/tqvenv/<environment_name>/bin/tq-trellix-tieand/opt/tqvenv/<environment_name>/bin/tq-trellix-tie-prov. - Once the application has been installed, a directory structure must be created for all configuration, logs and files, using the
mkdir -pcommand. Use the commands below to create the required directories:mkdir -p /etc/tq_labs/
mkdir -p /var/log/tq_labs/
mkdir -p /etc/pki/tls/certs/Trellix_dxl_certs/ - Perform an initial run using the following command:
/opt/tqvenv/<environment_name>/bin/tq-trellix-tie -ll /var/log/tq_labs/ -c /etc/tq_labs/ -v3
- Enter the following parameters when prompted:
Parameter Description ThreatQ Host This is the host of the ThreatQ instance, either the IP Address or Hostname as resolvable by ThreatQ. ThreatQ Client ID This is the OAuth id that can be found at Settings Gear → User Management → API details within the user’s details. ThreatQ Username This is the Email Address of the user in the ThreatQ System for integrations. ThreatQ Password The password for the above ThreatQ account. Status This is the default status for objects that are created by this Integration. Example Output
/opt/tqvenv/<environment_name>/bin/tq-trellix-tie -ll /var/log/tq_labs/ -c /etc/tq_labs/ -v3
ThreatQ Host: <ThreatQ Host IP or Hostname>
ThreatQ Client ID: <ClientID>
ThreatQ Username: <EMAIL ADDRESS>
ThreatQ Password: <PASSWORD>
Status: Review
Connector configured. Set information in UI
Configuration
ThreatQuotient does not issue API keys for third-party vendors. Contact the specific vendor to obtain API keys and other integration-related credentials.
To configure the integration:
- Navigate to your integrations management page in ThreatQ.
- Select the Labs option from the Category dropdown (optional).
- Click on the integration entry to open its details page.
- Enter the following parameters under the Configuration tab:
Parameter Description Daily Rate Limiting Enter a daily limit, 1-100000, for the number of DXL set reputation requests made. The default limit setting is 1000. The daily rate limit helps to prevent overloading the Trellix TIE infrastructure. Data pertaining to the daily rate limiting is persisted in the file
Trellix_tie_cache.json(orTrellix_tie_cache-<connector-name>.json). This file can be modified or removed to reset the daily rate limit for the specific connector in question.Known Malicious Reputation Mapping Select the appropriate . Options include: - Very High
- High
- Medium
- Low
- Very Low
Most Likely Malicious Reputation Mapping Select the appropriate . Options include: - Very High
- High
- Medium
- Low
- Very Low
Might Be Malicious Reputation Mapping Select the appropriate . Options include: - Very High
- High
- Medium
- Low
- Very Low
Number of Days Enter the number of days back the integration should go for indicators added to the ThreatQ platform. Accepted values range from 1 - 365. Filter by Indicator Status Enter a ThreatQ Status to filter indicators by. This parameter only accepts single-word statuses.
Example: ActiveFilter by Indicator Score Enter an indicator score to filter indicators by. The value provided will be calculated as a greater than or equal to equation.
Example: Enter 5 will filter indicators with a score of 5 or greater.
Entering a value of 0 will include all scores.Filter by Indicator Attributes Enter a comma-separated list of key-value pairs in which the key corresponds to the Attribute Name and the value corresponds to the Attribute Value. The key and value are separated by a colon. You can filter on multiple Attribute Values for the same Attribute Name by having individual key-value pairs where the key is the same for both pairs.
Example:Attribute1:Value1, Attribute2:Value2, Attribute1:Value2Intelligence Data Enrichment This parameter allows you to specify if file hashes in ThreatQ should be enriched by the Trellix ecosystem. Enabling this feature will result in The following attributes are created for each of Trellix ATD, Trellix GTI and the Enterprise (which in this case is ThreatQ): - * Enterprise Trust Level - Reputation of this hash as known by Enterprise.
- * GTI Trust Level - Reputation of this hash as known by GTI.
- Prevalence - True when the file was referenced by more than a configurable amount of end- points.
- Detection Count
- Enterprise Count
- Review any additional settings, make any changes if needed, and click on Save.
- Click on the toggle switch, located above the Additional Information section, to enable it.
ThreatQ Scoring to Trellix TIE Reputation Mapping
Use the following information to assist in setting the reputation mapping parameters under the Configuration tab for the integration.
ThreatQ supports the following scoring bands:
| ThreatQ Scoring Band | Range |
|---|---|
| very low | 0-4 |
| low | 5-6 |
| medium | 7-8 |
| high | 9 |
| very high | 10+ |
One or more ThreatQ scoring bands can be mapped to a Trellix reputation score with the following conditions:
- The same ThreatQ scoring band cannot be mapped to multiple Trellix TIE reputation scores.
- A higher ThreatQ scoring band cannot be mapped to a less malicious Trellix TIE reputation score. For example, the following configuration is invalid:
Trellix TIE Reputation ThreatQ Scoring Bands Known Malicious low Most Likely Malicious medium Might Be Malicious high - Multiple scoring bands can be assigned to the same Reputation as long as the above two conditions are satisfied. An example of a valid configuration is as follows:
Trellix TIE Reputation ThreatQ Scoring Bands Known Malicious very high, high Most Likely Malicious medium Might Be Malicious low, very low
Trellix Cache File
A cache file, trellix_tie_cache.json, is utilized by the connector. The following key values pairs are recorded in the cache file:
| Value Pairs | Description |
|---|---|
indicators_sent |
The total number of indicators sent to Trellix TIE over a 24 hour period. |
start_time |
The epoch time from when the connector was initially ran. This value is set to the current time whenever the connector runs 24 hours after the recorded start time. |
Trust Level |
Trust levels are as follows:
|
Share Status - <connector_name> |
This attribute is created for each indicator after the indicator is pushed to a particular fabric. Possible values are:
|
Reputation Override - <connector_name> |
This attribute can be added manually from the ThreatQ user interface if a user wants to re-push an already pushed indicator to the DXL fabric with a different reputation.
At maximum, there can be one Reputation Override attribute per indicator. |
Usage
Use the following command to execute the driver:
For ThreatQ v6, all the generated files are stored in /etc/tq_labs. To find additional options and option descriptions, simply invoke the program with -h.
For ThreatQ v5, all location-based options default to /etc/tq_labs if they are not provided. To find additional options and option descriptions, simply invoke the program with -h.
Command Line Arguments
This connector supports the following custom command line arguments:
| Argument | Description |
|---|---|
-h, --help |
Review all additional options and their descriptions. |
-ll LOGLOCATION, --loglocation LOGLOCATION |
Sets the logging location for the connector. The location should exist and be writable by the current. A special value of 'stdout' means to log to the console (this happens by default). |
-c CONFIG, --config CONFIG |
This is the location of the configuration file for the connector. This location must be readable and writable by the current user. If no config file path is given, the current directory will be used. This file is also where some information from each run of the connector may be put (last run time, private oauth, etc.) |
-v {1,2,3}, --verbosity {1,2,3} |
This is the logging verbosity level where 3 means everything. |
-cn, --con-name |
Name of the connector (Option used in order to allow users to configure multiple Trellix TIE connector instances on the same TQ box) |
-x, --cache (Optional) |
ThreatQ v5 Only - this sets the location of the cache file that marks the last file hash indicator that was received in this connector's previous run. The default is cwd. |
dc, --dxl-config-dir (Optional) |
ThreatQ v5 Only - this sets the location of where the connector will look for the directory containing the Trellix DXL certificate files. The default is cwd. |
| --cron | ThreatQ v6 Only - creates a CRON entry for the connector based on a pre-loaded ThreatQ template. See the CRON section for more details. |
Accessing Connector Logs
ThreatQ version 6 aggregates the logs for all custom connectors to its output container. You can access the container's log using the following command:
The connector log directory was created in 10 of the installation process and is identified using the -ll argument flag when executing the driver.
Accessing Connector Configuration
The custom connector configuration file can be found in the following directory: /etc/tq_labs/.
The custom connector configuration file was created in step 10 of the install process and identified using the -c argument flag when executing the driver.
CRON
The addition of the --cron argument in the initial run of connector, performed during the install process, resulted in the creation of a cron job file for the connector in the following directory: /etc/cron.d/. The contents of the file will resemble the following structure:
The {schedule} will be replaced with the cron settings you entered with the --cron flag and the {executable} will be replaced for with the connector's driver command.
You will also see a # at the beginning of the file. This comments out the job. This allows you to configure the custom connector in the ThreatQ UI first. After you have configured the connector in ThreatQ, you can remove the # from the file content's in order to activate the cron job.
To summarize this process:
- Install the connector and perform an initial run using the
--cronargument to create the cron job. - Complete the connector's configuration settings in the ThreatQ UI.
- Access the connector's cron file in the
/etc/cron.d/directory and remove the # from the beginning of the file.
Automatic CRON configuration has been removed from this script. To run this script on a recurring basis, use CRON or some other jobs scheduler. The argument in the CRON script must specify the config and log locations.
Add an entry to your Linux crontab to execute the connector at a recurring interval. Depending on how quickly you need updates, this can be run multiple times a day (no more than once an hour) or a few times a week.
In the example below, the command will execute the connector every two hours.
- Log into your ThreatQ host via a CLI terminal session.
- Enter the following command:
crontab -e
This will enable the editing of the crontab, using vi. Depending on how often you wish the cronjob to run, you will need to adjust the time to suit the environment.
- Enter the commands below:
Every 2 Hours Example
0 */2 * * * /opt/tqvenv/<environment_name>/bin/tq-trellix-tie -c /etc/tq_labs/ -ll /var/log/tq_labs/ -v3 - Save and exit CRON.
Change Log
- Version 1.4.1 rev-a
- Updated the v6 installation steps to include steps for air gapped customers.
- Version 1.4.1
- Updated the integration to work with ThreatQ v6. The connector now uses the
/etc/tq_labs/directory as the default location to store files generated by the integration. - Updated the minimum ThreatQ version to 5.12.0
- Updated the integration to work with ThreatQ v6. The connector now uses the
- Version 1.4.0
- Updated the connector's integration dependencies.
- Added additional support for python 3.
- Rebranded the integration to the Trellix TIE Connector.
- Version 1.3.3
- Updated integration to improve overall performance. The improvements will resolve a 500 server error that some users experienced when running the connector.
- Version 1.3.2:
- Fixed a bug for conflicting dependencies regarding asn1crypto-1.3.0.
- Version 1.3.1:
- Reputations that were labeled Possible Malicious have been relabeled as Might Be Malicious.
- Version 1.3.0:
- The maximum number of DXL set reputation requests allowed per day increased from 1000 to 100000.
- Indicators sent to the DXL communication fabric are prioritized as follows:
- Indicators with Reputation Overwrite set (ordered descending by score)
- Indicators with a higher score (ordered descending by score)
- All ThreatQ indicators, regardless of score, are now mapped to McAfee reputation Most Likely Malicious, by default.
- Selection fields now provide multi-select and Boolean features.
- Querying indicators in the TIE server does not increase the sighting count.
PDF Guides
| Document | ThreatQ Version |
|---|---|
| Trellix TIE Connector Guide v1.4.1 | 4.19.0 or Greater |
| Trellix TIE Connector Guide v1.4.0 | 4.19.0 or Greater |
| McAfee TIE Connector Guide v1.3.3 | 4.19.0 or Greater |
| McAfee TIE Connector Guide v1.3.2 | 4.19.0 or Greater |
| McAfee TIE Connector Guide v1.3.1 | 4.19.0 or Greater |
| McAfee TIE Connector Guide v1.3.0 | 4.19.0 or Greater |
| McAfee TIE Connector Guide v1.2.0 | 4.19.0 or Greater |
| McAfee TIE Connector Guide v1.1.0 | 4.19.0 or Greater |