Workflow Actions
Roles Required: Admin, Splunk_System_Role, ess_admin.
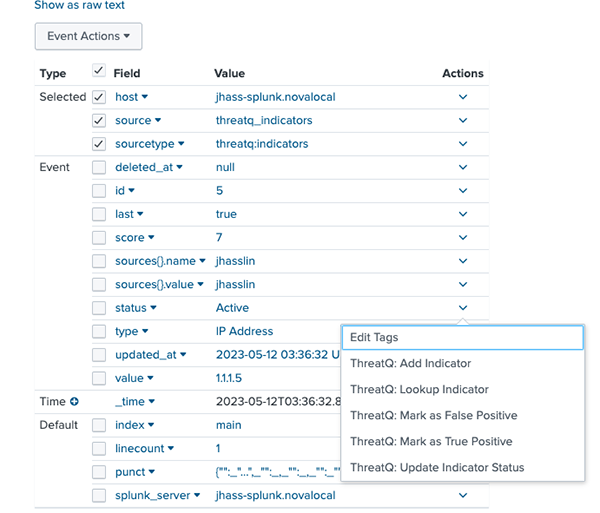
The ThreatQuotient App provides five user workflow actions to the analysts for providing interactivity with the ThreatQuotient platform from Splunk. As shown on the diagram below, the actions can be invoked on any Splunk event by expanding the event view and clicking on the down arrow in the column below Action.

The actions are described below.
| Action | Description |
|---|---|
| ThreatQ: Add Indicator | This workflow action adds the indicator to ThreatQ. You are presented with UI inputs that allow you to select indicator type, status and source. If the data and type do not match, an error is reported. Successful completion of this workflow action results in the indicator being successfully added to the ThreatQ Threat Library. |
| ThreatQ: Lookup Indicator | This workflow action searches for an indicator in ThreatQ and pulls additional context for that indicator. If the indicator does not exist in ThreatQ, an error is reported. |
| ThreatQ: Mark as False Positive | This workflow action adds the attribute key-value False Positive: True to the indicator in ThreatQ. If the indicator does not exist in ThreatQ, an error is reported. |
| ThreatQ: Mark as True Positive | This workflow action adds the attribute key-value True Positive: True to the indicator in ThreatQ. If the indicator does not exist in ThreatQ, an error is reported. |
| ThreatQ: Update Indicator Status | This workflow action updates the status of the indicator in ThreatQ. This action supports all statuses, including custom, that exist on the ThreatQ instance.
You can view additional information and settings for this action on the application and the add-on by clicking on the Settings dropdown and selecting Alert Actions under the Knowledge heading. You can review and edit sharing permissions, action status, usage, and view log events. |
Performing Workflow Actions by Non-Admin Users
Users can perform workflow actions from Splunk to ThreatQuotient without admin capability by performing following steps.
- Navigate to Settings > Advance search > Search macros.
- Apply the app filter to ThreatQuotient Add-on for Splunk.
- Edit the workflow_action_using_conf macro and set it to True.
- Go to the backend and create the credentials_storage.conf in the local folder.
If local folder is not available then create new folder and name it to "local"
- Now provide the below information in the credentials_storage.conf file:
sample of credentials_storage.conf: [credentials] username = <username> password = <password> server_url = <server_url> threatq_splunk_url = < threatq_splunk_url > client_id = < client_id> [proxy_credentials] proxy_enabled = <boolean> proxy_password = <proxy_password> proxy_port = <proxy_port> proxy_type = <proxy_type> proxy_url = <proxy_url> proxy_username = <proxy_username> - Restart Splunk.