ThreatQ App for QRadar
The web format of this guide reflects the most current release. Guides for older iterations are available in PDF format.
App Details
ThreatQuotient provides the following details for this app:
| Current Integration Version | 2.1.0 |
| Compatible with ThreatQ Versions | >= 4.44.0 |
| Compatible with QRadar SIEM Versions | >=7.4.2 |
| Support Tier | ThreatQ Supported |
| IBM App Exchange | https://exchange.xforce.ibmcloud.com/hub/extension/ a263ff2c1597c3ffb2a1510f0224260c |
Introduction
The ThreatQ App for QRadar is a bi-directional application that runs within the QRadar SIEM's application framework. The application allows for the ingestion of ThreatQ's indicators of compromise (IoCs), exports QRadar Offenses to ThreatQ as Events, parses QRadar Events and adds the Offense Source as Indicators in ThreatQ, and provides right-click actions that allow QRadar Analysts to interact with their ThreatQ instance from within the QRadar SIEM's UI.
If a previous version of the application has been installed, ThreatQuotient recommends that you uninstall the current version and then install the new version. It's also advised to delete all ThreatQ reference sets before installing and pulling indicators with the new version. This will ensure the differential has the most accurate information.This application will be available for download from the IBM App Exchange.
Prerequisites
The ThreatQ App for QRadar prerequisites are:
- Chrome browser
- ThreatQ version 4.44.0+ to take advantage of the client credentials CLI command.
- QRadar SIEM version greater than or equal to 7.4.2.
- Authentication Token from a ThreatQ Authorized Service.
- Configuration of the ThreatQ App for QRadar requires administrative privileges. All other actions are available to users.
Firefox and Internet explorer are not fully supported at this time. Please use the Chrome browser with v1.2.0+ of the app.
Upgrading does not overwrite the configurations. ThreatQuotient recommends that you uninstall the current version and then install the new version.
Installation
If a previous version of the application has been installed, ThreatQuotient recommends that you uninstall the current version and then install the new version. It's also advised to delete all ThreatQ reference sets before installing and pulling indicators with the new version. This will ensure the differential has the most accurate information.
This application will be available for download from the IBM App Exchange.
The application package may be installed via the Extension Management component of the QRadar SIEM.
- Click on the Admin tab In the QRadar SIEM.
- Click on Authorized Services located under the User Management section.
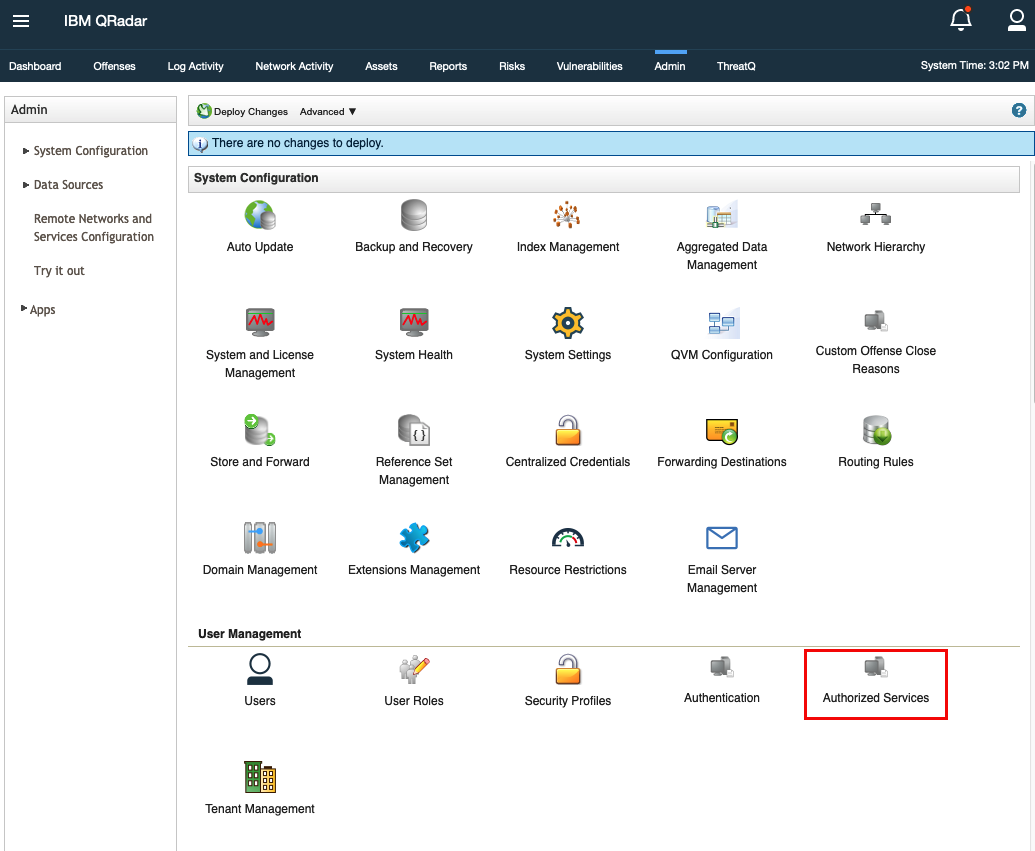
- Click on Add Authorized Service.

- Complete the applicable fields and click Create Service.

- Copy the Authentication Token that was generated and store it for later use.

Be sure to deploy the changes so that the app can use the token.
- Open Extensions Management located under the System Configuration section.
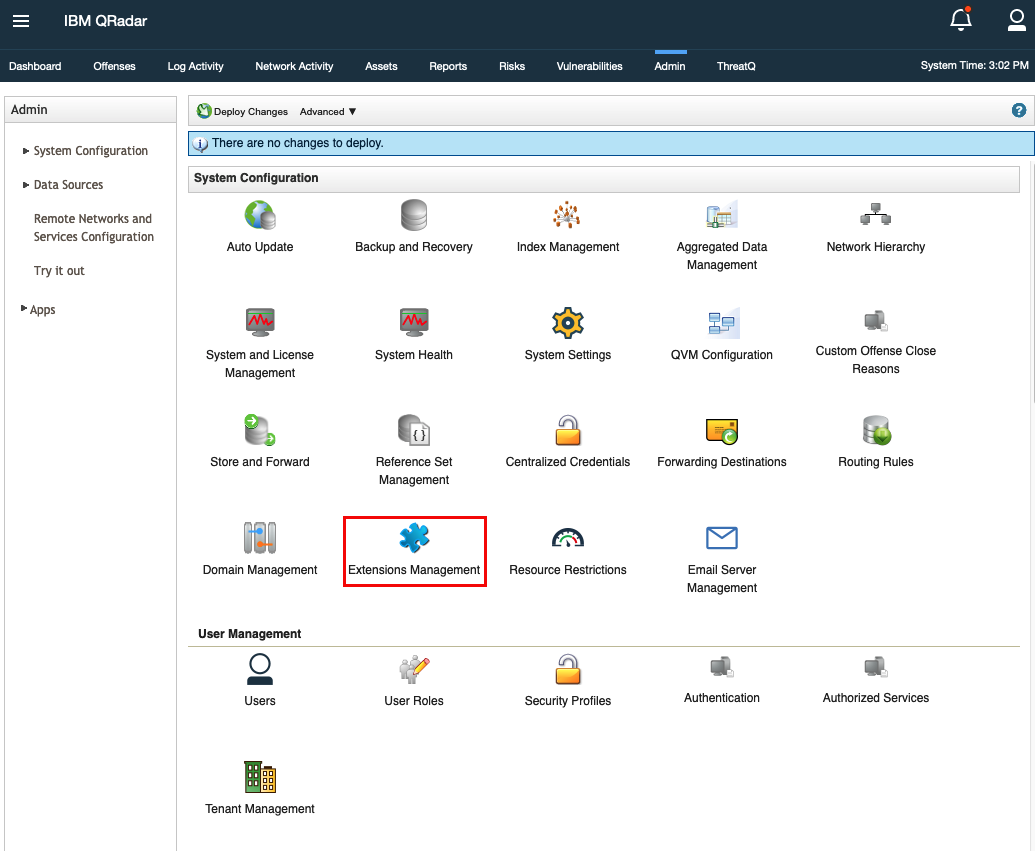
- Click on Add to add a new extension.
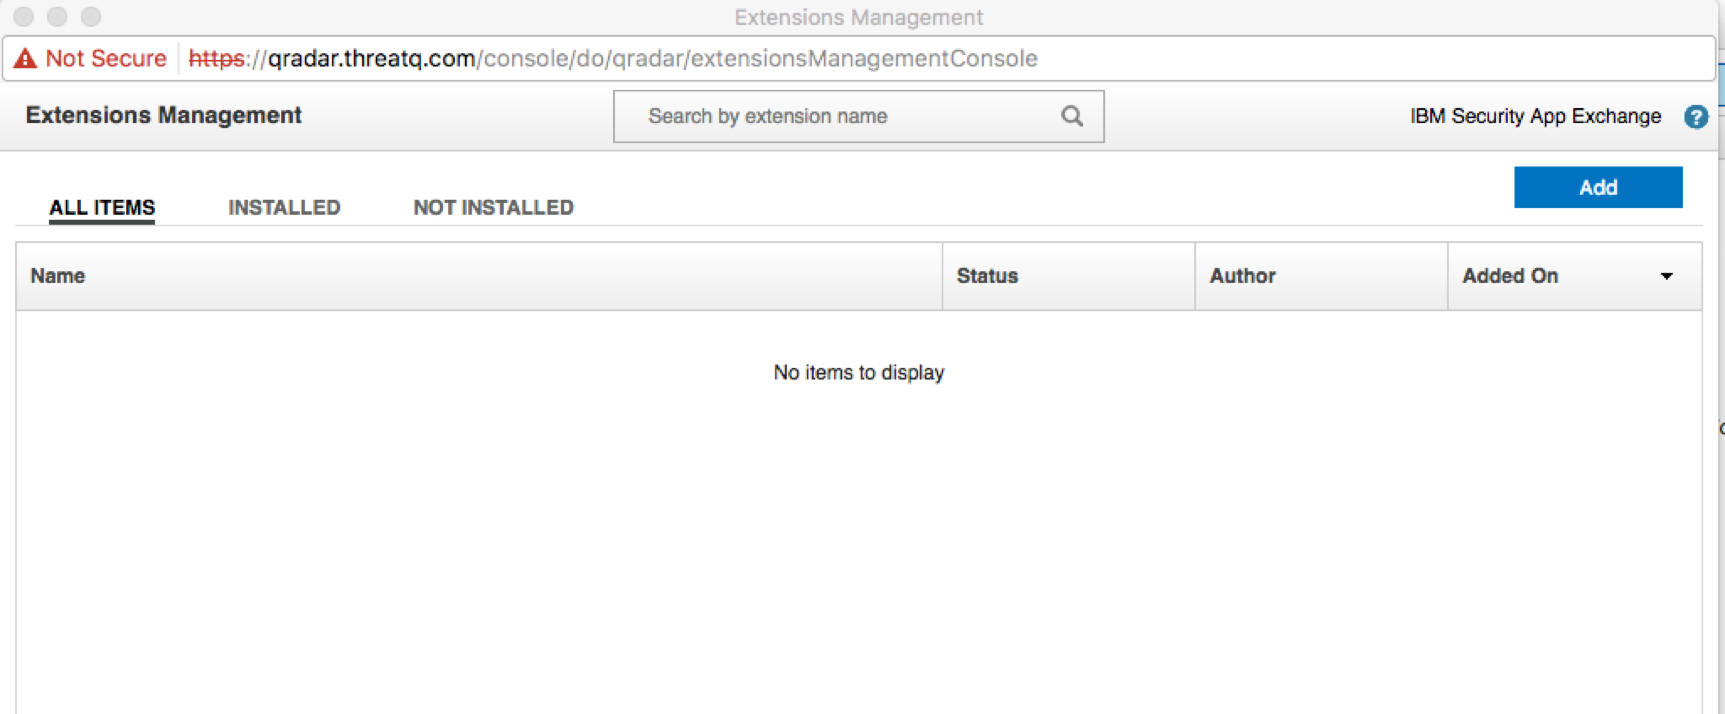
- Browse to the location where the ThreatQ App for QRadar was downloaded, select it, and ensure that the Install immediately checkbox option is selected.
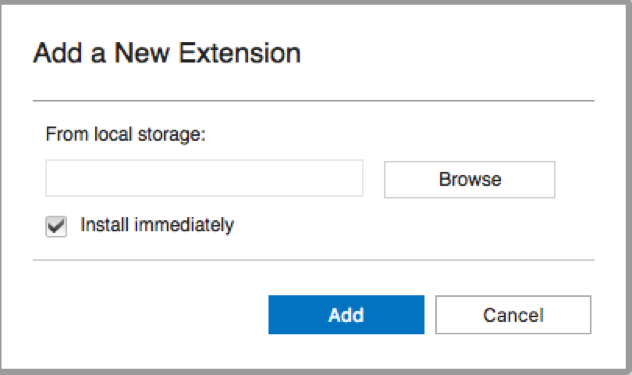
- Click Add.
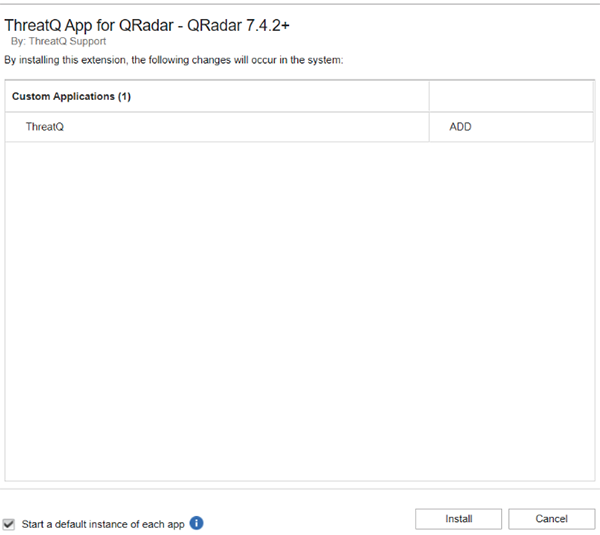
- Click Install.
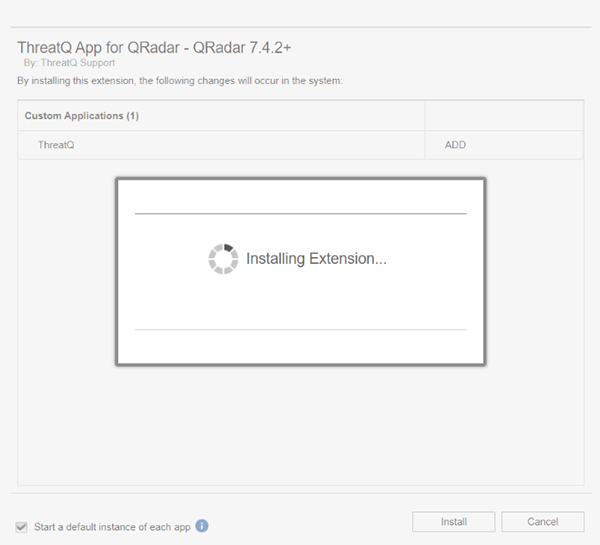
An installation window will pop up with a loading wheel while installing the extension.
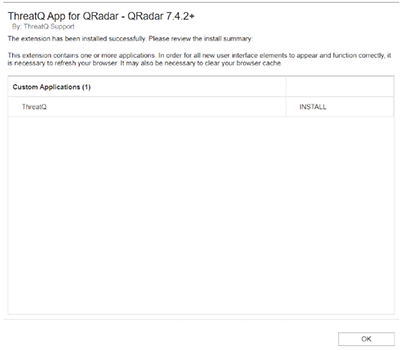
- Click OK.
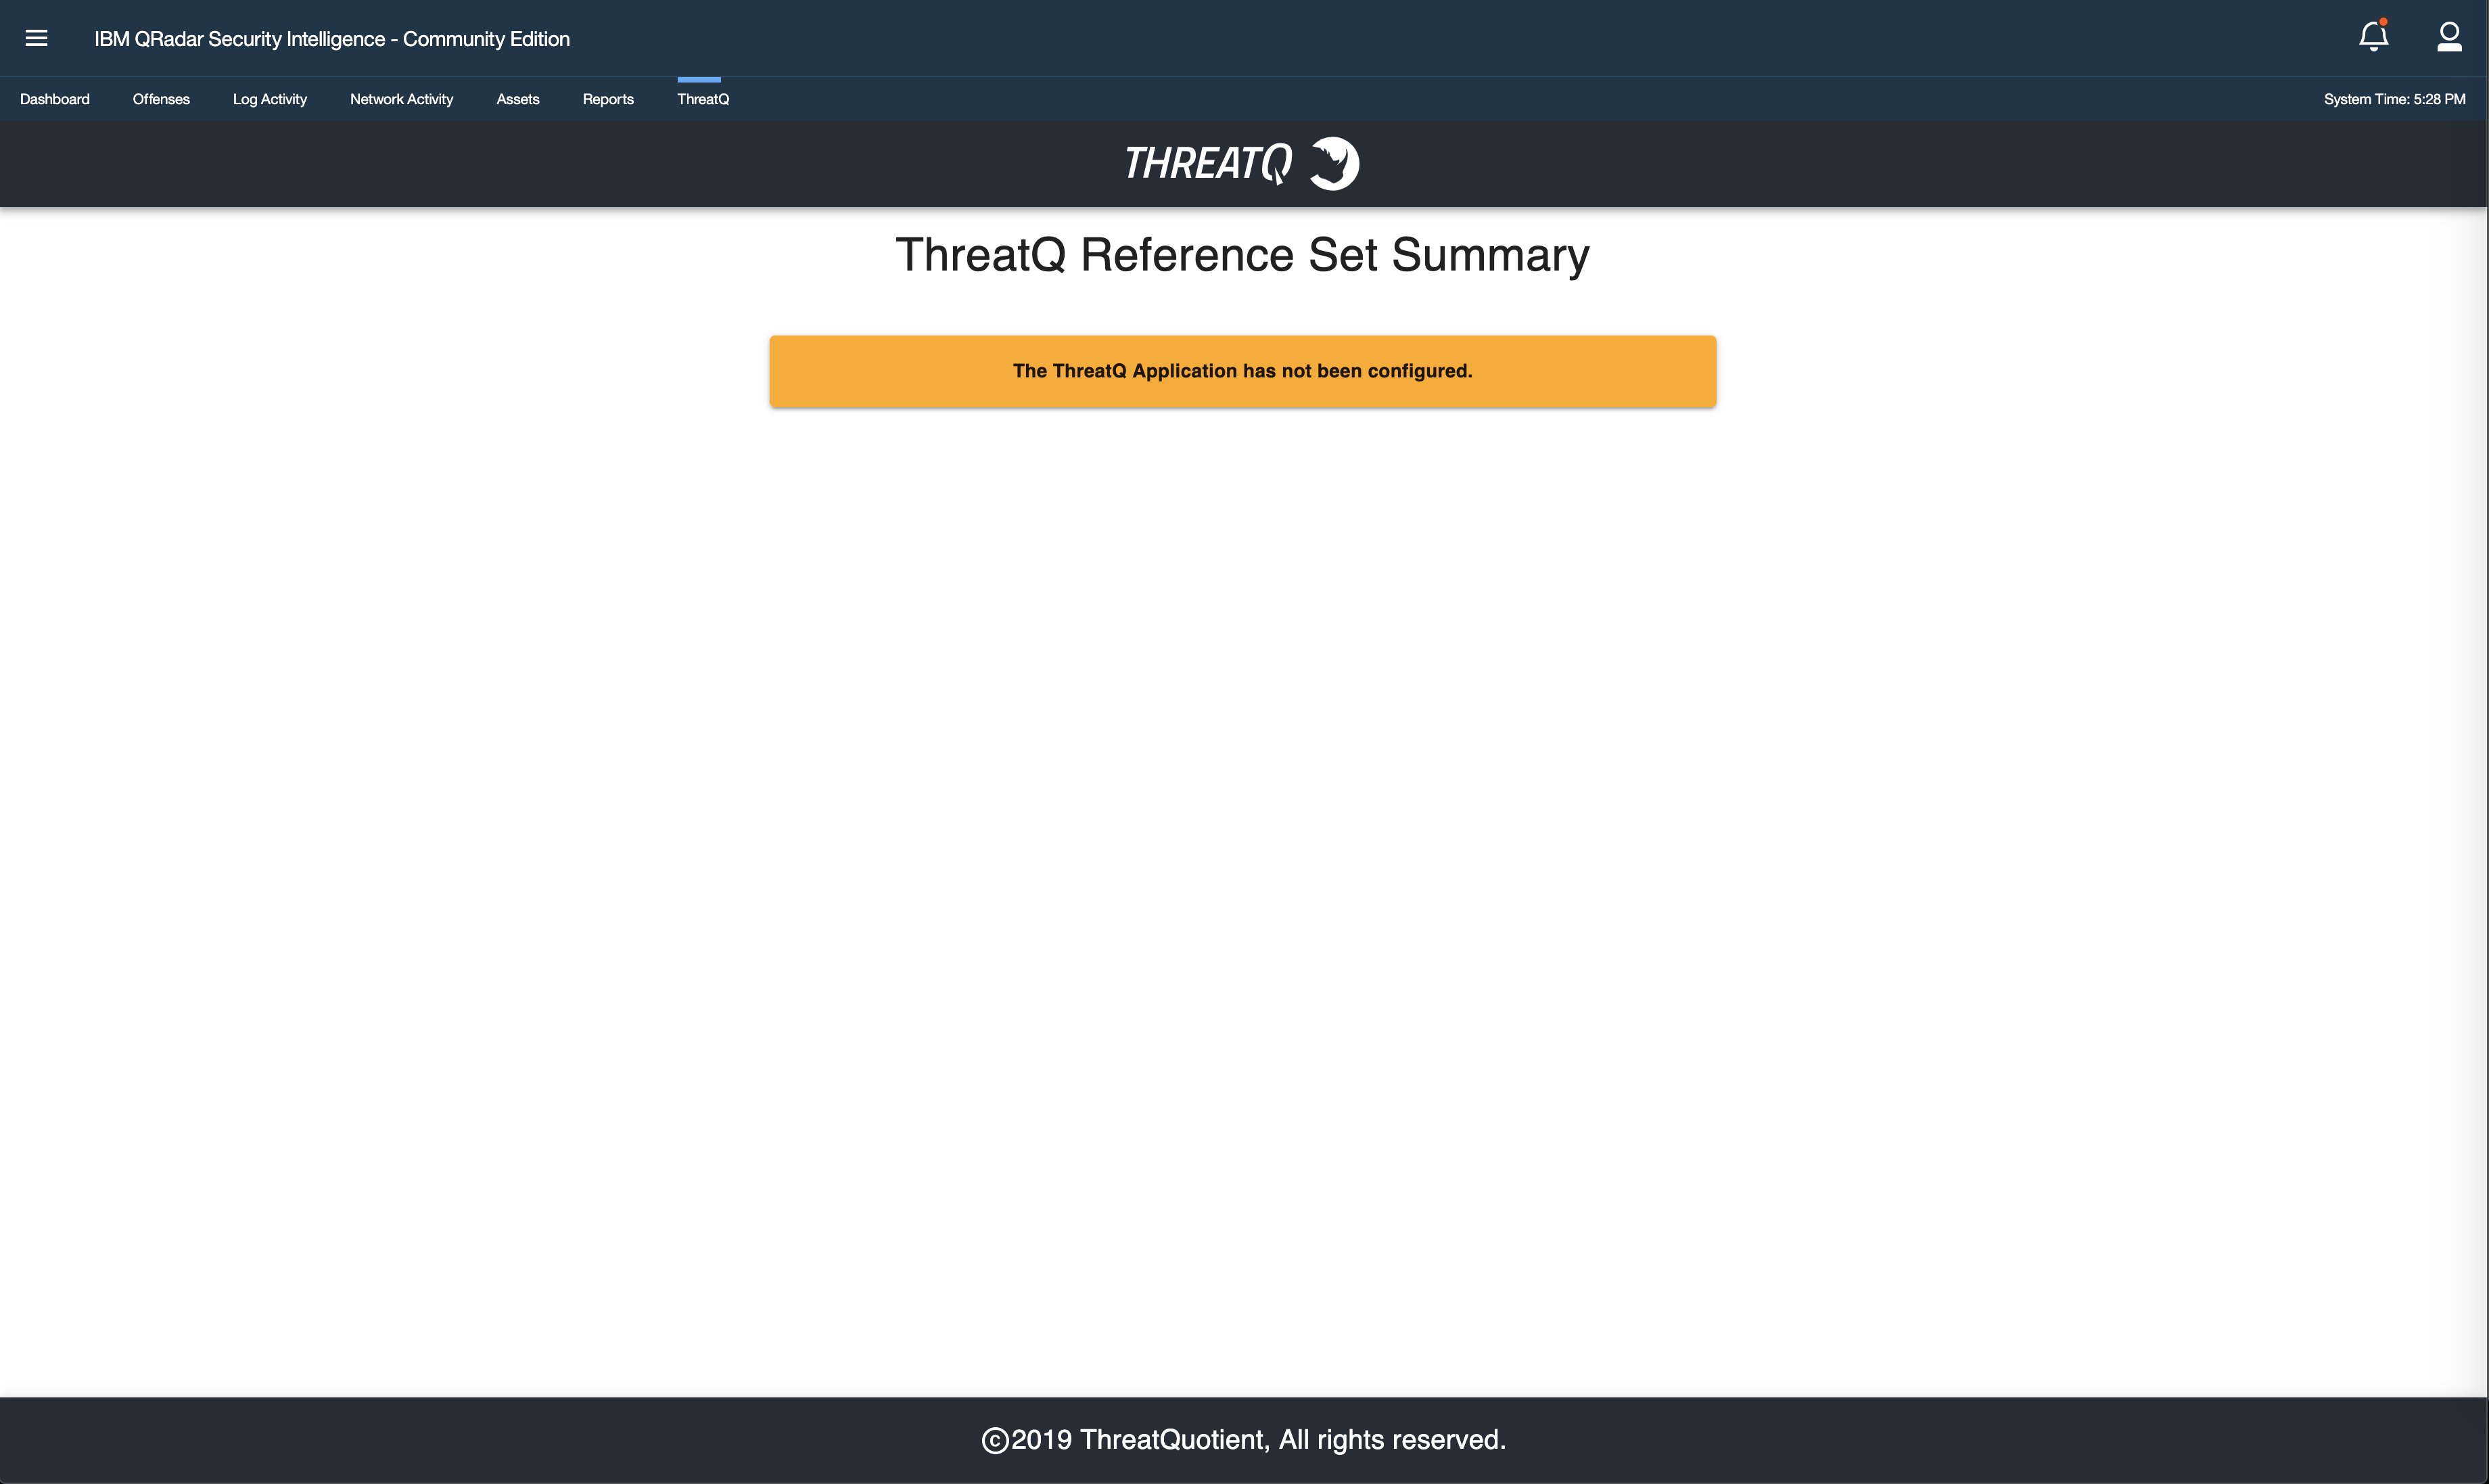
Upon successful installation, a new tab labeled ThreatQ will be displayed in the QRadar SIEM UI. The tab will initially display a note indicating that the configurations need to be set in the ThreatQ Configuration page within the Admin tab.
Upgrading
You must delete all the ThreatQ reference sets before upgrading the app.
The Time to Live configuration parameter will only function if the reference sets are newly created.
ThreatQuotient recommends that you uninstall the current version in order to automatically remove old files.
If you do not want to uninstall the app then you need to remove files manually and then upgrade the app by following these steps:
- Go into application docker by following the steps to access application docker.
- Execute the following command:
rm /opt/app-root/store/*.csv
- Then upgrade the application to a newer version of the app by following Installation steps (starting from step 6).
It is important to note that the ThreatQ App for QRadar version 2.0.0 included the following new configuration fields: Time to Live and ThreatQ Instance Timezone. The app will accept the app-default values but can be updated on the ThreatQ Configuration page of the App.
| Parameter | Description |
|---|---|
| Time to Live (TTL) | The time that is remaining until the element is removed from the reference set. The default setting is 30 days.
If the indicators are not updated within the configured TTL, they will be removed from the reference set once its TTL expires. |
| ThreatQ Instance Timezone | Timezone of the ThreatQ Instance. The default setting is UTC. Confirm that this field is in sync with the ThreatQ Instance otherwise there could be a data mismatch. |
Configuration
ThreatQuotient does not issue API keys for third-party vendors. Contact the specific vendor to obtain API keys and other integration-related credentials.
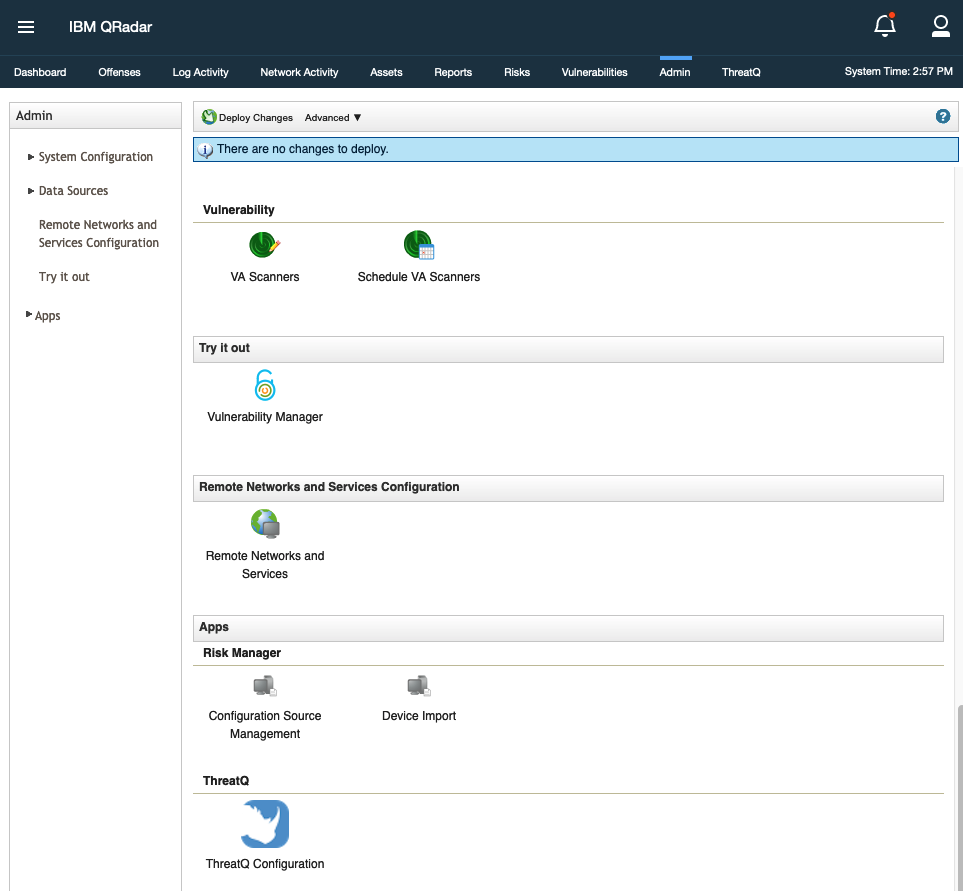
The ThreatQ Configuration option will appear in the Admin page under the Apps heading upon successful installation. To configure to app, you will need to:
- Generate ThreatQ Oauth Credentials
- Configure your ThreatQ Threat Library Search
- Configure the ThreatQ App settings in the QRadar UI
Generating ThreatQ OAuth Credentials
You will need to generate oauth2 client credentials in order to successfully have the app authenticate with ThreatQ. This is performed using the command line of the ThreatQ appliance.
- SSH to your ThreatQ installation.
- Create a new client id and client secret password using the following command:
kubectl exec --namespace threatq --stdin --tty deployment/api-schedule-run -- ./artisan threatq:oauth2-client --name="Qradar"
- Copy the client_id and client_secret from the output for use in the configuration of the ThreatQ QRadar application.
Example Output:session_timeout_minutes: 1440
name: Qradar
type: private
client_id: ntdjzwe3mduyyjqxyjdiyza5mzyxmtkx
client_secret: YThlOTBlZjM0YTYxNWM1YjVkODdmMTdjNGY5MzZkYTg4M2RmYmRiZGJmNjk1OTRm
updated_at: 2020-01-14 14:03:27
created_at: 2020-01-14 14:03:27
- SSH to your ThreatQ installation.
- Navigate to the api directory using the following command:
cd /var/www/api
- Create a new client id and client secret password using the following command:
php artisan threatq:oauth2-client --name="Qradar"
- Copy the client_id and client_secret from the output for use in the configuration of the ThreatQ QRadar application.
Example Output:session_timeout_minutes: 1440
name: Qradar
type: private
client_id: ntdjzwe3mduyyjqxyjdiyza5mzyxmtkx
client_secret: YThlOTBlZjM0YTYxNWM1YjVkODdmMTdjNGY5MzZkYTg4M2RmYmRiZGJmNjk1OTRm
updated_at: 2020-01-14 14:03:27
created_at: 2020-01-14 14:03:27
Configuring your ThreatQ Data Collection
IoCs will be imported into QRadar based on the configurations from the ThreatQ Threat Library saved searches, referred to as Data Collections in the ThreatQ platform. The filter parameters for the data collection must be configured in ThreatQ.
The current parameters for filtering indicators in the Threat Library are:
- Indicator Type
- Indicator Status
- Indicator Score
- Date Created
- Last Modified
- Import ID
- Relationship
- Source
- Tag
- With Attribute
- Without Attribute.
Perform the following steps to create a Data Collection in ThreatQ:
- Navigate to the Threat Library in ThreatQ.
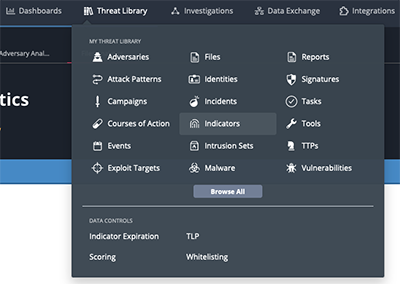
- Select the parameters from the supplied filters.
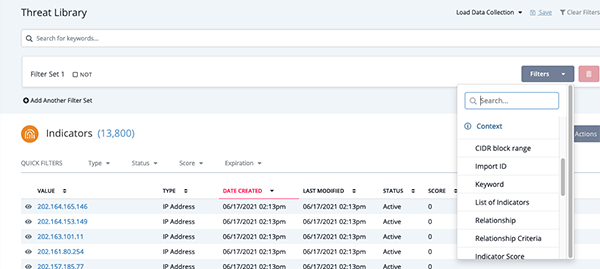
- Click on Save.
The Save Data Collection dialog box opens.
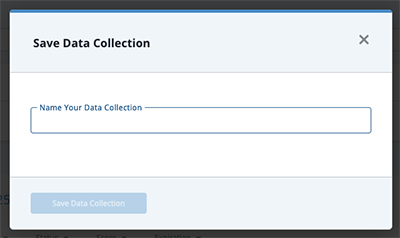
- Enter the name for your search and click Save Data Collection.
Make sure to configure the ThreatQ data collections in such a way that the QRadar reference sets created for the same don’t exceed 100k values. If QRadar reference set holds more than 100k values, user might see some issues.
Configuring ThreatQ in QRadar
IBM requires Admin-level permissions to set the configuration in QRadar. This change was in ThreatQ App for QRadar version 1.3.5.
- Click on the Admin tab in the QRadar SIEM UI.
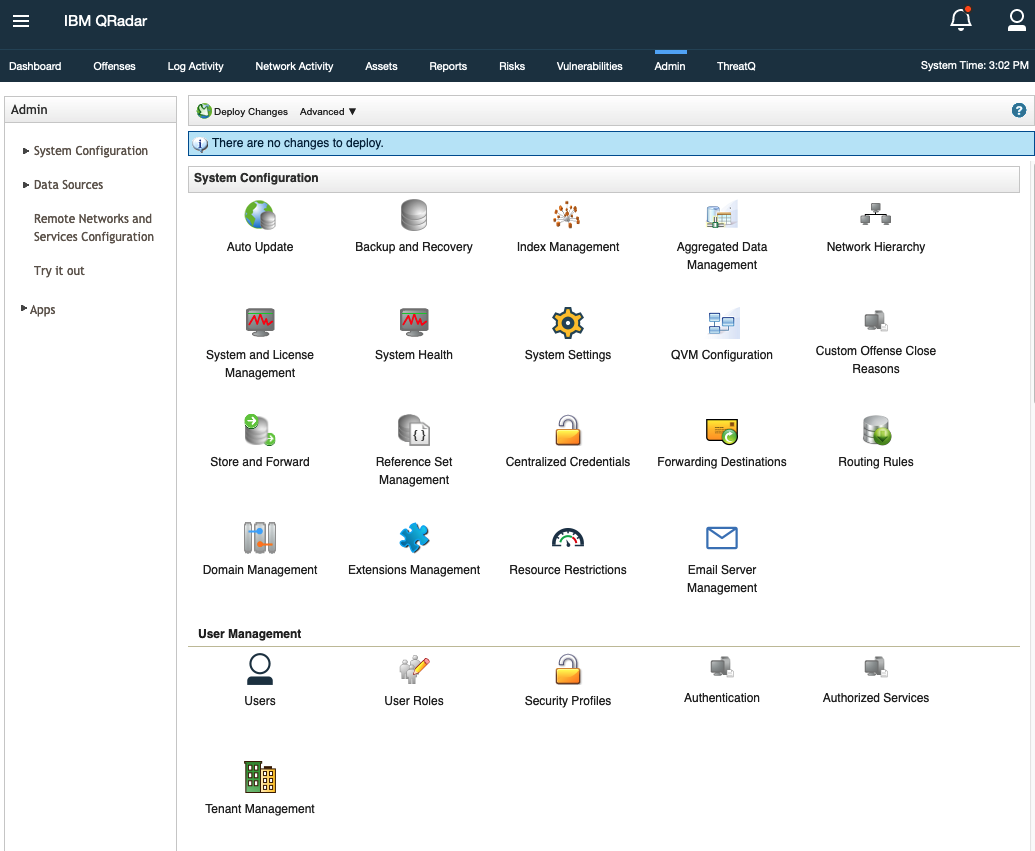
- Then scroll down to the Apps heading and click on ThreatQ Configuration.

A popup window will open with the ThreatQ Configuration form.
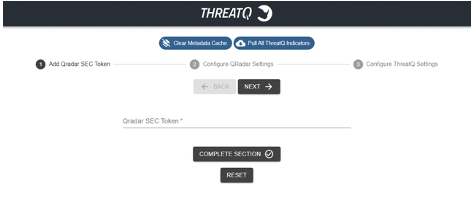
The configuration form will also include three action buttons at the top of the form:Button Description Clear Metadata Cache This button will clear the indicator information stored in the metadata cache. Pull All ThreatQ Indicators This button will trigger the app to download all the indicators from ThreatQ and will remove the outdated indicators from QRadar reference sets. - Complete the SEC Token Section:
Field Description QRadar SEC Token The API token for QRadar SIEM.
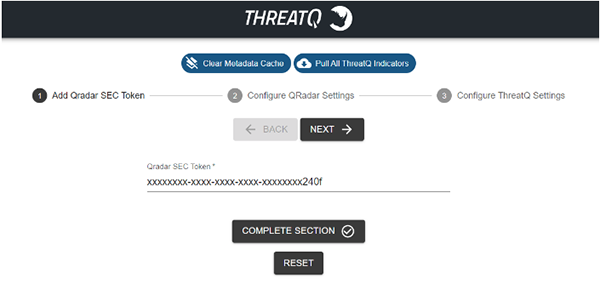
- Click Next or Complete Section.
- Complete the QRadar Settings section:
Field Description Enable Exporting Offenses to ThreatQ (toggle switch) If desired, toggling this switch on will enable QRadar to export Offenses to ThreatQ based on the filtering fields defined below. See the Exporting Offenses / Events section for more details. QRadar Offense Severity Offenses with severity greater than or equal to this value will be exported to ThreatQ. Offense Magnitude Offenses with magnitude greater than or equal to this value will be exported to ThreatQ. Offense Statuses Offenses with one of these statuses will be exported to ThreatQ. Categories Offenses with one of these categories will be exported to ThreatQ. QRadar list of IDs The list of ID's that of offenses that should be included in the Export to ThreatQ. QRadar List of Offense Keywords Comma-delimited list of strings that may be found in an Offense Description. Used to provide additional filtering of exporting Offenses to ThreatQ.
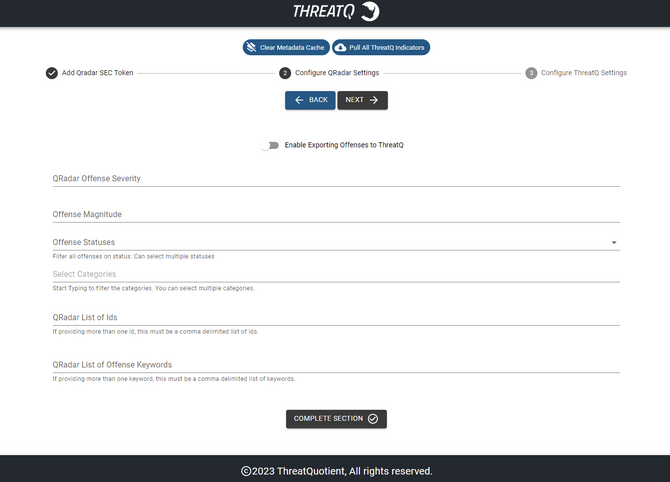
- Click Next or Complete Section.
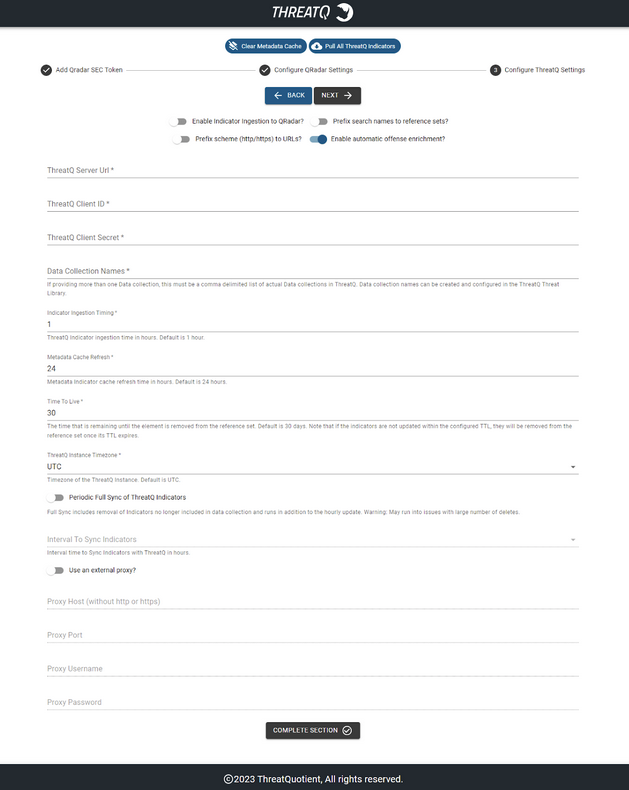
- Complete the ThreatQ Settings section:
Field Description Enable Indicator Ingestion to QRadar Toggling this switch on will enable importing indicators from ThreatQ to QRadar. Pull Indicators Immediately Toggling this switch will append the name of each data collection to the reference set names. Example: If you have a data collection named Score10, with this switch applied it will create reference sets similar to ThreatQ Score10 IP Address. For best results, this option should be selected when first setting up the app. When toggling this option, it's recommended to delete any previous search files (if any) in the app's container while making the change. This will ensure that you have the most up to date reference sets.
Enable Automatic Offense Enrichment This option allows you to enable/disable the automatic offense enrichment script. Prefix Search Names to Reference Sets Toggling this switch will append the name of each data collection to the reference set names. Example: If you have a data collection named Score10, with this switch applied it will create reference sets similar to ThreatQ Score10 IP Address.
For best results, this option should be selected when first setting up the app. When toggling this option, it's recommended to delete any previous search files (if any) in the app's container while making the change. This will ensure that you have the most up to date reference sets.Prefix Scheme (http/https) to URLs Toggling this switch will enable/disable URL normalization during the indicator import process. ThreatQ Server URL The URL for the applicable ThreatQ server. ThreatQ Client ID The client id generated from the oauth2-client command on the ThreatQ appliance. ThreatQ Client Secret The client secret generated from the oauth2-client command on the ThreatQ appliance. Data Collection Names Comma-delimited list of the names of Data Collections used to import indicators from ThreatQ to QRadar.
Do not add spaces between data collection names if adding multiple.
Example: score10,score9Indicator Ingestion Timing The time (in hours) in which the indicators from ThreatQ to QRadar will be updated. Default is 1 hour. Metadata Cache Refresh The time (in hours) in which indicators will remain in the metadata cache before they will start updating information. Default is 24 hours. Time to Live The time that is remaining until the element is removed from the reference set. The default setting is 30 days. If the indicators are not updated within the configured TTL, they will be removed from the reference set once its TTL expires.
ThreatQ Instance Timezone Timezone of the ThreatQ Instance. The default setting is UTC. Confirm that this field is in sync with the ThreatQ Instance otherwise there could be a data mismatch. Periodic Full Sync of ThreatQ Indicators Toggling this switch on will enable periodic synchronization of indicators between ThreatQ and QRadar. This will download all the indicators from ThreatQ, ingest them into QRadar reference sets and remove the outdated indicators from QRadar reference sets. Interval to Sync Indicators Interval at which the periodic synchronization of indicators between ThreatQ and QRadar executes. Use an External Proxy This parameter allows you to enable/disable the ability to make API calls through a proxy. Proxy Host The host url/ip of the proxy server. Proxy Port The port being used for the proxy server. Proxy Username The username used for the proxy server. Proxy Password The password used for the proxy server.
- Click Next or Complete Section.
You will receive a message that all steps have been completed.
Important Notes
- If you are editing either Time To Live or Prefix Search names to reference sets then it is recommended to delete all the reference sets and click on the Pull All ThreatQ Indicators to avoid inconsistency of indicators between ThreatQ and QRadar.
- If you have enabled Prefix Search names to reference sets and you edit the Data Collection Names, then it is recommended to delete all the reference sets related to the removed data collection names to get rid of unnecessary reference sets.
- If you update any of the configured data collection on the ThreatQ side, then it is recommended to click on Pull All ThreatQ Indicators once as the data collection will only fetch the updated indicators. This would make sure that the data is in sync with the ThreatQ.
- As per the IBM suggestion, you should configure the data collection name app in such a way to restrict the total number of indicators in the reference sets to a maximum of 100K to avoid having performance issues. If you need to run rules on reference data, ThreatQuotient recommends to have a reference set with 10K indicators only.
Once the configurations have been set, Reference Sets will be dynamically created based on the Indicator Type found in the search results from ThreatQ.
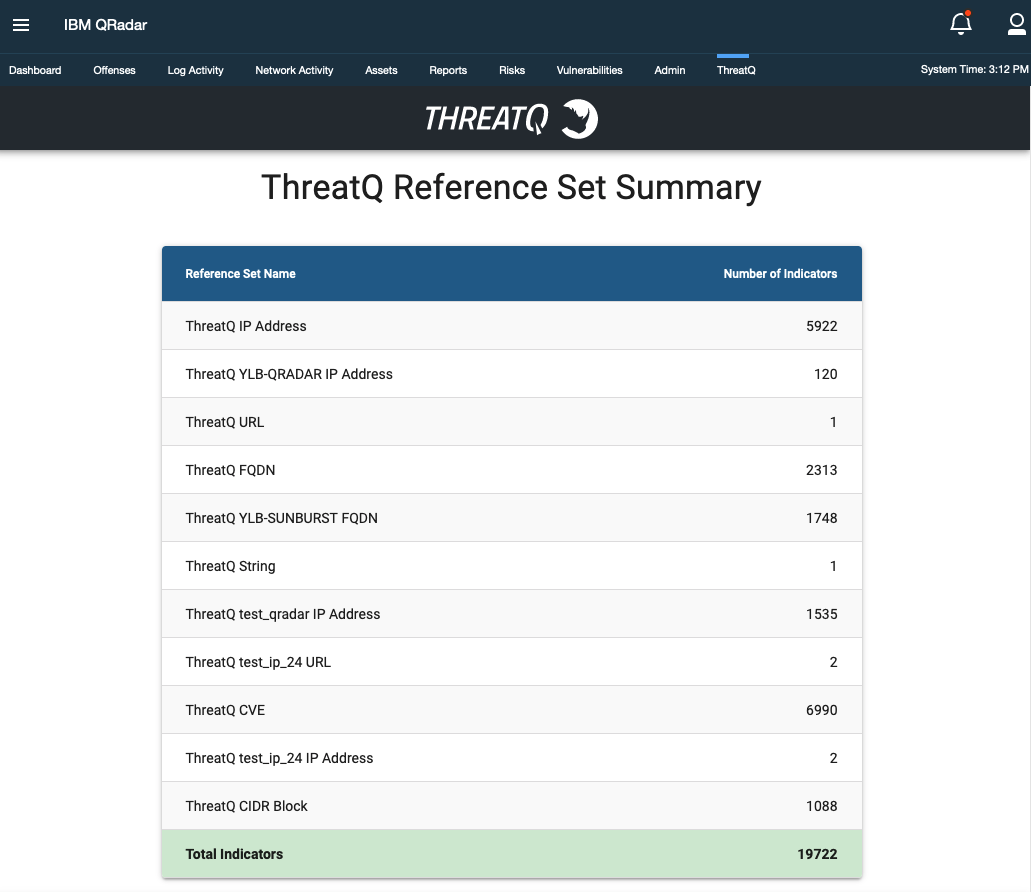
If this is the first run, the ThreatQ App will create Reference Sets for all Indicator Types found in the results from the search query.
The ThreatQ tab in the QRadar SIEM UI will then display a table of elements containing the ThreatQ Reference Sets.
There are 25 possible Reference Sets based on ThreatQ Indicator Types:
- ThreatQ CIDR Block
- ThreatQ CVE
- ThreatQ Email Address
- ThreatQ Email Attachment
- ThreatQ Email Subject
- ThreatQ File Path
- ThreatQ Filename
- ThreatQ FQDN
- ThreatQ Fuzzy Hash
- ThreatQ GOST Hash
- ThreatQ IP Address
- ThreatQ MD5
- ThreatQ Mutex
- ThreatQ Password
- ThreatQ Registry Key
- ThreatQ SHA-1
- ThreatQ SHA-256
- ThreatQ SHA-384
- ThreatQ SHA-512
- ThreatQ String
- ThreatQ URL
- ThreatQ URL Path
- ThreatQ User-agent
- ThreatQ Username
- ThreatQ X-Mailer
Configuration Store
The ThreatQ Configuration page in the QRadar SIEM's UI will collect and store the necessary fields in the store/threatq_app_config.ini within the App' docker container - see the Steps to Access Application Docker section for more details.
Usage
Upon installation and configuration. The application will automatically execute and continue to run on the QRadar SIEM.
The following background scripts will be running:
| Thread | Description |
|---|---|
| Get Indicators | This script will periodically (according to the configured interval) collect the Indicators from the ThreatQ instance and ingest them in the QRadar. |
| Offense Enrichment | This script will run every 30 minutes to fetch the offenses and add details which were obtained from ThreatQ in the Offense Notes. |
| Export Offense | This script will run every 2 minutes to create Indicators and Incidents on ThreatQ according to the offenses in the QRadar. |
Right-Click Actions
ThreatQ for QRadar provides five right-click actions within various pages of the QRadar SIEM's UI.
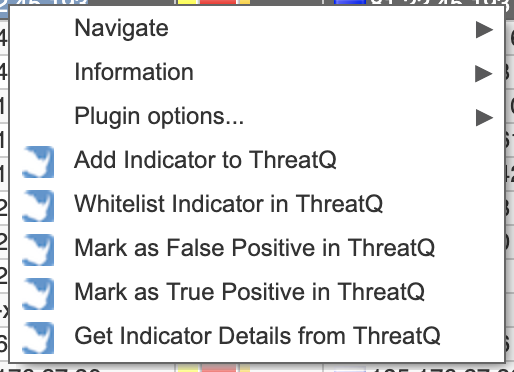
Actions include:
| Option | Action |
|---|---|
| Add Indicator to ThreatQ | Adds an IP Address to ThreatQ, if it does not already exist, and/or returns a URL to the ThreatQ Indicator Details page. |
| Whitelist Indicator in ThreatQ | Changes the status of an indicator that already exists in ThreatQ to Whitelisted. |
| Mark as False Positive in ThreatQ | Changes the status of an indicator that already exists in ThreatQ to Review and adds a False Positive attribute with a value of Yes. |
| Mark as True Positive in ThreatQ | Changes the status of an indicator that already exists in ThreatQ to Active and adds a True Positive attribute with a value of Yes. |
| Get Indicator Details from ThreatQ | Returns the URL for the ThreatQ Indicator Details page. |
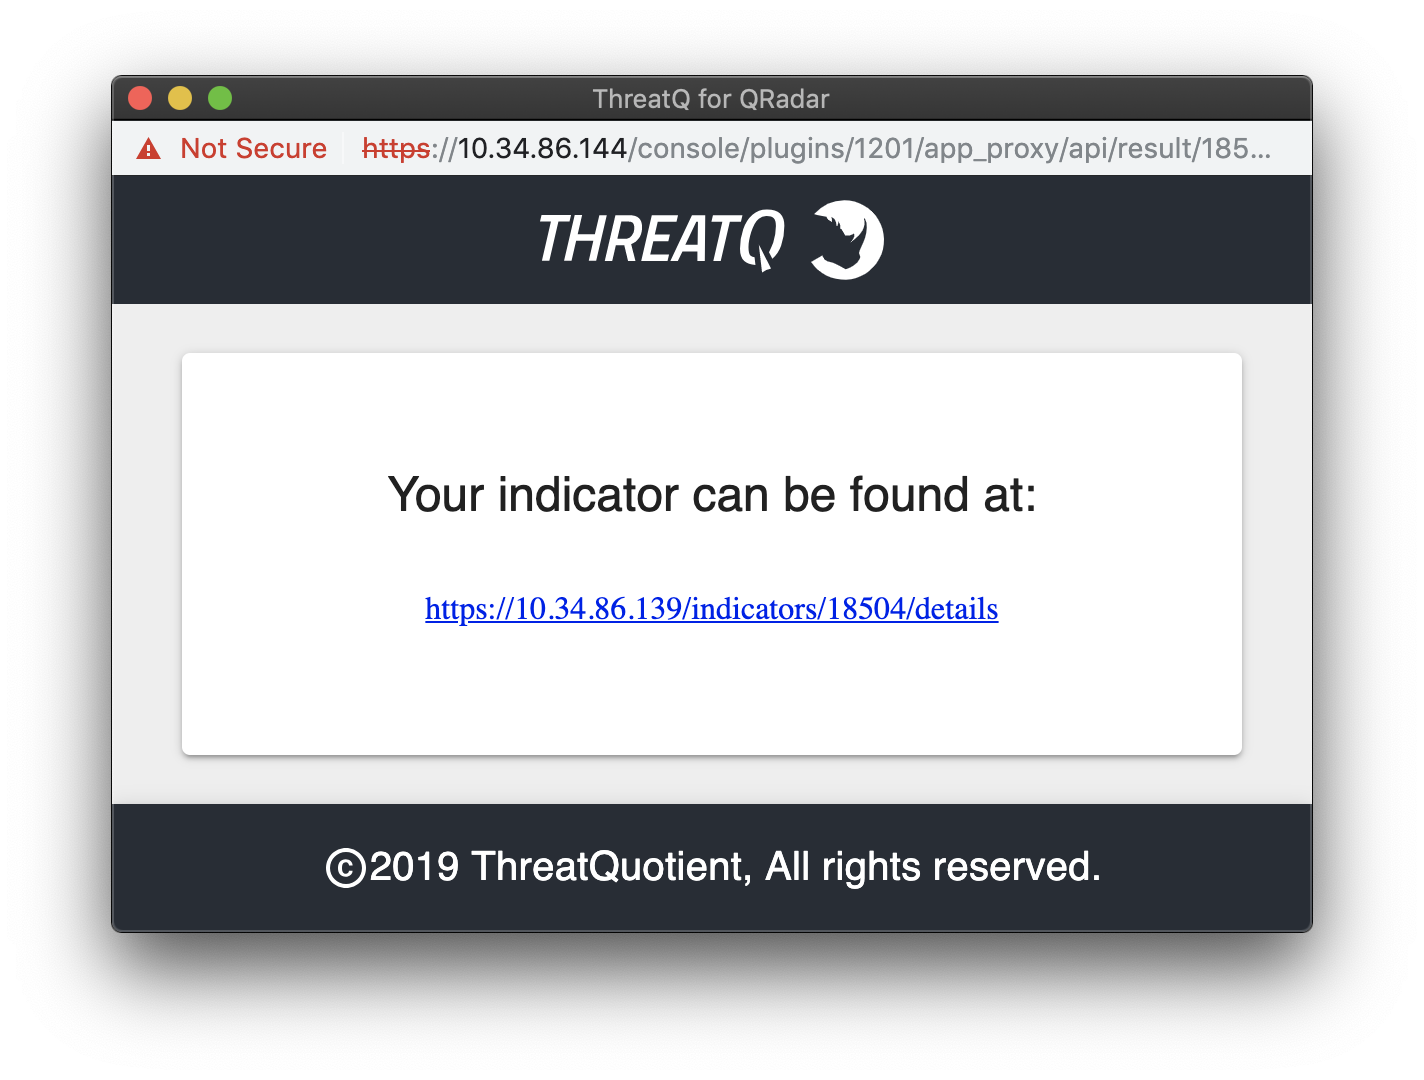
Each right-click action will present a popup window with a URL to the applicable Indicator Details page in ThreatQ.
Metadata Provider
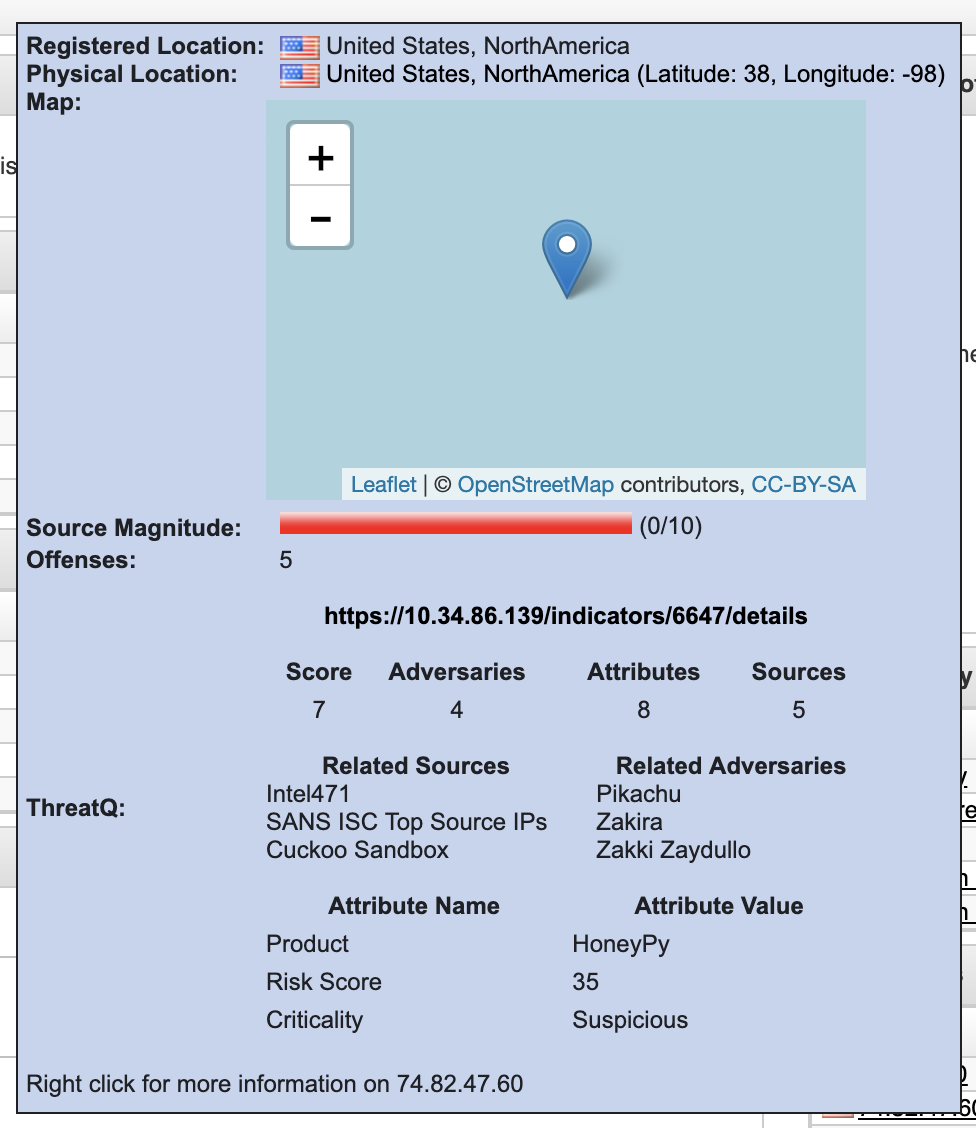
The ThreatQ app for QRadar contains a metadata provider which will provide contextual information on hover of an indicator. Currently this works for: IP Address, Ariel:URL, and Ariel:Hostname indicator types.
If contextual information is found in ThreatQ on the indicator, the following information will be displayed:
- ThreatQ Url for the indicator
- ThreatQ Score
- Total number of Adversaries
- Total number of Attributes
- Total number of Sources
- The first three Adversaries
- The first three Attributes
- The first three Sources
Exporting Offenses / Events
QRadar Analysts may benefit from exporting Offenses and related Events directly to their ThreatQ instance. Once enabled by checking the Enable Exporting Offenses to ThreatQ switch in step 7 of the configuration form, the ThreatQ App provides a number of configurations to filter and parse Offenses to ensure that only the certain Offenses and related Events are exported to ThreatQ.
REST Filters
The ThreatQ App for QRadar currently provides three filters which are applied to the REST call to get a list of Offenses for exporting to ThreatQ.
The only pre-configured filter is start_time>[last_hour_in_milliseconds], which is hard-coded within the App to search for only Offenses that have a start time greater than the value generated by the App. If this is the first time the ThreatQ App has been configured and run, the initial value for the start_time>[last_hour_in_milliseconds] filter is set to search for Offenses that have a start time within the last hour. That value is converted to milliseconds and applied to the start_time> filter in the REST call.
start_time>1509546854000 will search for Offenses that have a start_time greater than Wednesday, November 1, 2017 2:34:14 PM.
After the first run, the ThreatQ App stores the last time it checked for offenses as a value for the key last_checked_offenses in the 'threatq_app_config.ini' file. The App regularly updates this value and uses this key/value pair for all subsequent calls to get Offenses.
The other filters are:
| Filter | Description |
|---|---|
| QRadar Offense Status | The value from this field is applied to the status in ([value]) filter and appended to the REST call. |
| QRadar Offense Severity | The value from this field is applied to the severity>=[value] filter and appended to the REST call. |
| QRadar Offense Magnitude | The value from this field is applied to the magnitude>=[value] filter and appended to the REST call. |
| QRadar Category | The value from this field is applied to the categories containing the "[value]" filter and appended to the REST call, for each selected category. |
Offense Description Parsing
The last configuration related to the exporting of Offenses is the QRadar List of Offense Keywords. Also found within the ThreatQ Configuration page in the QRadar UI, this field is an optional field which takes a one or more comma-delimited strings that may be used to search within the text of a QRadar Offense Description field. If this field is set, only Offenses with one or more of the keywords in its Description and matching the filters described above will be exported to ThreatQ.
Manual Offense Enrichment

You can click on the ThreatQ Context Info button from the offense details page to populate offense notes manually. As soon as you click on the button, notes containing the context information from ThreatQ will be populated:

If that indicator is not present on ThreatQ then the following text will be populated on clicking the ThreatQ context info button.

Automatic Offense Enrichment
IPv4 addresses attached to the offense source can be automatically queried from ThreatQ and the fetched context information will be populated as offense notes. Notes will be populated with updated details of offenses that are present on ThreatQ.
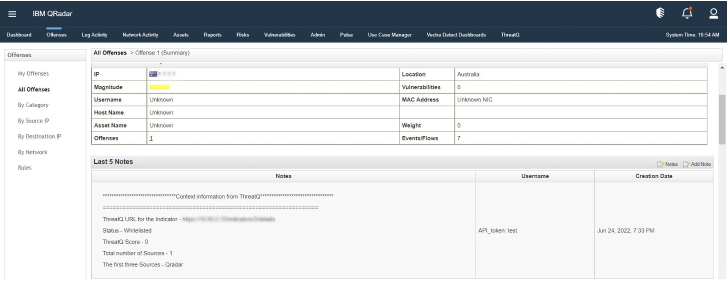
No offense notes will be ingested by the automatic offense enrichment script if no information is obtained from ThreatQ.
Accessing Application Docker
The following steps cover how to access the Application Docker. In the docker container, you can see logs and configure parameters.
Perform the below command on your QRadar instance via SSH:
- Run the following command:
/opt/qradar/support/recon ps
The command will list all the applications installed in QRadar.
- Find the app with the name “ThreatQ” and copy the App-ID.
- Run the following command:
/opt/qradar/support/recon connect App-ID
or
docker exec -it <docker-id> bin/bash - You will now be in the docker container.
Checking Application Logs
The following are steps to check application logs, which is located inside the application docker container.
- Access the Application Docker.
- Navigate to the log directory:
cd /opt/app-root/store/log
- Run
lsto view all log files
| File | Description |
|---|---|
| app.log | Contains logs of the configuration page, manual ThreatQ offense enrichment action, dashboard, and other right-click GUI actions. |
| startup.log | Contains logs related to the socket connection and flask server. |
| supervisord.log | Contains logs related to the process management performed by supervisor. |
| data_collection.log | Contains logs related to the data collection python script. |
| export_offenses.log | Contains logs related to the export offenses python script. |
| scan_offenses.log | Contains logs related to the automatic offense notes population python script. |
| app_upgrade.log | Contains logs related to the app upgrade script. |
Troubleshooting
The first step to troubleshooting a QRadar App is to retrieve the App ID for the affected application.
There are two methods to retrieve the App ID:
Command Line Retrieval
The App ID may be retrieved by SSH'ing into the console and running the following command:
| Version | Command |
|---|---|
| QRadar SIEM's >= 7.3.0 <= 7.3.1 console |
shell $/opt/qradar/support/qapp_utils_730.py ps
|
| QRadar SIEM's >= 7.3.2 console |
shell $/opt/qradar/support/recon ps
|
The output will display similar to:
shell Collecting app data........ Complete!
shell ID NAME PORT CONTAINER IMAGE STATUS'
Interactive API for Developers
The second method of retrieving the App ID is from the Interactive API for Developers under the Help menu in the QRadar SIEM's UI.
- Browse to the api_doc endpoint in QRadar by clicking Help/Interactive API for Developers
- Open folder representing the API version, 8.0 (The API version, in this case 8.0, may be different depending on the version of the QRadar SIEM),
- Locate the
/guiappframeworkfolder, click on it to expand the contents, - Locate the
/applicationsendpoint and click on it to select it - Scroll to bottom of the page and click on Try It Now
In the Response Body of the request, there should be a list of all of the Applications that are installed. Find the appropriate application and copy down the value from the 'application_id' key.
The full output from this command may also provide useful information in troubleshooting application issues and should be copied for review.
The output from the recon command provides some additional information with regards to how to access the application's docker container, as well as, to the state of the application.
The value from the Container field in this output can be used to execute the following docker command in order to review any application specific logs:
Once in the App's docker environment, the source code for the App is located in the app/ directory. All App specific logs are located in store/log/ directory.
For any application issues, ThreatQ TIS will be requesting the following:
-
The standard output from this command:
shell $/opt/qradar/support/qapp_utils_730.py psor
shell $/opt/qradar/support/recon ps -
Collect and send the following log files from the Application's docker container to ThreatQ:
shell store/log/app.log store/log/startup.log store/log/supervisord.log
These steps were based on the guidance from IBM's App Troubleshooting page. Additional information can be found here: https://www.ibm.com/community/qradar/.
Scenario 1 - App Configuration Fails with Various Error Messages
The following scenario will walk you through troubleshooting steps for two different configuration errors you may encounter.
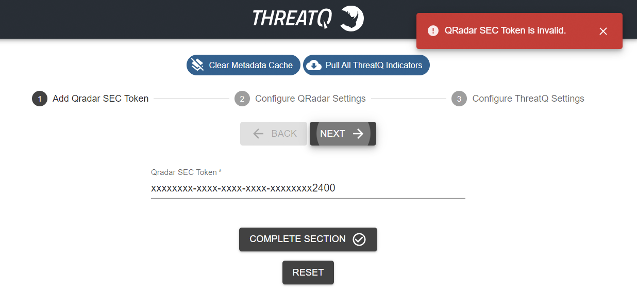
Error - QRadar SEC Token is Invalid
This happens when the user has entered the wrong SEC token, which resulted in the authentication failing when saving the configuration. Verify the SEC Token that you are provided. See the Checking Application Logs section for details on reviewing logs.
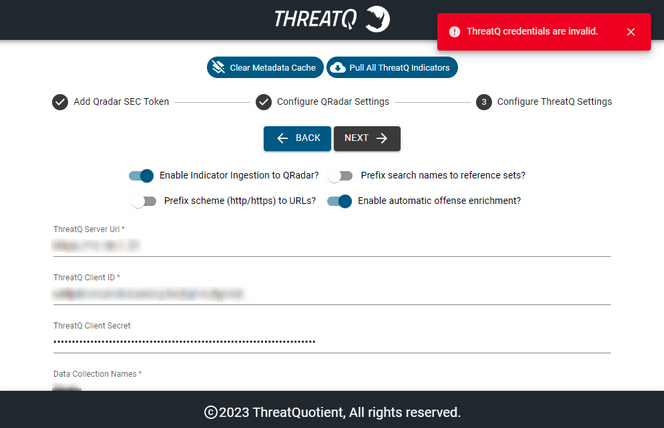
Error - ThreatQ Credentials Are Invalid
This error occurs when a user has entered the wrong client secret key/Client ID/ThreatQ Server URL for ThreatQ. Verify the credentials that you provided. See the Checking Application Logs section for details on reviewing logs.
Scenario 2 - UI-Related Issues in the App
You should clear browser cache and reload the site if you experience unintended behaviors or errors on the configuration and dashboard pages.
Scenario 3 - Inconsistency Between the Data on ThreatQ and QRadar
Once the app is configured, if the you edit the Time To Live again or change the value of Prefix search names to reference sets, this can cause the inconsistency between the data of QRadar and ThreatQ.
Resolve this issue with the following steps:
- Delete all the ThreatQ reference sets.
- Follow below steps to delete the data collection checkpoint file:
- Go inside application docker container - see the Accessing the Application Docker chapter.
- Execute the following command:
rm /opt/app-root/store/dc_checkpoint.conf
- You can click the Pull All ThreatQ Indicators button on the configuration page to pull all the data from ThreatQ.
This process may take some time as it collects all of the data at once.
Scenario 4 - Inconsistency Between the Data on ThreatQ and QRadar while Upgrading
You should delete all reference sets before upgrading the application to a newer version. The recommended approach would be to uninstall the older application, remove all the ThreatQ ref sets and install the newer version of the app.
Scenario 5 - Duplicate Reference Sets Created
Perform the following steps if you encounter duplicate reference sets with the same name:
- Navigate to the Admin tab and click on Reference Set Management.
- Double-click on the duplicate reference set with number of elements - 0.
- Click on the Add button in the top-left corner.
- A dialog box would open up, add any value in the Value(s) textbox and then click the Add button.
- Once the value is added close the Reference Set Editor window.
- On the Reference Set Management window, the duplicate reference set would have its number of elements set to 1.
- Click on that reference set and then the Delete button.
- Wait for the search to complete and click the Delete button.
The duplicate reference set has been deleted.
All Other Issues
Use the following steps to generate log files:
- Click on System and License Management in the Admin Panel.
- Select the host on which the tab ThreatQ app for Qradar v7.4.2+ is installed.
- Click on Actions in the top panel and select the option Collect Log Files.
A pop-up named Log File Collection will open.
- Click on Advance Options.
- Select the checkbox to Include Debug Logs, Application Extension Log, and Setup Log (Current Version).
- Click on Collect Log Files after selecting 5 days as data input.
- Click on Click here to download files. This will download all the log files in a single zip to your local machine.
Known Issues / Limitations
- If the QRadar reference sets hold a large number of values in them, there might be a disparity in the counts displayed in the reference set details window and the reference set list window.
- Duplicate QRadar reference sets might be created with the same name.
- If the QRadar reference sets hold a large number of values(>100k) in them, there might be issues with deleting the values from the reference set by the background script.
Change Log
- Version 2.1.0 rev-a
- Guide Update - added ThreatQ v6 documentation.
- Version 2.1.0
- Added configuration option, Enable Automatic Offense Enrichment, which allows you to enable/disable the automatic offense enrichment script. This option is found under step 7 of the Configuring ThreatQ in QRadar section.
- Updated the automatic offense enrichment script to not ingest offense notes when no information is obtained from ThreatQ.
- Updated the ThreatQ SDK to version 1.8.7.
- Version 2.0.0
- Added Automatic and Manual offense enrichment.
- Added validations on the configuration page.
- Added reset functionality on the configuration page.
- Moved the proxy section below the ThreatQ settings section on the configuration page.
- The Pull ThreatQ Indicators action was renamed to Pull All ThreatQ Indicators.
- Added new configuration options: Time to Live and ThreatQ Instance Timezone to the Configure ThreatQ settings section on the configuration page.
- Indicators from the Reference sets will now be deleted based on the set Time To Live field located under the Configure ThreatQ settings section on the configuration page.
- Added enhancement in data collection and export offense scripts.
- Added a background script that, when enabled, will sync the indicators between ThreatQ and QRadar at a configured interval.
- Version 1.3.6
- Fixed a token refresh issue where the app would fail to refresh the access token. This would halt all communication with the ThreatQ platform. This affected the following actions:
- IoC ingestion from ThreatQ into QRadar
- Offenses/Events exported from QRadar to ThreatQ
- Hover to obtain metadata
- All right-click actions
- The minimum ThreatQ version requirement has been updated to version 4.44.0 to utilize an update to the ThreatQ SDK.
- Added permissions to configuration settings (in QRadar) for endpoints. These settings are now restricted to Admin-level accounts per IBM requirements.
- Removed logs with sensitive information.
- Fixed a token refresh issue where the app would fail to refresh the access token. This would halt all communication with the ThreatQ platform. This affected the following actions:
- Version 1.3.1
- Fixed an issue that would cause data to sync incorrectly.
- UI field label update: Saved Searches are now Data Collections.
- Reorganized user guide.
- Version 1.3.0
- Added support for QRadar 7.4.2 compatibility.
- Added toggle option, Prefix Scheme (http:/https) to URLs, to enable/disable URL normalization during the indicator import process. See the ThreatQ Settings section of the Configuration chapter for more details.
- Version 1.2.5
- Fixed a bug where accented characters would cause the app to crash.
- Version 1.2.4
- Fixed a bug where in some cases the sync would fail without warning.
- Added the ability to append saved search names to the reference sets.
- Version 1.2.3
- Fixed a bug where indicators with special characters failed to sync.
- Version 1.2.2
- Fixed a bug with the pull indicators immediately option.
- Updated indicator pull from ThreatQ to be more memory efficient.
- Updated indicator pull from ThreatQ with a search differential.
- Version 1.2.1
- Changed authentication from username/password auth to client credentials.
- Removed the source name from the QRadar app, since this is now configurable via the client credentials command.
- Added extra logging to provide better error reporting.
- Version 1.2.0
- Redesigned User interface to improve user interactivity and looks
- Added a new option to the right click context menu for 'Mark True Positive'
- New filters for QRadar Offenses based on Status, Magnitude, Category, and Offense ID
- Events created in ThreatQ by QRadar now contain a link back to the QRadar Offense.
- Ability to import a larger initial offense set. Ability to change the source of indicators and events added to ThreatQ.
- Http/Https are appended to URL type indicators if a scheme is not present.
- Source name for QRadar app can now be modified.
- Other bug fixes and performance enhancements
- Version 1.1.0
- Metadata provider for IP Address Indicators and Ariel:URL/Ariel:Hostname
- Shows a link to the ThreatQ indicator if found
- Shows the indicator's Score
- Shows the number of Adversaries, Attributes, and Sources.
- Shows the first 3 Adversaries, Attributes, and Sources.
- Ability to clear the Metadata cache of all stored indicators.
- Ability to change the timing in which the Metadata cache will start to refresh indicator data.
- Ingestion of indicators from ThreatQ to QRadar can be enabled/disabled.
- The timing for indicator ingestion from ThreatQ can be changed.
- A ThreatQ Threat Library Search can now be leveraged to import indicators into QRadar
- Proxy settings for communicating from QRadar to ThreatQ have been added.
- Other bug fixes and performance enhancements.
- Metadata provider for IP Address Indicators and Ariel:URL/Ariel:Hostname
- Version 1.0.0
- Right Click Context Menu which provides the following actions:
- Add indicators to ThreatQ
- Add Indicator to ThreatQ Whitelist
- Mark Indicator as False Positive in ThreatQ
- Check ThreatQ for Indicator Details
- Dashboard that shows how many indicators of what types are in QRadar from ThreatQ
- Right Click Context Menu which provides the following actions:
PDF Guides
| Document | ThreatQ Version | QRadar SIEM Version |
|---|---|---|
| ThreatQ App for QRadar User Guide v2.1.0 | 4.44.0 or Greater | 7.4.2 |
| ThreatQ App for QRadar User Guide v2.0.0 | 4.44.0 or Greater | 7.4.2 |
| ThreatQ App for QRadar User Guide v1.3.6 | 4.44.0 or Greater | 7.4.2 |
| ThreatQ App for QRadar User Guide v1.3.1 | 4.30 or Greater | 7.4.2 |
| ThreatQ App for QRadar User Guide 1.3.0 | 4.30 or Greater | 7.4.2 |
| ThreatQ App for QRadar User Guid v1.2.5 | 4.30 or Greater | 7.3.1 Patch 7 or Greater |
| ThreatQ App for QRadar User Guide v1.2.4 | 4.30 or Greater | 7.3.1 Patch 7 or Greater |
| ThreatQ App for QRadar User Guide v1.2.3 | 4.30 or Greater | 7.3.1 Patch 7 or Greater |
| ThreatQ App for QRadar User Guide v1.2.2 | 4.30 or Greater | 7.3.1 Patch 7 or Greater |
| ThreatQ App for QRadar User Guide v1.2.1 | 4.30 or Greater | 7.3.1 Patch 7 or Greater |
| ThreatQ App for QRadar User Guide v1.2.0 | 4.16 or Greater | 7.3.1 or Greater |
| ThreatQ App for QRadar User Guide v1.0.0 | 2.0.4 or Greater | 7.2.8 Patch 6 or Greater |