Configuring Network Connectivity
Caution: The following steps must be performed as the root user or via sudo.
Configuring network connectivity for your ThreatQ environment may include some or all of the following processes:
- Converting to a Static IP Address
- Configuring chrony as a Network Timing Protocol (NTP) Client
- Checking Connectivity to ThreatQ Servers
- Setting Up Your Proxy Server
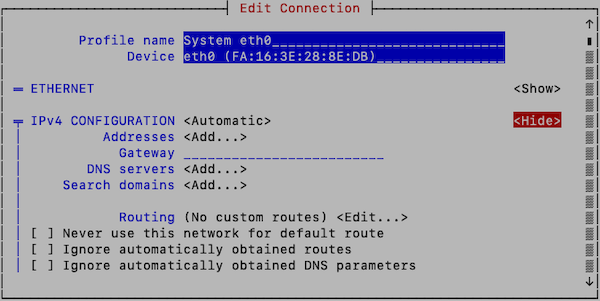
Converting to a Static IP Address
- Run the network configuration utility from the command line:
# nmtui-edit - Select the appropriate network interface in the left column.
- Press Tab to move the cursor to the Edit option and press Enter.

- Press Tab to move the cursor to <Show> for the protocol (IPv4 or IPv6) that you wish to configure:

- Enter the desired network configuration information.
- Tab to <OK> and press Enter.
This returns you to the main page. - Tab to <Quit> to close the tool.
- Enter the following command to restart networking:
# systemctl restart network
Networking configuration should now be complete. You can verify network configuration by running the
ip addrcommand.
Checking Connectivity to ThreatQ Servers
To test your connection to the ThreatQ RPM servers, enter the following commands:
HTTP/1.1 401 Unauthorized
Date: Tue, 19 Jul 2016 19:50:13 GMT
Server: Apache/2.4.6 (CentOS) OpenSSL/1.0.1e-fips PHP/5.6.14
WWW-Authenticate: Basic realm="Restricted Access"
Content-Type: text/html; charset=iso-8859-1
HTTP/1.1 403 Forbidden
Date: Tue, 19 Jul 2016 19:53:19 GMT
Server: Apache/2.4.6 (CentOS) OpenSSL/1.0.1e-fips
Last-Modified: Thu, 16 Oct 2014 13:20:58 GMT
ETag: "1321-5058a1e728280"
Accept-Ranges: bytes
Content-Length: 4897
Content-Type:text/html; charset=U TF-8
Setting Up Your Proxy Server
-
SSH into your ThreatQ instance.
-
Open the environment file using the vi command:
vi /etc/environment -
Press the i character to enter insert mode. Enter your following entry into the file while replacing the placeholders with your information. These settings are case-sensitive so you must include both the lowercase, ex: http, and uppercase, ex: HTTP, versions.
You can add exceptions to the no_proxy strings to prevent specific entries that should not be forwarded to the proxy. The minimal value for no_proxy should be the loopback IP address and "localhost" plus the TQ entry for itself "threatq". Do not use CIDR notation or wildcards with no_proxy entries as they are not accepted formats. In that situation, list the IP addresses.
If Proxy Server Requires a Password
http_proxy=http://<username>:<password>@<Proxy IP>:<Proxy Port>
HTTP_PROXY=http://<username>:<password>@<Proxy IP>:<Proxy Port>
https_proxy=http://<username>:<password>@<Proxy IP>:<Proxy Port>
HTTPS_PROXY=http://<username>:<password>@<Proxy IP>:<Proxy Port>
no_proxy=localhost,127.0.0.1,threatq,<ThreatQ IP>, <ThreatQ Hostname>
NO_PROXY=localhost,127.0.0.1,threatq,<ThreatQ IP>, <ThreatQ Hostname>If Proxy Server Does Not Require a Password
http_proxy=http://<Proxy IP>:<Proxy Port>
HTTP_PROXY=http://<Proxy IP>:<Proxy Port>
https_proxy=http://<Proxy IP>:<Proxy Port>
HTTPS_PROXY=http://<Proxy IP>:<Proxy Port>
no_proxy=localhost,127.0.0.1,threatq,<ThreatQ IP>, <ThreatQ Hostname>
NO_PROXY=localhost,127.0.0.1,threatq,<ThreatQ IP>, <ThreatQ Hostname> -
Press the ESC key and enter the following command to close the editor:
:wq <Enter Key>The next several steps will show you how to ensure that custom connector CRON jobs are able to use the proxy settings. This is achieved by sourcing the environment script so that it is available to all child sessions and applications.
-
Open the proxy.sh file using the vi command:
vi /etc/profile.d/proxy.sh -
Press the i key to enter Insert mode and enter the following lines:
set -a
source /etc/environment
set +a
This will ensure the automatic export of any variables created.
-
Press the ESC key and enter the following command to close the editor:
:wq <Enter Key> -
Log out of your session and then log back in.
-
Run the following command to confirm your settings:
printenv | grep -i proxy -
Remove any other proxy-related files from the
/etc/profile.ddirectory.