Context Filters
Context filters allow you to filter advanced search results by specific details associated with an object.
Filtering by Author
The Author context filter allows you to filter the system objects displayed based on the objects' source and attribute source authors. It allows you to filter by:
- Configuration Driven Feed (CDF)
- Operation
- ThreatQ Data Exchange (TQX) feed
- ThreatQ TDR Orchestrator (TQO) Workflow/CDW
- User
- Click the Filters option and select Author.
The Author row is displayed under the filter set name.

- Click the Add Author option to access a drop-down list of authors.
- Locate and click the checkbox next to the author value(s) for your filter by scrolling through the drop-down list or entering the name in the Search field. You can select one or more authors at a time from this list.
When you apply the Author filter, the Author column is automatically added to the results listing. The Author column displays the source author(s) listed alphabetically in pill format.The Author column only lists an object's source author(s). It does not list an object's attribute source author(s). If your author filter only matches an object's attribute source author, the column is blank.
Filtering by Attribute
You can filter the Threat Library list to include or exclude objects with a specific attribute.
- Click the Filters option and select either With Attribute or Without Attribute.
The Attribute Filter dialog box opens.

- Select an Attribute Type.
- Enter an Attribute Value associated with the Attribute Type.
When you apply a With Attribute filter, you can use wildcard values to more easily locate indicators. The Value field supports the following search methods:search type Search Query Search Results Exact Match us US only Ends With *us or %us US and Lazarus Begins With us* or us% US, USBferry, and USBStealer Value Contains *us* or %us% US, USBferry, USBStealer, Lazarus, and Dust Storm Click the Plus icon to the right of the dialog box to add another attribute and repeat steps 2-3. This step is optional.
- Click the Add button.
The filters are applied to the search results.
Using Multiple Attribute Filters
The Match Any/All toggle option allow you to configure the filter to include objects that either fit one attribute filter or all. The Any option is selected by default. This means the filter displays results that fit any of the attribute filters. The All option means the filter displays results that fit all attribute filters.
Multiple Attribute Filters ANY - Match Toggle Selection Example
| Setting | Field | Value |
|---|---|---|
| Filter A | Attribute Type | Attack Phase |
| Attribute Value | C2 | |
| Filter B | Attribute Type | Severity |
| Attribute Value | High | |
| Filter Options | Any/All Toggle | Any |
| Result | Search Results are filtered to include/exclude objects with Attack Phase: C2 OR Severity: High attributes. | |
Multiple Attribute Filters ALL - Match Toggle Selection Example
| Setting | Field | Value |
|---|---|---|
| Filter A | Attribute Type | Attack Phase |
| Attribute Value | C2 | |
| Filter B | Attribute Type | Severity |
| Attribute Value | High | |
| Filter Options | Any/All Toggle | All |
| Result | Search Results are filtered to include/exclude objects with Attack Phase: C2 AND Severity: High attributes. | |
Attribute Common Scenarios
- User clicks on the Threat Library tab and selects on the Indicators tab.
- User clicks on the Filters button and select With Attribute.
The Attribute Filter dialog box opens. - User selects Attack Pattern as the Attribute Type and C2 as the Attribute Value.
- User clicks on Add.
The User will now see a search parameter With Attribute with Attack Pattern: C2 listed. The search results update to show all Indicators with an attribute of Attack Pattern: C2.
- User clicks on the Threat Library tab and selects on the Indicators tab.
- User clicks on the Filter button and select Without Attribute.
The Attribute Filter dialog box opens. - User selects Attack Pattern as the Attribute Type and C2 as the Attribute Value.
- User clicks on Add.
The User will now see a search parameter With Attribute with Attack Pattern: C2 listed. The search results update to show all Indicators without an attribute of Attack Pattern: C2.
- User clicks on the Threat Library tab and selects on the Indicators tab.
- User clicks on the Filters button and select Without Attribute.
The Attribute Filter dialog box opens.
- User selects Attack Pattern as the Attribute Type and leave the Attribute Value blank.
- User clicks on Add.
The User will now see a search parameter Without Attribute with Attack Pattern listed. The search results update to show all Indicators that do not have an Attribute Type of Attack Pattern assigned to them.
- User clicks on the Threat Library tab and selects on the Indicators tab.
- User searches for keyword: demo.
The User will see a search parameter listed Keyword: "demo" and the results update to show only indicators that mention demo.
- User clicks on the Filters button and select With Attribute.
The Attribute Filter dialog box opens.
- User selects Attack Pattern as the Attribute Type and C2 as the Attribute Value.
- User clicks on Add.
The User will now see a search parameter With Attribute with Attack Pattern: C2 listed. The search results will update to show all Indicators that mention the keyword demo AND have an attribute of Attack Pattern: C2.
- User clicks on the Threat Library tab and navigates to the Indicators tab.
- User clicks on the Filter button and select With Attribute.
The Attribute Filter dialog box opens. - The User specifies two attributes:
- Attack Pattern:C2
- Severity: High
- User clicks on Add.
The User will now see two search parameters under the With Attribute section - Attack Pattern: C2 and Severity: High. The search results updates to show all Indicators with an attribute of Attack Pattern: C2 and Severity: High. The search parameter for attributes is defaulted to Any. This indicates that objects with an attribute of Attack Pattern: C2 or Severity: High are displayed.
- User clicks on the Filters option and selects With Attribute.
A form will load with all applied filter attributes. - The User clears the Attack Pattern's Attribute Value field and clicks Add.
The User will now see two search parameters under the With Attribute section: Attack Pattern: Any and Severity: High. The search results updates to show all Indicators with an attribute type of Attack Pattern OR Severity: High.
- User applies two attribute filters to the indicators results: Attack Phase: C2 and Severity:High.
The filtered results will display any indicators that has either of those attributes.
- User clicks on the Any/All Match toggle button and select All.
The filtered results will display any indicator that has both of those attributes
Filtering by CIDR Block Range
You can filter Threat Library objects by a block of IP addresses using the CIDR block range filter. The CIDR Block Range filter allows you to specify a CIDR block with prefix and suffix for an IPv4 search.
- Click the Filters option and select CIDR block range.
The Add a CIDR Block dialog box opens.
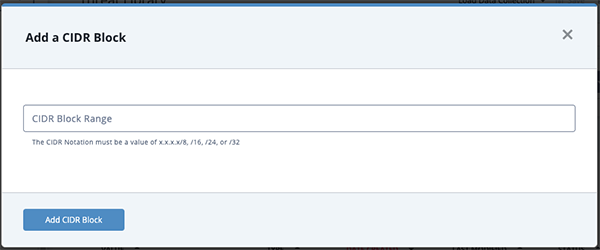
- Enter the CIDR block in one of the following formats:
- x.x.x.x/8
- x.x.x.x/16
- x.x.x.x/24
- x.x.x.x/32
- Click Add CIDR Block to apply the filter.
Filtering by Value Contains
You can filter Threat Library objects by a specific value or string within the value using the Value Contains filter.
- Click the Filters option and select Value Contains.
The Contains dialog box opens.

- Select an Object, enter a Value, and click Add to apply the filter.
Filtering by List of Indicators
The List of Indicators Filter option allows you to filter the Threat Library by pasting a list of indicators, in raw text.
The filter will return indicators that are an exact match. It does not return partial matches.
- Click the Filters option and select List of Indicators.

The List of Indicators dialog box opens.

- The Specify an operator field defaults to a value of Is which returns exact matches. However, you can click the arrow next to this field and select Contains as the operator to return partial matches.
- Enter or paste your list of indicators in the Provide a list of indicators field.
 The accepted list format is one indicator per line.
 - Click Add to apply the filter.
Filtering by Keyword
Keyword searches for phrases return objects that include all the terms in the phrase. For instance, a search for “united kingdom” returns objects that include “united kingdom” instead of objects that include “united” and “kingdom” or “united” or “kingdom”. By default, searches return instances where the search term or phrase is a standalone prefaced by and appended by a space. For instance, a search for “panda” does not return “pandas” or “expandability”.
To search for characters in a string, you can use a percent sign (%) or asterisk (*) to specify that characters appear in the position represented by the wildcard. For example, specifying “net%” matches “network” and “netware”. Specifying “%net” matches “botnet” and “internet”. Specifying “%net%” matches “ninety” and “hornets”. See the Wildcards and Symbols in Searches section for more examples.
ThreatQ keyword searches apply to different fields based on system object type.
| System Object/Object Context | Fields Searched |
|---|---|
| Adversary |
|
| Attachment |
|
| Attribute |
|
| Comment |
|
| Custom Object |
|
| Description |
|
| Event |
|
| Indicator |
|
| Object Status |
|
| Point of Contact |
|
| Signature |
|
| Source |
|
| Task |
|
- Enter your keyword search term or phrase in the Search for keywords field and press Enter
OR
Click the Filters option and select Keyword to access the Filter by Keyword window. Then, enter your search term or phrase in the Keyword field and click the Add button. - To add more keywords, repeat step 1.
- If you add more than one keyword, you can specify a Must Match setting of:
- ANY - Search results include objects that include any of the keywords.
- ALL - Search results include objects that include all of the keywords.
- Click the X for each filter to remove it or select Clear All Filters to remove all filters
Filtering by Relationship
The Relationship Filter option allows you to filter the Threat Library by related objects. Using the Relationship filter, you can:
- Filter search results to include objects related to a specific object.
- Filter search results to include objects using multiple related object filters. You will also have the option to set the filter to include objects that fit one of the multiple filters or all.
- Click the Filters option and select Relationship.
The Filter by Relationship dialog box opens.

- Use the text box provided to select an object.
- Click Add to apply the filter.
The Match Any/All toggle option will allows you to configure the filter to include objects that either fit one related object filter or all. The Any option will be selected by default. This means the filter will display results that fit any of the related object filters. The All option means the filter will display results that fit all related object filters.
Filtering by Relationship ANY - Match Toggle Selection Example
| Setting | Related Object |
|---|---|
| Filter A | ABC Indicator |
| Filter B | DEF Event |
| Filter Option | Any |
| Result | Search Results are filtered to include objects related to the ABC Indicator OR the DEF Event. |
Filtering by Relationship ALL - Match Toggle Selection Example
| Setting | Related Object |
|---|---|
| Filter A | ABC Indicator |
| Filter B | DEF Event |
| Filter Option | All |
| Result | Search Results are filtered to include objects related to the ABC Indicator AND the DEF Event. |
Filtering by Relationship Criteria
The Relationship Criteria filter allows you to filter system objects based on the characteristics of their related objects. For instance, you can filter a list of indicators to include only those with related login compromise event objects.
- Click the Filters option and select Relationship Criteria.
The Relationship Criteria dialog box opens.

- Use the text box to select your Object and Type.
- Optional. You can further filter your results based on the following additional criteria.
Date Created Filter
The Date Created option allows you to narrow your results based on the date a related object was created. This filter allows you to specify creation before or after a date, within a date range, or within a specific number of preceding days.
- To add a Date Created filter, click the Filters dropdown and select Date Created.
- Click the date type dropdown to specify creation before (is before) or after (is after) a date, within a date range (is between), or within a specific number of preceding days (is within the last).
- Based on the date type you selected, enter a date and time, date and time range, or number of days.
Source Filter
The Source option allows you to filter your results based on one or more sources. In addition, you can specify that an object must meet all or at least one of your Source criteria.
- To add a Source filter, click the Filters dropdown and select Source.
- Click the Add Source option
- Locate the source by scrolling through the list or typing the source name in the Search for sources field.
- Click the source you want to add as a filter criteria.
- To add more source filters, repeat steps 2 through 4.
When you add multiple Source filters, the Must Match field allows you to select ALL to indicate that an object must meet the requirements of all the Source filters or ANY to specify that your results include objects that meet the requirements of at least one Source filter.
Value Contains Filter
- To add a Value Contains filter, click the Filters dropdown and select Value Contains.
- Enter your desired value in the field provided.
With Attribute Filter
The With Attribute option allows you to filter results based on one or more specific attribute keys or attribute key and value combinations. In addition, you can specify that an object must meet all or at least one of your With Attribute criteria.
- To add a With Attribute filter, click the Filters dropdown and select With Attribute.
- Enter the attribute key and attribute value (optional) you want to filter by.
- To add more attribute key/value filters, click the + icon and repeat step 7.
When you add multiple With Attribute filters, the Must Match field is displayed and defaults to ALL to indicate that an object must meet the requirement of all the With Attribute filters. You can change this value to ANY so that your results include objects that meet the requirements of at least one With Attribute filter.
Tag Filter
The Tag option allows you to filter your results based on the tag(s) associated with a related object. In addition, you can specify that an object must meet all or at least one of your Tag criteria.
- To add a Tag filter, click the Filters dropdown and select Tag.
- Click the Add Tag option
- Locate the tag by scrolling through the list or typing the tag name in the Search for tags field.
- Click the tag you want to add as a filter criteria.
- To add more tag filters, repeat steps 2 through 4.
When you add multiple Tag filters, the Must Match field allows you to select ALL to indicate that an object must meet the requirements of all the Tag filters or ANY to specify that your results include objects that meet the requirements of at least one Tag filter.
- After you select all of your filter options, click Apply to filter your Threat Library results.
Filtering by Score
You can filter indicators in the advanced search results by score.
This option is only available for indicators.
- Navigate to the Advanced Search results page by selecting Search > Advanced Search then selecting Indicators from the left-hand object type menu.
You can also select Threat Library > Indicators from the main menu.
- Click the Filters dropdown and select the Indicator Score filter option.
The Indicator Score dialog row will load in the filter set.

The scale offers a range of 1-10.
- Adjust the score scale to filter the results.
Filtering by Scoring Range
You can move the two scale markers to select a scoring range.
Move the left marker to 6 and the right marker to 8 to filter the search results to include indicators with a score between 6 and 8.
Filtering by Specific Score
You can move the scale makers to the same scoring number to filter by a specific score.
Move the left and right markers to 8 to filter the search results to only include indicators with a score of 8.
Select the Update Score filter again or select Clear to remove the filter.
Filtering by Tags
Using the Tags filter allows you to filter search results based on tags applied to an object.
- Click the Filters option and select Tags.
The Filter by Tag row opens.

- Select Add Tag.
The Add Tag dialog box opens. - Use the supplied text field to select a tag.
- Repeat steps 2-3 to apply multiple tag filters.
The Match Any/All toggle option will allows you to configure the filter to include objects that either fit one tag filter or all. The Any option will be selected by default. This means the filter will display results that fit any of the tag filters. The All option means the filter will display results that fit all tag filters.
ANY - Match Toggle Selection Example
| Setting | Tag |
|---|---|
| Filter A | Phishing |
| Filter B | DDoS |
| Filter Option | Any |
| Result | Search Results are filtered to include items with either Phishing OR the DDoS tags. |
ALL - Match Toggle Selection Example
| Setting | Tag |
|---|---|
| Filter A | Phishing |
| Filter B | DDoS |
| Filter Option | All |
| Result | Search Results are filtered to include items with both Phishing AND DDoS tags. |
Filtering by Source
The Source filter allows you to filter Threat Library search results by object, attribute, or description source.
- Click the Filters option and select Source.
The Source row is displayed below the filter name. - Locate and select the source for your filter by scrolling through the drop-down list or entering the source in the Search for sources field.
- Click the arrow next to Source to specify whether the filter references all sources or is restricted to object or attribute sources.
- Click the checkbox next to Is Only to specify that the filter includes objects that only include the selected source(s) and do not include any other sources not specified by the filter.
- To continue adding sources to the filter, click the Add Source option and repeat step 2.
The Match Any/All toggle option allows you to configure the filter to include objects that either fit one related object filter or all. The Any option is selected by default. This means the filter displays results that fit any of the related object filters. The All option means the filter displays results that fit all related object filters.
Filtering by Source ANY - Match Toggle Selection Examples
| Setting | Source |
|---|---|
| Filter A | This Platform |
| Filter B | Domain Tools |
| Filter Option | Any |
| Result | Search Results are filtered to include objects with a source of This Platform OR Domain Tools. |
Filtering by Source ALL - Match Toggle Selection
| Setting | Source |
|---|---|
| Filter A | This Platform |
| Filter B | Domain Tools |
| Filter Option | All |
| Result | Search Results are filtered to include objects with both This Platform AND Domain Tools as sources. |
Filtering by TLP
TLP visibility must be enabled to use the TLP filter in the Threat Library search. See the Configure TLP Visibility section for more details.
The Threat Library allows you to filter your search results based on the TLP label assigned to the object sources, attributes, or description sources. By default, all TLP filter options are checked so that your Threat Library view includes all objects. To exclude objects by TLP, you can uncheck the box to the left of the label name. For example, to omit objects with object and/or description sources assigned a Red TLP label, uncheck the Red box.
When you apply a TLP filter, the Sources, attribute, and description columns only display data that matches the TLP filter.
Tips and Tricks
- TLP filters can be stored as part of data collections, similar to other filter types.
- The TLP filter is a global filter that is applied across all object types and all filter sets for a given search query (i.e. it cannot be applied to individual object types or within individual filter sets).
- TLP filters impact the Threat Library CSV output in that CSV results output will match those in the Threat Library results.
- Navigate to Threat Library.
The option to filter by TLP color designation will be located under the search bar and Filter Set option.

- Use the Limit by TLP filter check boxes to select which TLP designations to apply to your search results.
If TLP Green is checked, only objects with any source of TLP Green will be returned in the search results.
The TLP filter also impacts the information returned in search results columns, including Sources, attributes, and descriptions.
Sources - In the Sources column of the search results, only sources that match the selected TLP labels are displayed.
Scenario Results Display Sources displayed before applying the TLP filter 
Sources displayed after applying the TLP filter 
Attributes - In any displayed attribute column, only attribute values with sources that match the selected TLP labels are displayed.
Scenario Results Display Attribute Contributors displayed before applying the TLP filter 
Attribute Contributors displayed after applying the TLP filter 
Descriptions - In any displayed description column, only descriptions with sources that match the selected TLP labels are displayed.
Filtering by Point of Contact
The Point of Contact filter allows you to filter objects by the ThreatQ user display name of the person assigned as the object's point of contact. You can filter by multiple user names as well as include objects that do not have a point of contact (Unassigned).
- Click the Filters option and select Point of Contact.
The Point of Contact row is displayed under the filter set name.

- Click the Add Point of Contact option to access a drop-down list of user names.
The point of contact list includes all ThreatQ user names even those not currently assigned as a point of contact for an object. In addition, this list contains an Unassigned option that allows you to include objects with a blank Point of Contact field.
- Locate and click the checkbox next to the user name for your filter by scrolling through the drop-down list or entering the name in the Search field. You can select one or more user names at a time from this list.
Filtering by Workflow
The Processed by Workflow filter allows you to filter Threat Library results by the TQO workflow that processed the objects and the time period during which the objects were processed.
- Click the Filters option and select Processed by Workflow.
The Processed By Workflow modal is displayed.

- Select the TQO workflow.
- Select a time range option:
- All Time - Returns all system objects processed by the workflow.
- Within a date range:
- Processed On - Returns system object processed by the workflow on a specific date.
- Processed Before - Returns system object processed by the workflow before a specific date.
- Processed After - Returns system object processed by the workflow after a specific date.
- Processed Between - Returns system object processed by the workflow within a date range.
- Processed Within the Last - Returns system object processed by the workflow within a specific number of days prior to the current date.
- Click the Save button to apply the filter criteria.